
User's Manual
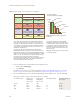


Table Of Contents

Chapter 8 HiveManager Configuration Examples
138 Aerohive
Uploading HiveAP Configurations
At this point, you have assigned configurations to the HiveAPs, accepted them for management, changed their login
settings, and possibly the country code as well. Now, you can push their configurations from HiveManager to the
HiveAPs.
1. Click Access Points > Managed HiveAPs > Update > Upload and Activate Configuration (Wizard).
The Upload and Activate Configuration (Wizard) dialog box appears.
2. If you have an SSID using captive web portal files, the first step in the upload process is to upload these pages
and a server key, if the captive web portal uses HTTPS to secure guest registrations. To upload these files, select
the HiveAPs to which you want to send the files, and then click Upload.
The HiveAP Update Results page appears so that you can monitor the progress of the upload procedure.
3. After the files are successfully uploaded, click the Back button in your browser to return to the Upload and
Activate Configuration dialog box.
4. To continue to the next step, click Next.
5. There are two options for uploading configurations to HiveAPs:
• Complete Upload, which uploads the complete configuration to the managed HiveAPs and which requires
them to reboot to activate the new configuration
• Delta Upload, which uploads only the parts of the configuration that were not pushed to the managed
HiveAP in a previous configuration update
Uploading a delta configuration does not require activation by rebooting the HiveAP and is, therefore, less
disruptive. However, before HiveManager can upload a delta configuration to a managed HiveAP, it must first
upload the full configuration and activate it by rebooting the HiveAP. After that, you can upload delta
configurations. When initially sending the configuration to HiveAPs, you must choose Complete Upload.
Note: If a managed HiveAP already has the maximum number of captive web portal directories (8), you must
delete at least one of them before you can add a new one. To see how many directories are already on a
HiveAP and delete a directory if necessary, do the following:
1. Make an SSH connection to the managed HiveAP by finding an icon of the HiveAP on a map,
right-clicking the icon, and choosing SSH to HiveAP
2. Enter the following command to see the number of existing directories and their names:
show web-directory
3. Delete a directory by entering the following command, in which <string> is the name of the
directory that you want to delete: no web-directory <string>
Note: If there is any failure when performing a delta upload, the next upload must be a full upload.