
User's Manual
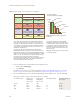


Table Of Contents
Chapter 8 HiveManager Configuration Examples
136 Aerohive
Assigning Configurations
1. Click Access Points > Automatically Discovered.
2. Select a group of HiveAPs associated with the same map.
If you defined SNMP sysLocation MIB objects as you installed the HiveAPs as explained in "Using SNMP" on
page 94, each HiveAP listed in the Automatically Discovered window will now include a map title in the
Topology Map column. By clicking the Topology Map column header, you can sort HiveAPs by topology map. You
can then select all the HiveAPs belonging to the same map (shift-click the check boxes to select multiple
contiguous HiveAPs) and assign the same WLAN policy, radio profiles, and classifier tags to them.
If you tracked HiveAPs by writing their MAC addresses on the maps as explained in "Using MAC Addresses" on
page 95, you can sort the HiveAPs in the Automatically Discovered window by MAC address. Click the Node ID
column header to display the HiveAPs numerically by MAC address. By referring to the MAC addresses and the
title of the map on which you wrote them during the installation, you can then select all the HiveAPs belonging
to the same map and assign the same map, WLAN policy, radio profiles, and classifier tags to them.
3. Click Modify > General, and then enter the following:
• WLAN Policy: Choose the WLAN policy that you want to assign to the selected HiveAPs. In these examples,
there are three WLAN policies. Assign WLANpolicy-hq1 to all HiveAPs in Building 1 at corporate
headquarters, WLANpolicy-hq2 to all HiveAPs in Building 2 at corporate headquarters, and
WLANpolicy-branch1 to all HiveAPs at the branch office.
• Topology Map: Choose the map that you want to assign to the selected HiveAPs. (If you used the SNMP
sysLocation MIB definition to associate HiveAPs with maps, HiveManager has automatically chosen the
correct map already.) The maps allow you to organize the HiveAPs by site (HQ or Branch1), then at HQ by
building (HQ-B1 or HQ-B2), and then by floor (HQ-B1-F1, HQ-B1-F2, HQ-B1-F3, and so on).
• Gateway Address: Leave as is.
• Location: If you set the SNMP sysLocation MIB when you installed the HiveAPs, leave this field as is. If not,
enter a description for the location of each HiveAP individually.
• Native VLAN: 1 (for control traffic among hive members on the wired backhaul interface)
• LAN Interface: Leave the settings as they are.
• WLAN Interface: Set the radio profile for wifi0 as radio_g0 and the radio profile for wifi1 as radio_a0.
Leave the values for the other fields as they are.
• HiveAP Classification: For HiveAPs at headquarters, type hq in the Tag1 field. For HiveAPs at the branch
site, type branch1 in the Tag1 field. By classifying the HiveAPs with these tags, they will receive the
similarly tagged IP address for the primary DNS server on the network at their respective locations. (The
two IP addresses are tagged in "DNS Servers" on page 101.)
4. Click Credentials, enter the following in the Root Admin Configuration section, and then click Save:
Root Admin Configuration
• New Admin Name: This is the root admin name that HiveManager uses to make SSH connections and
upload a full configuration to managed HiveAPs. The default root admin name and password is admin
and aerohive. To change the login settings on the HiveAPs, enter a new admin name. The admin name
can be any alphanumeric string from 3 to 20 characters long.
• New Password: Although the password is obscured, the default password is aerohive. To change the
default password on the HiveAPs, enter a new password here. The password can be any alphanumeric
string from 5 to 16 characters.
• Confirm New Password: If you entered a password in the above field, enter it again to confirm accuracy.