
User's Manual


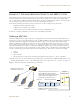
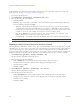

Table Of Contents

Chapter 8 HiveManager Configuration Examples
92 Aerohive
The selected image file is transferred from your management system to HiveManager as shown in Figure 3.
Figure 3 Uploading a Map of a Building Floor Plan
5. Repeat this for all the image files that you need to load. In this example, you load 21 files:
• 8 maps for the eight floors in HQ-B1 (Headquarters Building 1)
• 8 maps for the eight floors in HQ-B2 (Headquarters Building 2)
• 4 maps for the four floors in Branch-1
• 1 file (named "corp_offices.png" in this example) that shows a picture of the three buildings
Naming and Arranging Maps within a Structure
1. Click To polo gy, right-click the top level map "World", and then choose Edit from the pop-up menu that appears.
2. In the Edit Map - World dialog box, enter the following, and then click Update:
•Map Name: CorpOffices (Note that spaces are not allowed in map level names.)
•Map Icon: Building
• Background Image: Choose corp_offices.png from the drop-down list.
• Environment: Because the CorpOffices "map" does not contain any HiveAP icons—it is an illustration of three
buildings that you use to organize the submaps of the floors in each building—the environment setting is
irrelevant. Leave it at its default, Free Space.
• Width (optional): Because the corp_offices.png depicts buildings instead of a floor plan, it is not necessary
to specify the width of the image.
3. Click To pol og y, right-click the top level map "CorpOffices", and then choose New from the pop-up menu that
appears.
4. In the New Map (Submap for CorpOffices) dialog box, enter the following, and then click Create:
•Map Name: HQ-B1-F
•Map Icon: Floor
• Background Image: Choose HQ-B1-F1.png from the drop-down list.
• Environment: Because the environment is that of a typical office building, choose Enterprise. The
environment assists in the prediction of signal strength and attenuation shown in the heat maps.
•Width: 80 feet (HiveManager automatically calculates the height based on the aspect ratio of the image.)
A white floor icon ( ) labeled "HQ-B1-F1" appears on the CorpOffices image, and a new entry named
"HQ-B1-F1" appears nested under "CorpOffices" in the navigation tree.
5. Click Unlock, select the icon, drag it to the location you want, and then click Save.
6. Click To pol og y, right-click the top level map "CorpOffices", and then choose New from the pop-up menu that
appears.
Management System HiveManager
Map showing one
of the floor plans
Uploading map to HiveManager