
User's Manual
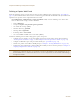

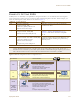
Table Of Contents

Chapter 8 HiveManager Configuration Examples
110 Aerohive
• Remove the string index_files/ from the image source definitions of the three images:
<img src="index_files/loginscreen_02.jpg" width="304" height="56" alt="">
<img src="index_files/loginscreen_03.jpg" width="450" height="4" alt="">
<img src="index_files/loginscreen_05.jpg" width="450" height="50" alt="">
• To change the color in the bar in the upper left corner, find <td width="146" bgcolor="002740">
and enter a different color definition. For example, to make it black, enter "000000".
• If you want to change the acceptable use policy, find the section that begins with the words
"1.0 Overview", and then either replace the text with your own policy or edit the existing one.
• To remove the Authenticated Network Access section at the top of the page, delete the HTML code from
"<FORM name=form2 action=reg.php method=post>" to "</DIV></FORM>".
Figure 12 on page 110 shows the result of editing the text in the acceptable use policy, changing the color in the
top left bar in the index.html file, creating two new images for loginscreen_02.jpg and loginscreen_05.jpg, and
removing the Authenticated Network Access section.
Figure 12 Modified Registration Page
8. To edit the "Successful Registration" page, which follows the registration page, click I agree, fill in the fields,
and then click Submit Query.
The browser opens the "Successful Registration" page.
9. Save the page as a file named success.html to the same directory as the index.html file.
10. Open it with a text editor, make your changes, and then save the modified file.
Note: When working on image files, make sure that they match the above dimensions.
Note: If you want to use the Authenticated Network Access section to authenticate employees through the
captive web portal, store their user accounts on the RADIUS server that you configure in "Example 7:
Defining AAA RADIUS Settings" on page 123. The HiveAPs hosting the captive web portal will forward
their user name and password entries to that RADIUS server for the authentication check.
Notes
The default registration page contains two forms: an upper form
for user authentication (through an external RADIUS server)
and a lower form for user registration. In this example, you
remove the upper form so that the page is simply for guest
registration.
The total number of fields in the customized file shown here is
the same as that in the default index.html file. If you want, you
can edit the HTML code to change the number of required and
optional fields. (Fields identified as "INPUT id=field<number>"
are required, and "INPUT id=opt_field<number>" are optional.)
If you change the number of fields in the HTML code, you must
also change them in the captive web portal section of the SSID
configuration.
There are some elements that cannot be removed from this file:
• "I agree" check box (its name must remain as “checkbox” in
the code)
• "First Name" and "Last Name" fields—they are used to
identify users in the roaming cache and event log
• Submit button