
Use and Care Manual


01-999-2534 Page 2
CAUTION: the use of anode devices, chemical additives
or cooler cleaner treatments in this cooler will void the
warranty.
INTRODUCTION
Your Shop Blaster evaporative air cooler was thoroughly tested
and inspected before leaving the factory. This manual is your guide
to economical, trouble free comfort cooling over the years with
reasonable care and regular maintenance. Failure to follow these
instructions may damage your cooler, impair its operation, and/or
void the warranty.
Read it carefully.
PREPARATION
Unpacking the unit
Remove the pad frame by lifting up and pulling outwards. The oat
kit bag is located in the cooler bottom pan. Remove the oat kit
bag from the cabinet. Float kit contains the following items:
1. Float valve assembly
2. Float bracket
3. Garden hose adapter
4. Overow stand pipe
5. Drain Bushing Assembly
SET UP FOR USE
The Shop Blaster evaporative cooler may be lled manually with
the ll door or automatically with the oat valve and garden hose
adapter.
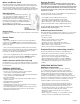
To Install oat valve and hose adapter. Attach the oat valve to the
cabinet as shown in gure 2. The garden hose adapter attaches to
the brass inlet tting on the oat valve (See gure 2). NOTE: Verify
that the hose washers are correctly in place before use.
Next install the overow stand pipe and drain bushing. Attach the
stand pipe, drain bushing, and washer in the hole in the drain pan
in the order shown in gure 3. NOTE: Verify that the washer is
correctly in place before use.
Water connection and oat adjustment
Move cooler to desired location (must be a level area for proper
operation of the cooler).
1. Connect water supply using a commercial grade water hose (not
supplied with cooler, obtained separately) to the adapter on the
oat valve and turn water on. CAUTION: water inlet pressure
should be limited to a maximum of 65 PSI to avoid rupturing the
water hose. If pressure exceeds this valve, an inline pressure
regulator should be installed (obtainable from a local plumbing or
hardware store).
2. Check that all connections are tight by visually inspecting hose,
oat valve, etc. for leakage.
3. Set oat valve for a water depth of 2.5". The oat is adjusted by
lightly bending the oat rod.
4. Do not insert garden hose into manual ll door; water may harm
the pump and void the warranty.
Figure 1
Figure 3
Figure 2