
Use and Care Manual


4
02-999-1773 – (Rev - )
CAUTION: Disconnect all electrical power to the
cooler by removing plug from receptacle before
attempting to install, open, or service your cooler.
Even while routinely inspecting or servicing the inside, the cooler can
be accidentally started. Keep all personnel away from the cooler and
electrical supply when you are working on it. Before servicing or
cleaning unit, switch “COOL” and “FAN” to the OFF position and
remove power cord from receptacle.
All foreign materials, scale, salt deposits, lime, etc. can and should
be removed from louvers, bottom pan, and other components. Your
cooler's long lasting finish can be brought to like-new condition by
using warm water and a soft cloth.
NOTE: Avoid using scouring pads, steel wool or wire brushes, as
these will damage the finish and encourage corrosion.
Maintenance & Inspection
CAUTION: Disconnect all electrical power to the
cooler by removing the plug from the receptacle before
attempting to install, open, or service your cooler.
IMPORTANT: Before operating cooler at beginning of
each cooling season, turn blower wheel, cooler motor
and pump motor shafts by hand to make sure they turn
freely. Failure to do so may result in burning out the
motor.
Periodic inspection of your cooler will enhance long, trouble-free
service life. For maximum efficiency, every two months during
operation, or any time the cooler is opened, the cooler should be
inspected. Some suggested items:
Check for leaks from pad frames, cabinet, etc.
Are there any dry spots on the media when cooler is in
operation?
Are bolts, nuts and set screws snug?
Are the bearings making unusual noises?
Does the blower wheel turn freely?
Is float level set correctly?
Is water in the bottom pan clean?
Belt condition / tension / alignment?
Set Screws, Bolts and Nuts
Check torque on set screws and cabinet hardware:
Motor and Blower Pulley set screws (95 in-lbs.)
Blower Wheel set screws (1 per side, 150 in-lbs)
Cabinet hardware (25 in-lbs)
CAUTION: Disconnect all electrical power to the
cooler and insure that belt is not rotating before adjusting
belt tension.
Adjust Belt Tension
Each time you inspect your cooler, be sure to check belt tension on
motor/blower assembly. Check belt condition and replace it if trays or
cracks appear. Check alignment of blower pulley with motor pulley.
Cleaning Water Pump & Hose
CAUTION: Do not allow pump to fall over and become
submerged; water will damage pump motor.
Clean water pump and hose assembly as follows:
1. Unplug pump cord, remove mounting bracket screw and
remove pump from cooler. Shake gently to remove water.
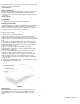
2. To prevent breakage, carefully release and remove impeller base
plate from the pump body. (see figure 9)
3. Using a mild detergent solution and clean cloth, clean deposits
from pump screen, around impeller and base plate.
4. Spin impeller to dislodge any foreign material.
5. Remove any foreign material in the adapter between the pump
and hose, or between the hose and the water
distributor assembly.
6. Rinse and reinstall impeller base plate.
7. Reinstall pump and reconnect pump cord.
Figure 6
Draining
Drain the cooler cabinet (with power off and
panels removed) as follows:
1. Connect a drain hose to the drain fitting on the bottom of
the reservoir, if not already connected to drain line.
2. Remove overflow standpipe from the drain fitting.
3. Drain, clean and dry reservoir.
Touch-Up
The hardness, adhesion and smoothness of the internal and external
finish on your cooler makes it extremely unlikely that scratches or
chipping will occur. In the event that finish damage does occur, it
should be promptly repaired by the following procedures:
1. Sand the area around bare metal spots.
2. Prime and paint with a quality paint.
Do not use asphalt type cooler undercoat material in water
reservoir. Undercoat will break free, clogging the pump and
water distributor.
LUBRICATION
Motor Bearings
Some motors used in Master Blaster coolers have ports for
lubricating the motor and are oiled at the factory. They should be
checked after 20-30 days of operation. If the need for oiling is
indicated, see the motor nameplate for specific instructions on re-