GR-LEON4-ITX Development Board Quick Start Guide AEROFLEX GAISLER AB Rev. 0.
GR-LEON4-ITX Development Board Quick Start Guide Information furnished by Aeroflex Gaisler AB is believed to be accurate and reliable. However, no responsibility is assumed by Aeroflex Gaisler AB for its use, nor for any infringements of patents or other rights of third parties which may result from its use. No license is granted by implication or otherwise under any patent or patent rights of Aeroflex Gaisler AB.
GR-LEON4-ITX Development Board Quick Start Guide TABLE OF CONTENTS 1 INTRODUCTION...........................................................................................................6 1.1 1.2 1.3 2 UNPACKING AND SETTING UP THE BOARD...........................................................7 2.1 2.2 2.3 3 First steps.................................................................................................................. 14 Running an application......................................
6.1 6.2 6.3 GR-LEON4-ITX Development Board Quick Start Guide General...................................................................................................................... 31 The performance of the system is less compared to what is advertised for LEON4. .31 I lost the contents of the USB Flash stick...................................................................31 How do I restore the original PROM contents?..........................................................
GR-LEON4-ITX Development Board Quick Start Guide LIST OF TABLES Table 3-1: System accounts.......................................................................................................... 12 Table 4-1: GRMON DVI transmitter initialization...........................................................................16 Table 5-1: SnapGear template configurations...............................................................................
1 GR-LEON4-ITX Development Board Quick Start Guide INTRODUCTION 1.1 Overview This document is a quick start guide for the GR-LEON4-ITX Development Board. The purpose of this document is to get users quickly started using the board. For a complete description of the board please refer to the GR-LEON4-ITX Development Board User Manual, the LEON4 system-on-chip is described in the LEON4-ASIC-DEMO Data sheet and User's Manual.
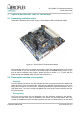
2 GR-LEON4-ITX Development Board Quick Start Guide UNPACKING AND SETTING UP THE BOARD 2.1 Unpacking and initial setup The board is delivered with a power supply, JTAG adapter, USB and Ethernet cables. Figure 2-1: GR-LEON4-ITX Development Board After unpacking the board, two routes can be taken. Either the preprogrammed Linux system can be booted, or you can connect to the board using the GRMON debug monitor. If you wish to start the bundled Linux system, please proceed to section 2.
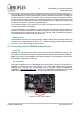
GR-LEON4-ITX Development Board Quick Start Guide only provides PIN headers with the receive and transmit lines for the serial terminal it is recommended that a monitor, keyboard and mouse is attached to the board. According the normal conventions for the PS/2 interface, the top connector (green) is the Mouse interface and the bottom connector (purple) is the Keyboard interface.
GR-LEON4-ITX Development Board Quick Start Guide Connecting with the included JTAG adapter The JTAG adapter shall be connected to the board using the JTAG pin header shown in the middle bottom of Figure 2-2. Please ensure that the JTAG cable/adapter is connected with the correct polarity, to prevent unintended damage to the board or cable.
GR-LEON4-ITX Development Board Quick Start Guide Using GRMON The GRMON User's Manual describes the capabilities of GRMON. Section 4 of this document describes some usage scenarios for GRMON on the GR-LEON4-ITX board. Figure 2-4: GRMON after connect © Aeroflex Gaisler AB June 2010, Rev. 0.
3 GR-LEON4-ITX Development Board Quick Start Guide LINUX SYSTEM USER GUIDE 3.1 Overview When the system is powered on the processor will load the Linux kernel from flash into main memory. The kernel will then mount a Debian root file system system from the USB Flash stick. The sections below describe the system and the available user interfaces. The reader is encouraged to read the full documentation before using the system for the first time. 3.
GR-LEON4-ITX Development Board Quick Start Guide Username Password Description user user Normal user account. root root Super-user account. Should only be used for system administration. Table 3-1: System accounts 3.4 Shutting down the System To protect the integrity of the file system, the system software should be properly shut down before powering down the board. The correctly shut down the system, issue the command: shutdown -h now This command must be issued as the super-user (root).
GR-LEON4-ITX Development Board Quick Start Guide auto eth0 iface eth0 inet static address 192.168.0.58 netmask 255.255.255.0 network 192.168.0.0 broadcast 192.168.0.255 gateway 192.168.0.1 It is recommended that the system is attached to a network which allows access to the Internet. 3.
4 GR-LEON4-ITX Development Board Quick Start Guide GRMON AND THE GR-LEON4-ITX BOARD 4.1 First steps The subsections below assume that GRMON, the host computer and the GR-LEON4-ITX board have been set up so that GRMON can connect to the board. The transcripts with courier font below are from a shell session invoking the command line version of GRMON. The same commands can be used when the debugger is used with a GUI. grmon -eth -ip 192.168.0.54 GRMON LEON debug monitor v1.1.
GR-LEON4-ITX Development Board Quick Start Guide Ethernet Debug Communications Link (EDCL). However any of the other debug links would be fine. The first listing shows all cores available in the design. Giving the command info sys prints a detailed report of the system. The output is too long to include here, however as a sample with some most of the output cut out: grlib> info sys 00.01:048 Gaisler Research ahb master 0 LEON4 SPARC V8 Processor (ver 0x0) … some output removed... 02.
GR-LEON4-ITX Development Board Quick Start Guide GRMON LEON debug monitor v1.1.39 professional version … output removed …. Use command 'info sys' to print a detailed report of attached cores Download application to RAM: grlib> load hello section: .text at 0x40000000, size 39584 bytes section: .data at 0x40009aa0, size 2764 bytes total size: 42348 bytes (70.4 Mbit/s) read 201 symbols entry point: 0x40000000 Run the application that was just downloaded: grlib> run Hello world Program exited normally.
GR-LEON4-ITX Development Board Quick Start Guide 4.4 Drawing images GRMON has support for drawing both test screens and images in PPM ASCII format. The transcript below show commands that draw the built-in test screen in different modes. Note that the DVI transmitter must be initialized for the correct bit depth. grlib> i2c 3 dvi init_l4itx_dvi Transmitter was not set to Chrontel CH7301C (AS=0), changing.. DVI transmitter set to Chrontel CH7301C (AS=0) Initializing CH7301 for LEON/GRLIB design..
GR-LEON4-ITX Development Board Quick Start Guide to the SPI boot PROM on the GR-LEON4-ITX board. The first step in communicating with the SPI memory device is to allow the SPI Flash layer to detect the device: grlib> spim flash detect Got manufacturer ID 0x20 and Device ID 0x2017 No device match for READ ID instruction, trying RES instruction..
GR-LEON4-ITX Development Board Quick Start Guide 4.6 Interacting with I2C devices The LEON4 ASIC device provides three I2C interfaces, two master interfaces (I2CM0 & I2CM1) and one slave interface (I2CS). As a demonstration I2C circuit, an on-board DS1672 Real-Time Clock circuit is connected on the board to the I2CM0 interface of the ASIC. The I2CM1 and I2CS interfaces of the ASIC are connected to 4 pin 0.1” headers on the board, to allow an external circuit to be hooked-up.
5 GR-LEON4-ITX Development Board Quick Start Guide ADVANCED TOPICS 5.1 Building the Linux kernel Overview Aeroflex Gaisler provides a Linux distribution named SnapGear Linux. A release of SnapGear Linux has been included on the first partition of the USB stick delivered with the board (software/Linux contains the distribution and software/toolchains/Linux contains the toolchain). SnapGear Linux can also be downloaded from http://www.gaisler.
GR-LEON4-ITX Development Board Quick Start Guide Figure 5-1: Selecting a SnapGear template configuration Downloading an image with GRMON After the new image has been compiled it can be downloaded to the board using GRMON. In the transcript below we connect to the board using the EDCL, the flag -nb must be given to GRMON in order to not break on page faults, the -u flag is also given in order to see the serial console in GRMON: jan@jan:~/Linux/snapgear-2.6-p41$ grmon -eth -ip 192.168.0.
GR-LEON4-ITX Development Board Quick Start Guide grlib> After this we can load the Linux image: grlib> load images/image.dsu section: .stage2 at 0x40000000, size 10240 bytes section: .vmlinux at 0x40004000, size 2782144 bytes total size: 2792384 bytes (79.0 Mbit/s) read 6260 symbols entry point: 0x40000000 grlib> run Booting Linux Booting Linux... pkbase: 0xfc800000 pkend: 0xfcc00000 fixstart 0xfcfe4000 Debian GNU/Linux 4.
GR-LEON4-ITX Development Board Quick Start Guide Memory: 252864k/262144k available (2120k kernel code, 9116k reserved, 292k data, 160k init, 65536k highmem) Mount-cache hash table entries: 512 Entering SMP Mode... 0:(2:2) cpus mpirq at 0xc0800110 Starting CPU 1 : (irqmp: 0xc0800110) DEBUG: psr.impl = 0xf fsr.vers = 0x7 Started CPU 1 Brought up 2 CPUs Total of 2 processors activated (399.76 BogoMIPS).
GR-LEON4-ITX Development Board Quick Start Guide USB Mass Storage support registered. usbcore: registered new interface driver usbhid drivers/usb/input/hid-core.c: v2.6:USB HID core driver i2c /dev entries driver TCP cubic registered NET: Registered protocol family 1 NET: Registered protocol family 17 drivers/rtc/hctosys.c: unable to open rtc device (rtc0) Waiting 10sec before mounting root device...
GR-LEON4-ITX Development Board Quick Start Guide Last login: Thu Jan 1 01:03:40 1970 on ttyS0 Linux gr-leon4-itx 2.6.21.1 #17 SMP Tue Mar 16 15:28:21 CET 2010 sparc The programs included with the Debian GNU/Linux system are free software; the exact distribution terms for each program are described in the individual files in /usr/share/doc/*/copyright. Debian GNU/Linux comes with ABSOLUTELY NO WARRANTY, to the extent permitted by applicable law.
GR-LEON4-ITX Development Board Quick Start Guide IP route cache hash table entries: 2048 (order: 1, 8192 bytes) TCP established hash table entries: 8192 (order: 4, 98304 bytes) TCP bind hash table entries: 8192 (order: 4, 65536 bytes) TCP: Hash tables configured (established 8192 bind 8192) TCP reno registered leon: power management initialized highmem bounce pool size: 64 pages Installing knfsd (copyright (C) 1996 okir@monad.swb.de).
GR-LEON4-ITX Development Board Quick Start Guide 5.2 Creating a boot PROM Overview Creating a boot PROM allows the system to boot software after power-up without the need to connect with GRMON. There are several boot loaders available for LEON/GRLIB systems. This document contains descriptions on how to use two of them, MKPROM2 and U-boot, with the GR-LEON4-ITX board. MKPROM2 Note: MKPROM2 does not support creating PROM images of SMP Linux images.
GR-LEON4-ITX Development Board Quick Start Guide Compression Ratio: 3.035 section: .vmlinux at 0x40004000, size 2658560 bytes Uncoded stream length: 2658560 bytes Coded stream length: 1562710 bytes Compression Ratio: 1.701 creating LEON3 boot prom: prom.out Searching for compiler to use (sparc-elf, sparc-rtems or sparc-linux): sparc-elf-gcc (GCC) 3.4.4 Copyright (C) 2004 Free Software Foundation, Inc. This is free software; see the source for copying conditions.
GR-LEON4-ITX Development Board Quick Start Guide pack/u-boot/prebuilt this directory also contains a pre-built version of the mkimage tool. The source for U-boot is on the USB Flash stick in the directory software/bootloaders/u-boot. To re-build u-boot, enter the U-boot source directory and issue the command make gr_leon4_itx_config followed by make.
GR-LEON4-ITX Development Board Quick Start Guide => sf probe => sf erase 400000 200000 => sf write 40200000 400000 $(filesize) To see information about the downloaded image issue the command: => iminfo It is also possible to update the u-boot image using GRMON.
6 GR-LEON4-ITX Development Board Quick Start Guide TROUBLESHOOTING AND FREQUENCY ASKED QUESTIONS 6.1 General The performance of the system is less compared to what is advertised for LEON4 The advertised LEON4 performance figures typically come from systems that include a Level-2 cache core. The GR-LEON4-ITX board and LEON4-ASIC-DEMO device were constructed using a pre-release version of the LEON4 processor and the L2 cache core was not available at this time.
GR-LEON4-ITX Development Board Quick Start Guide There is no known workaround for this issue and the LEON4-ASIC-DEMO device cannot be used in a system where it will be accessed by a master performing bursts over eight words in length. I2C communication does not work Please make sure that the bus has pull-ups (see the GR-LEON4-ITX Board User Manual for how to enable pull-ups). My USB disk is not detected / does not work The board may not be able to provide enough power for drives connected via USB.