
Operation Manual


26
F.10 v.2 OPERATING MANUAL
© 2002 Design, 2011 Doc. No. 12-7260-r01 (4/19/11)
Inspection
• Closely check all of the sealing surfaces for any signs of damage that might impair proper sealing.
• Inspect the Buttons, Lens, and Housing to ensure they are not cracked or damaged.
WARNING: If damage or corrosion is found, return your F10 to an Authorized AERIS Dealer, and DO NOT attempt to
use it until it has received factory prescribed service.
• Remove the Battery Cover O-ring and inspect it for any signs of deterioration or deformity. DO NOT use tools to remove the O-ring.
• To ensure proper sealing, O-ring replacement is highly recommended each time the Battery is replaced.
• Closely examine the Battery Cover and Housing for any signs of damage that might prevent proper sealing.
• Closely examine the inside of the Battery Compartment for any signs of corrosion indicating entrance of moisture into the unit.
• If corrosion is found, return the F10 to an Authorized AERIS Dealer, and DO NOT attempt to use it until it has received factory service.
• If moisture is found, it is best to have the unit inspected and cleaned by an Authorized AERIS Dealer.
Battery Installation
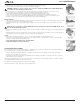
• Slide a new 3 volt type CR2430 Lithium Battery, negative side down into the Battery Cavity. Slide it in from the Left side (Fig. 78) and ensure that
it slides under the contact clip on the lower/right rim of the cavity.
• Lightly lubricate the new Cover O-ring with silicone grease and place it on the inner rim of the Battery Cover. Ensure that it is evenly seated
(Fig. 79).
NOTE: The Cover O-ring must be a genuine AERIS part that can be purchased from an Authorized AERIS Dealer. Use of
any other O-ring will void the warranty.
• Carefully place the Battery Cover (with O-ring) into position on the rim of the Battery Compartment, then press it evenly and completely down into
place.
• Maintain the Battery Cover securely in place and turn it counter clockwise 10 degrees using the special Battery Cover tool provided (Fig. 80), or
by pushing the lower portion to the right while pushing the upper portion to the left (Fig. 81).
Testing
• Activate the unit and observing the display to ensure it is consistently clear and sharp in contrast throughout the screen.
• If any portions of the display are missing or appear dim, or if a Low Battery Condition is indicated, return your F10 to an Authorized AERIS
Dealer for a complete evaluation before attempting to use it.
• Set the Date, Main Time, Alternate Time, and Daily Alarm.
• Verify all Free Mode Set Points prior to diving.
ALTITUDE SENSING AND ADJUSTMENT
Prior to the first dive of a series of repetitive dives, Altitude (i.e., Ambient Pressure) is measured upon activation of Free Surface Mode and every 15
minutes until a dive is made or operation reverts to Main Time after 2 hours.
> While it is operating in Watch Modes after a dive, measurements are taken every 15 minutes during the 24 hour period after surfacing.
> Measurements are only taken when the unit is dry.
> Two readings are taken, the second reading 5 seconds after the first. The readings must be within 1 foot (30 cm) of each other to record that
Ambient Pressure as the current Altitude.
When diving in high altitude waters from 3,001 to 14,000 feet (916 to 4,270 meters), the F10 automatically adjusts to these conditions providing
corrected Depth indication at intervals of 1,000 feet (305 meters).
No adjustments are made during any time that the Wet Contacts are bridged.
The F10 will not function as a Dive Gauge above 14,000 feet (4,270 meters).
Fig. 78 - BATTERY
INSTALLATION
Fig. 79 - BATTERY
COVER O-RING
Fig. 80 - COVER
INSTALLATION
(using tool)
Fig. 81 - COVER
INSTALLATION
(without tool)