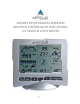
WS3083 PROFESSIONAL WIRELESS WEATHER STATION WITH USB UPLOAD, UV INDEX & LIGHT METER WS3083 -1-
WS3083 PROFESSIONAL WIRELESS WEATHER STATION WITH USB UPLOAD, UV INDEX & LIGHT METER Operation Manual About This Manual Thank you and congratulations on selecting this professional weather station. We are positive you will enjoy the benefits of accurate weather readings and information that our weather stations offer. This manual will guide you step-by-step through setting up your device. Use this manual to become familiar with your professional weather station, and save it for future reference.
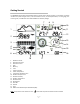
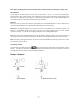
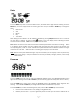
Getting Started The WS3083 Professional Wireless Weather Station includes a base station (receiver), a transmitter unit which includes solar panel and light sensors, one wind direction sensor, one wind speed sensor, one rain gauge, one mounting tree, one USB cable and a downloadable PC software package. 7 8 9 10 1 11 12 2 13 3 14 4 5 15 6 16 18 1. 2. 3. 4. 5. 6. 7. 8. 9. 10. 11. 12. 13. 14. 15. 16. 17. 18.
Important Notes System Start Insert two LR6 (AA) size batteries into the transmitter first. The LED located in the middle on the front of the transmitter will illuminate for 4 seconds. If the LED does not light up or stays on permanently make sure the batteries are inserted the correct way. After the transmitter is powered up it will transmit weather data for 24 seconds and then will start radio controlled time reception.
Note: When replacing batteries in the transmitter wait two minutes before re-inserting for a proper reset. Wind Direction On the edge of the wind direction sensor, there are four letters - “N”, ”E”, ”S” and “W” representing the directions North, East, South and West. The wind direction sensor has to be adjusted so that the directions on the sensor are matching your real location.
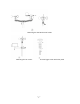
Mounting the dual wind sensor holder Mounting the rain sensor Thermo-hygro sensor with solar panel WS3083 -6-
Mounting the thermo-hygro sensor Fix the whole set to a pole with the two adjustable hoops The anemometer’s cable is connected to the input on the wind direction sensor. The wind direction sensor’s cable is connected to the input marked Wind on the thermo-hygro sensor. The rain sensor’s cable is connected to the input marked Rain on the solar panel. The solar panel’s cable is connected to the input marked Rain on the thermo-hygro sensor.
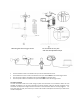
Setting Up The base station has six keys for easy operation: the MENU key, UP key, DOWN key, ENTER key, HISTORY key and the ON/OFF key. Note: Keeping the UP or DOWN key pressed when setting certain units will increase/decrease digits in greater steps. The setting procedure can be exited at any time by either pressing the HISTORY key or waiting for the 30-second time-out to take effect.
Date Press the MENU key twice to select the DATE section, the DATE section digits will start flashing. Press the ENTER key to shift the display between the following parameters and press the UP or DOWN key to change the value: Date Format Year Month Day Time Alarm After editing the Time Alarm it can be enabled or disabled by pressing ON/OFF while the hour or minute of the Time Alarm is flashing. An alarm symbol appears in the Time display section indicating the alarm function has been enabled.
pressure reading to allow for your altitude. To do so make sure you have selected Relative as above and change the pressure reading to match with a local benchmark such as the local air pressure provided for your area on the Met Service or Bureau of Meteorology websites. If Absolute pressure is selected, skip this step. Pressure high alarm (press ON/OFF to enable/disable). If the alarm is enabled, an alarm symbol appears in the display. Pressure low alarm (press ON/OFF to enable/disable).
Weather Forecast Press the MENU key five times to select the TENDENCY section, the TENDENCY section digits will start flashing. Press the UP or DOWN key to select the tendency (not generally required as this will adjust automatically over a few days as the unit collects data and begins forecasting).
Weather forecast symbols: Sunny Partly Cloudy Cloudy Rainy Snow Storm Snowstorm Clear Night Cloudy Night WS3083 - 12 -
Indoor Humidity Press the MENU key six times to select the INDOOR HUMIDITY section, the INDOOR HUMIDITY section digits will start flashing. Press the UP or DOWN key to change the humidity high alarm (press ON/OFF to enable/disable). If the alarm is enabled, an alarm symbol appears in the display. Press the ENTER key to select the following modes, then press the UP or DOWN key to set the value: Indoor humidity low alarm (press ON/OFF to enable/disable).
Outdoor Humidity Press the MENU key eight times to select the OUTDOOR HUMIDITY section. similar to Indoor Humidity above. Procedures and settings are Outdoor Temperature Press the MENU key nine times to select the OUTDOOR TEMPERATURE section, the OUTDOOR TEMPERATURE section digits will start flashing. Press the UP or DOWN key to change the temperature display mode between Temperature, Wind Chill and Dew Point.
The UV Index has a scale of 1-12 as follows: Extreme: Very High: High Moderate: Low: 10, 11, 12 7, 8, 9 5, 6 3, 4 0, 1, 2 Wind Press the MENU key eleven times to select the WIND section, the WIND section digits will start flashing. Press the UP or DOWN key to shift the display between Average wind speed and Gust (default Average wind speed). Note: Average wind speed is the average speed over the 48 second period between signal transmissions.
symbol appears in the display. Maximum light intensity value (since last reset). Resetting the maximum light intensity value when both the light intensity value and MAX icon are flashing, hold the ENTER key for 3s, the maximum light intensity value will be reset to the current reading. Rain Press the MENU key thirteen times to select the RAIN section, the RAIN section digits will start flashing.
PC Connection An important feature of the WS3083 is the capability for the recorded data to be downloaded, stored and displayed on your PC. Data Storage The Base Station allows the internal storage of up to 4,080 complete sets of weather data with time and date. These data sets are stored in non-volatile ring buffer memory (EEPROM) and will not be lost in the event of an interruption of power supply (e. g. change of batteries).
Trouble Shooting Problem I am not receiving any outside data. Solution Check that batteries in both units are fresh and fully charged. Alkaline batteries slow down and freeze in colder temperatures which leads to signal dropouts so we recommend Lithium batteries in colder climates. Also avoid rechargeable batteries as many are 1.2V (standard 1.5V required) and they also leak their peak charge quickly even if they are 1.5V. Put the batteries in the receiver last to force a proper resync.
Specifications Outdoor data Transmission distance in open field: Frequency: Temperature range: Resolution: Measuring range rel. humidity: Rain volume display: Resolution: Wind speed: Light: Up to 100m (line of site) 433 MHZ - 40C to +60C 0.1C 10% to 99% 0 – 9,999mm 0.
EU DECLARATION OF CONFORMITY Hereby, Aercus Instruments, declares that this Wireless Weather Station (Model: WS3083) is in compliance with the essential requirements and other relevant provisions of Directive 1999/5/EC. A copy of the signed and dated Declaration of Conformity is available on request from contact@aercusinstruments.com. COUNTRIES RTTE APPROVAL COMPLIED All EU countries This handbook may contain mistakes and printing errors.