WS1093 PROFESSIONAL WIRELESS WEATHER STATION WITH TOUCHSCREEN AND USB UPLOAD -1WS1093
WS1093 PROFESSIONAL WIRELESS WEATHER STATION WITH TOUCHSCREEN AND USB UPLOAD Operation Manual Thank you and congratulations on selecting this professional weather station. We are positive you will enjoy the benefits of accurate weather readings and information that our weather stations offer. This manual will guide you step-by-step through setting up your device. Use this manual to become familiar with your professional weather station, and save it for future reference.
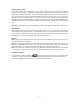
Getting Started The WS1093 touch screen weather station includes a base station (receiver), a transmitter unit, one wind direction sensor, one wind speed sensor, one rain gauge, one mounting tree, one USB cable and a downloadable PC software package.
Important Operation Notes All actions and functions of the weather station are started on the touch screen by slightly touching (not pressing) the related areas with the stylus, touch the flashing +, ON/OFF or – to make the corresponding selection increase or decrease. Note: the stylus can be found on the top rear of the console and can sometimes be stiff to remove the first time.
Reconnecting Lost Signal If no outdoor weather data is displayed as a result of loss of signal during set up, mounting, changing of batteries in the transmitter or plugging or unplugging cables, simply remove the batteries from the Base Station wait 2 minutes and reinsert. After this the Base Station will make an initial measurement and start to register the transmitter (the Outdoor Reception Signal icon will be turned on).
Setup - Sensors -6WS1093
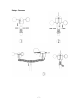
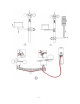
-7WS1093
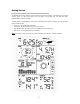
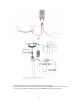
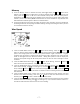
The wind speed sensor’s cable is connected to the wind direction sensor. The wind direction sensor’s cable is connected to the input marked Wind on the thermo-hygro sensor. The rain sensor’s cable is connected to the input marked Rain on the thermo-hygro sensor.
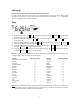
Setting Up For basic settings touch the Touch Screen in the desired display area using the stylus. Note: setting procedure can be exited at any time by touching any other function area (except “+”, “-” or “ON/OFF”. The basic settings can be performed as follows: Time 1) Touch the TIME section, the + and – button will be flashing. Touch the + button or – button to adjust 2) 3) 4) 5) the contrast level from 0 to 8 (default 5). Touch the TIME section again, the + and – button will be flashing.
Memory 1) Touch the Memory section to activate the history data toggle display, the + and – button will be flashing. Press the – button to toggle back to see earlier weather history data together with its time stamp, press the + button to see more recent weather history data. When the history data is displayed the corresponding time will be displayed in the time section area (the history data saving interval is preset to 30 minutes).
Date 1) 2) 3) 4) 5) 6) 7) Touch the DATE section, the + and – button will be flashing. Touch the + button or – button to shift between alarm, date and day of the week format. Touch the DATE section again, the + and – button will be flashing. Touch the + button or – button to Shift between DD-MM format and MM-DD format for the date. Touch the DATE section a third time, the + and – button will be flashing. Touch the + button or – button to set the year.
+ button or – button for 3 seconds to change the number faster. Touch the ON/OFF button to turn the alarm on or off (the alarm icon will be turned on indicating the alarm function has been activated). 4) Touch the rain section a fourth time to display the current maximum rain fall record. Touching the rain section for 3 seconds will reset the maximum rain fall value to the current value. 5) Touch the rain section a fifth time to reset the rain fall value to 0.
Pressure bar graph Touch the PRESSURE BAR GRAPH section and then press the + or – button to toggle the bar graph time scale between 12 hrs or 24 hrs for pressure history. Weather Forecast 1) Touch the WEATHER FORECAST section, the + and – button will be flashing. Touch the + button or – button to shift the display between SUNNY, PARTLY CLOUDY, CLOUDY and RAINY icon (not generally required as this will adjust automatically over a few days as the unit collects data and begins forecasting).
Indoor Temperature 1) 2) 3) 4) 5) Touch the INDOOR TEMPERATURE section, the + and – button will be flashing. Touch the + button or – button to shift the display unit between C and F. Touch the INDOOR TEMPERATURE section again to set the indoor temperature high alarm function, the +, ON/OFF and – button will be flashing, the HI AL icon will light up. Touch the + button or – button to change the value, hold the + button or – button for 3 seconds to change the number faster.
function, the +, ON/OFF and – button will be flashing, the LO AL icon will light up. Touch the + button or – button to change the value, hold the + button or – button for 3 seconds to change the number faster. Touch the ON/OFF button to turn the alarm on or off (the alarm icon will be turned on indicating the alarm function has been activated).
PC Connection An important feature of the WS1093 is the capability for the recorded data to be downloaded, stored and displayed on your PC. Data Storage The Base Station allows the internal storage of up to 4,080 complete sets of weather data with time and date. Note: this data is lost when the batteries are removed so download to your PC prior to removing the batteries if you wish to retain this information.
Trouble Shooting Problem I am not receiving any outside data. Solution Check that batteries in both units are fresh and fully charged. Alkaline batteries slow down and freeze in colder temperatures which leads to signal dropouts so we recommend Lithium batteries in colder climates. Also avoid rechargeable batteries as many are 1.2V (standard 1.5V required) and they also leak their peak charge quickly even if they are 1.5V. Put the batteries in the receiver last to force a proper resync.
Specifications Outdoor data Transmission distance in open field: Frequency: Temperature range: Resolution: Measuring range rel. humidity: Rain volume display: Resolution: Wind speed: Up to 100m (line of site) 433 MHZ - 40C to +65C (show OFL if outside range) 0.1C 10% to 99% 0 – 9999mm (show OFL if outside range) 0.
EU DECLARATION OF CONFORMITY Hereby, Aercus Instruments, declares that this Wireless Weather Station (Model: WS1093) is in compliance with the essential requirements and other relevant provisions of Directive 1999/5/EC. A copy of the signed and dated Declaration of Conformity is available on request from contact@aercusinstruments.com. COUNTRIES RTTE APPROVAL COMPLIED All EU countries This handbook may contain mistakes and printing errors.