
User's Manual


View the expanded manual:
http://aeotec.com/support
Aeotec by Aeon Labs Z-Stick.
Aeon Labs Z-Stick Gen5 is a self-
powered Z-Wave USB adapter with
remote network creation capabilities
(independent from external power and
host microprocessor). By being able
to remotely include/remove Z-Wave
devices, this greatly simplies Z-Wave
network installation. When connected
to a host controller (via USB), it enables
the host controller to take part in the
Z-Wave Network.
The Z-Stick Gen5 is also device
firmware upgradeable by the end
consumer. This enables the product
to always have the latest Z-Wave
protocol, capabilities and commands.
By taking advantage of the Z-Wave
mesh network, commands can
be routed to their destination via
intermediary “listening” Z-Wave
products. Products that are Z-Wave
certied can be used and communicate
with other Z-Wave certied devices.
The Z-Stick operates in three distinct
modes: Inclusion-Mode, Removal-
Mode and SerialAPI-Mode. Both
Inclusion-Mode and Removal-Mode
require the Z-Stick to be unplugged
from the USB connector of the host,
while SerialAPI-Mode requires that
the Z-Stick to be plugged into the
USB connector of the host. Software
drivers for the “ZW050x_USB_VCP_
PC_Driver” may need to be installed in
order for the Z-Stick to be recognized
on some computers (drivers can
be found at http://www.aeotec.com/
support).
1. To initiate Inclusion-Mode, unplug the
Z-Stick from the USB connector and
then tap the Action Button. (The blue
LED will blink slowly.)
2. To include a new Z-Wave device into
the network, simply go to the device
with the Z-Stick and press the button
on the device you wish to include. (The
blue LED on the Z-Stick will blink fast
during a network neighbour discovery
and stay solid for 2 seconds to indicate
successful inclusion of the device into
the network.)
1. To initiate Removal-Mode, unplug
the Z-Stick from the USB connector.
Then press and hold down the Action
Button for approximately 2 seconds.
(The orange LED will blink fast.)
2. To remove a Z-Wave device from the
network, simply go to the device with
the Z-Stick and press the button on the
device you wish to remove. (The blue
LED on the Z-Stick will immediately
stay solid for 2 seconds to indicate
successful removal from the network.)
3. The orange LED will then return
to blink fast, indicating readiness for
further device exclusions. Repeat step
2 for each device you wish to exclude.
4. Tap the Z-Stick’s Action Button to
turn it off or it will automatically exit
the removal mode after 30 seconds of
inactivity.
To initiate SerialAPI-Mode, plug the
Z-Stick into the USB connector of the
host (i.e. PC, MAC, or Gateway).
Note:
1). While in SerialAPI-mode, the
Z-Stick is always listening (it is awake
and always in RX receive mode) for
instructions and acts as a Z-Wave
adapter and responds to commands
sent through USB by the host processor
software.
2). Pressing the Action Button will not
have any effect while in SerialAPI-
Mode. But short pressing the Reset
Button will reset the USB port.
This must be done through the host
software which takes control of the
Z-Stick USB adapter while the Z-Stick
is in SerialAPI-Mode. Please consult
the instruction manual of the host
software to add the Z-Stick to a pre-
existing Z-Wave network (i.e. “Learn”,
“Sync”, “Add as Secondary Controller”,
etc.). This function can only be
performed via host software.
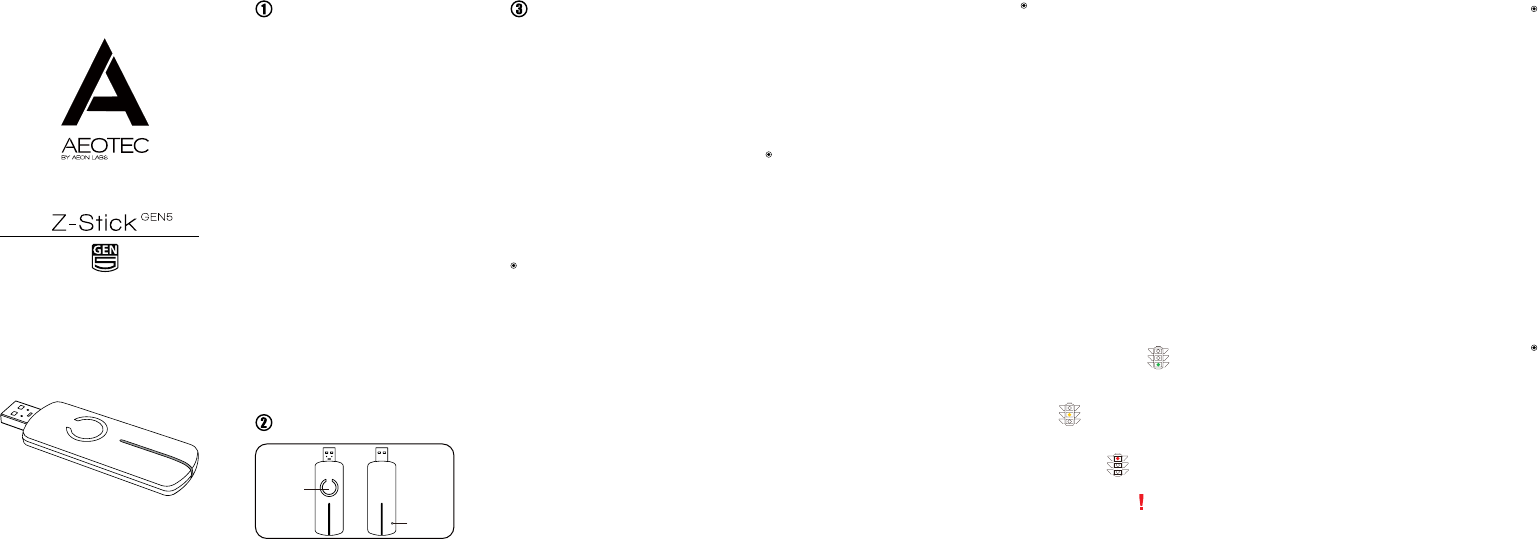
Familiarize yourself with your
Z-Stick.
Quick start.
Inclusion-Mode: Adding/Including
Z-Wave Devices into the Z-Wave
Network.
Removal-Mode: Deleting/
Removing/Excluding Z-Wave
Devices from the Z-Wave Network.
SerialAPI-Mode: Allowing a Host
Processor To Take Control of the
Z-Stick and Take Part in the Z-Wave
Network.
Installation and Maintenance
Application (IMA) feature.
Add the Z-Stick to a pre-existing
Z-Wave network.
When the Z-Stick acts an independent/
secondary controller that has been un-
plugged from the USB host, it also can
measure the network health in Z-Wave
network. The different colour of LED on
the Z-Stick indicates the communication
quality between the Central Controller
and the current location of Z-Stick in
the network.
Short press the Action Button 5 times, if
the colour of LED is changed to purple
and then it follows with fast blink, which
means it goes into the IMA feature.
The colour of LED will be changed
according to the network health
level. If the colour of LED is changed
to green, which means the current
communication quality is more than
95% on -7dBm. If the colour of LED
is changed to orange, which means
the current communication quality is
more than 95% on 0dBm. If the colour
of LED is changed to purple, which
means the current communication
quality is less than 95% on 0dBm. If the
colour of LED is changed to red, which
means the current communication has
failed.
Short press the Action Button 5 times
again, the Z-Stick will automatically exit
the IMA feature.
When the Z-Stick is in Serial API-
Mode and acts a primary controller,
it can measure the network health
for each device in the network. The
different colour of LED indicates the
communication quality between the
Z-Stick Controller and devices in the
network.
Install the IMA tool software rst (note:
the IMA tool can be downloaded from
here: http://www.aeotec.com/support).
Select the node device and then click
the IMA test button to start the IMA test
between the Central Controller and
the node devices. Your IMA tool client
will receive the test result and use
different colour of LED icon to indicate
the network health level, its colour will
be changed follow with the change of
network health level. If the colour of
LED is changed to green , which
means the current network quality is
good. If the colour of LED is changed to
orange , which means the current
network quality is acceptable but
latency can occur. If the colour of LED
is changed to red , which means the
current network quality is insufficient.
If the IMA tool return a , which means
the current network is critical because
node is not responding.
®
Action Button
Reset Button
3. The blue LED will then return to
blinking slowly, indicating readiness for
further device inclusions. Repeat step 2
for each device you wish to include.
4. Tap the Z-Stick’s Action Button to
turn it off or it will automatically exit
the removal mode after 30 seconds of
inactivity.