
User Manual


11
22
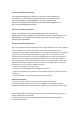
Install Nano Dimmer to the gang box.
3.
Live/Hot wire connection: Connect the Live/Hot
wire to the “L” terminal on the Nano Dimmer.
Neutral wire connection: Connect the Neutral
wire to the “N” terminal on the Nano Dimmer.
Load wire connection: Connect the Load wire
to the “OUT” on the Nano Dimmer.
External/manual Switch connection: Connect
2 18AWG wires to the “S1” and “S2” on the
Nano Dimmer.
External/manual Switch connection: Connect
2 18AWG wires form the 2 terminals on the
External/manual Switch to the “COM” on the
Nano Dimmer.
a.
b.
c.
d.
e.
Reset your Nano Dimmer.
If at some stage, your primary controller is missing
or inoperable, you may wish to reset all of your
Nano Dimmer’s settings to their factory defaults.
To do this, press and hold the Action Button for 20
seconds and then release it. Your Nano Dimmer will
now be reset to its original settings, and the green
LED will be solid for 2 seconds and then remain the
colourful gradient status as a conrmation.
S1 S2
N
L
OUT
COM
N
L
a
b
c
d
e
mode.
Press the Action Button 2 times within 1 second
on the Nano Dimmer, the blue LED (secure
indication) will blink to indicate the Nano Dimmer
is entering into secure pairing mode.
If the Nano Dimmer has been successfully added
to your Z-Wave network, its RGB LED will be
solid. If the pairing was unsuccessful, the red
LED will be on for 2 seconds and then remain a
colourful gradient, repeat the instructions above
from step 1.
2.
3.
6
Technical specifications.