
User Manual


13
4. USE
Once your instrument has been congured, you can use it. You must still:
Congure the measurement channels,
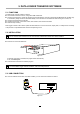
Connect the probes, sensors, transmitters, or signal conditioners
Start a recording session
4.1. CHANGING A PARAMETER
To change a parameter, press
; this changes the rst eld on the screen that can be modied to reverse video. Use the
keys to select the eld you want to modify, then press
again to edit the eld. Then use the or key to dene the eld. If
the eld comprises several characters, use the or key to go from one character to another.
When you have nished, press
to validate.
The numbers are not changed digit by digit, but more globally.
For example, to go from 0.00 to 85.00, start on the left-hand digit, before the zero, and press . The digit will be incremented
repeatedly. When it reaches 8, shift the cursor to the second digit and change it in the same way. And so on.
For a negative number, start on the left-hand digit, before the zero, and press . The digit changes to 00.00, then to -10.00, then
-20.00, etc.
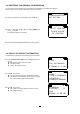
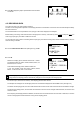
4.2. CONFIGURING THE MEASUREMENT CHANNELS
From the Measurement data screen (see Figure 7), press twice.
From this screen, you can activate or deactivate measurement
channel 1 and choose the type of input:
pulse
event (discrete)
4-20mA current
±10V, ±1V, or ±100mV voltage
CHANNEL 1:
ENABLED
INPUT:
±100 mV
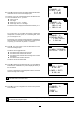
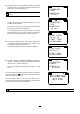
It is not possible to deactivate both channels. If you deactivate channel 2 when channel 1 is already deactivated, channel
1 is automatically reactivated. This makes it impossible to start a recording session with both channels deactivated by
mistake.
UNITS:
CHANNEL 1:
Press to go to the next screen and enter the unit of channel
1 in 4 characters.
If you do not specify a unit, the default values will be:
mV for ±100 mV
V for ±10V and ±1 V
mA for 4-20 mA
Wh for pulse
For an event input, you can choose whether triggering is on
the positive-going or negative-going front.
TRIGGER:
RISING