GB - User’s manual 99 Washington Street Melrose, MA 02176 Phone 781-665-1400 Toll Free 1-800-517-8431 Visit us at www.TestEquipmentDepot.
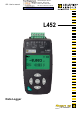
Thank you for purchasing an L452 Data Logger. For best results from your instrument: read these operating instructions carefully, comply with the precautions for use. WARNING, risk of DANGER! The operator must refer to these instructions whenever this danger symbol appears. Information or useful tip. Magnet. Earth. The product is declared recyclable following an analysis of the life cycle in accordance with standard ISO 14040.
CONTENTS 1. FIRST USE................................................................................................................................................................................. 4 1.1. Delivery condition............................................................................................................................................................ 4 1.2. Accessories.................................................................................................................
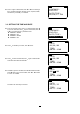
1. FIRST USE 1.1.
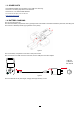
1.3. SPARE PARTS One USB mains adapter and one USB A / micro USB cord 1.80m long. One set of 5 connecting strips with 6 screw terminals. One set of two 1.2V, 2400mA NiMH batteries. For accessories and spares, visit our web site: www.chauvin-arnoux.com 1.4. BATTERY CHARGING Turn the instrument over. Remove the battery compartment cover by pushing it as far as the marks in the direction indicated by the arrows, then lifting it off. Insert the 2 batteries provided, paying attention to the polarity.
2. PRESENTATION OF THE INSTRUMENT 2.1. FUNCTIONS OF THE INSTRUMENT The L452 Data Logger is a two-channel recorder. It can be powered either by the rechargeable batteries or by mains, via a USB cable. It is used: to record DC voltages up to 10V, to record direct currents from 4 to 20mA, to count pulses, to detect events on its discrete inputs. The voltage and current measurements can be sampled at intervals from 200ms to 1 minute.
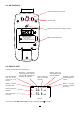
2.3. ON THE BACK Notch for hanging the instrument. Non-skid pads. Magnet for attachment to a metallic surface. MADE IN FRANCE Battery compartment cover. USE ONLY SPECIFIED POWER SUPPLY 2 x AA 1.2V RECHARGEABLE BATTERY Figure 6 2.4. DISPLAY UNIT A typical measurement screen looks like this: Overload: indicates that the measurement is out of bounds. Recording: indicates that a recording session is scheduled and indicates that recording is in progress. Battery: indicates the charge state.
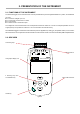
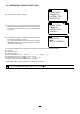
3. SETTINGS OF THE INSTRUMENT Before you use the L452 for the first time, you must configure it. It can be configured either in the local mode (on the keys of the instrument itself) or in the remote mode (using the Data Logger Transfer software).
Press again to edit the field, then or to scroll through the 5 possible languages (English, French, Spanish, Italian, and German), and finally to validate. LANGUAGE: ENGLISH DATE/TIME: MM/DD/YY 24h 3.3. SETTING THE TIME AND DATE From the previous screen, press to select the field, then to go to the next field.
3.4. CONFIGURING THE BLUETOOTH LINK BLUETOOTH: DISABLED VISIBILITY: INVISIBLE From the previous screen, press . BLUETOOTH: ENABLED VISIBILITY: VISIBLE Proceed as for the previous adjustments to activate the Bluetooth link and make it visible, at least until the instrument is connected to the PC. After that, you may make it invisible once again. Press and the display unit indicates the name under which the instrument will appear on the PC.
3.5. RESTORING THE ORIGINAL CONFIGURATION You can cancel all of the changes you have made to the configuration by resetting the instrument. Only the date, the time, and the content of the memory will remain. CONFIGURATION: NO ACTION Switch the instrument on, press four times and twice. Press twice, then the or key to display RESET, and finally to validate. The instrument asks for confirmation. RESET CONFIG? PRESS ENTER TO CONFIRM To cancel, press and simultaneously.
Press . You can see the default name of the next recording session. This name is the name of the instrument plus a session number that is incremented each time. It can be modified via the Data Logger Transfer software. To return to the Measurement data screen, press the On/Off RECORDING NAME: L452-452105MLP 1 key. 3.7. SWITCHING THE INSTRUMENT OFF To switch the instrument off, press the On/Off key and hold it down until the instrument displays POWER OFF.
4. USE Once your instrument has been configured, you can use it. You must still: Configure the measurement channels, Connect the probes, sensors, transmitters, or signal conditioners Start a recording session 4.1. CHANGING A PARAMETER To change a parameter, press ; this changes the first field on the screen that can be modified to reverse video. Use the keys to select the field you want to modify, then press again to edit the field. Then use the or key to define the field.
Press . The next 2 screens are used to define transformation coefficients for the current and voltage inputs. For example, if you use a temperature sensor that delivers 4mA at -10°C and 20mA at 100° C, you enter: Input: 4-20 mA Unit: degC Scale Low: 4.0 mA = -10 degC Scale High: 20.0 mA = 100 degC The instrument then displays the measurement directly in °C.
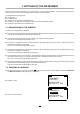
4.3. CONNECTING PROBES, SENSORS, TRANSMITTERS, OR SIGNAL CONDITIONERS The L452 Data Logger operates with a great variety of probes having outputs of the following type: Voltage: ± 100 mV, ± 1 V or ± 10 V Current: 4 - 20 mA Pulse: ± 10 V On/Off (discrete): ± 10 V Place the connecting strip provided on the terminal block of the instrument and push it home. 30V MAX V mA mA INPUT 1 INPUT 2 Figure 8 L452 SIMPLE LOGGER III Then connect the probes.
OL If the measurement from one of the channels is outside of the measurement range, the instrument displays OL. Check that the probe you have connected delivers the right signal and that the type of input is the right one. 1 Press to display the minimum and maximum of channel 1. Press to display the minimum and maximum of channel 2. The values displayed on this screen are not the instantaneous values displayed on the Measurement data screen, but averages over the storage period. 1 2.
Press to display the graphic representation of the last event of channel 1. 1 DATE: 09/15/15 TIME: 11:28:17AM 4.5. RECORDING DATA The L452 can store up to 1024 recording sessions. The size of a recording session depends on the storage period and on the duration of the record. This last is limited by the battery life of the instrument. The recorded sessions can be uploaded to a PC (see §5) to be saved, displayed, and analysed.
Press . Choose a recording duration between 1 minute and 99 weeks. Bear in mind that the life between charges of the instrument is not that long (see § 6.3). The recording time must be at least as long as the storage period. You can start recording immediately by pressing 3 times. The symbol is displayed. Proceed in the same way if you want to stop recording before the end of the programmed recording time.
4.6. CLEARING MEMORY If you want to preserve recorded sessions, transfer them to a PC (see §5) before clearing the memory of the instrument. From the Measurement data screen (see Figure 10), press 4 times, then once. Choose Erase for the memory. MEMORY: NO ACTION MIN/MAX: NO ACTION ERASE MEMORY? The instrument asks for confirmation. To cancel, press and simultaneously. To confirm, press .
5. DATA LOGGER TRANSFER SOFTWARE 5.1. FUNCTIONS The Data Logger Transfer software is used to: Connect the instrument to the PC, using either USB or Bluetooth. Configure the instrument: choose the language, set the date and time, activate or deactivate the Bluetooth link (the latter only if connected by USB), activate or deactivate visibility of the instrument on the Bluetooth network and give it a name, etc. Configure the measurement channels.
5.4. BLUETOOTH COMMUNICATION Make sure that the Bluetooth symbol is in fact displayed on the screen of the instrument. Otherwise, refer to §3.4 to activate the Bluetooth link and make the instrument visible on the Bluetooth network. If Bluetooth fails to activate, the voltage of the batteries is too low. Recharge them (see §1.4) If your PC does not have a Bluetooth connection, install a USB-Bluetooth adapter.
Figure 17 For more security, then make the instrument invisible on the Bluetooth network (see §3.4). It will then not appear in the lists of available peripherals on other computers within its range. 5.5. REMOTE MODE The L452 can operate in 2 modes: The local mode (see §§3 and 4), which can be used to configure the instrument, configure the measurements, display the measurements, start and stop recording, and clear the memory. The remote mode is used to control the instrument from a PC.
6. TECHNICAL CHARACTERISTICS 6.1. REFERENCE CONDITIONS Quantity of influence Reference values Temperature 20 ± 3 °C Relative humidity 45 to 55%RH Internal supply voltage 2.4 ± 0.2V External supply voltage 110 to 240V 50/60Hz Electric field < 1V/m Magnetic field < 40A/m The intrinsic uncertainty is the error specified for the reference conditions. It is expressed as a percentage of the reading ± display points. 6.2. ELECTRICAL CHARACTERISTICS 6.2.1.
Consumption / life Sampling rate 200 ms 400 ms 60 s Screen lit 6 mA / 18 days 5 mA / 21 days 4 mA / 27 days Screen off 3 mA / 36 days 2 mA / 54 days 0,4 mA / 270 days All consumption values are with Bluetooth deactivated. Maximum: 2.5 W 6.4. MEMORY The size of the memory is 32MB. The L452 can record up to 1024 sessions. 6.5. BLUETOOTH Bluetooth 2.1 Class 1 Range: 100m in line of sight. Default pairing code: 000 Nominal output power: +15 dBm Nominal sensitivity: -82 dBm Rate: 115.2 kbits/s 6.
6.8. MECHANICAL CHARACTERISTICS Dimensions (L x P x H) Weight 125 (138 with the connecting strip) x 66 x 33 mm approximately 210g with the connecting strip. Ingress protection IP40 per IEC 60 529. IK 04 per IEC 50102 Drop test per IEC 61010-1 6.9. COMPLIANCE WITH INTERNATIONAL STANDARDS The device is compliant per IEC 61010-1 and IEC 61010-2-030. 6.10. ELECTROMAGNETIC COMPATIBILITY (CEM) The instrument is compliant with standard IEC 61326-1.
7. MAINTENANCE Except for the batteries, the instrument contains no parts that can be replaced by personnel who have not been specially trained and accredited. Any unauthorized repair or replacement of a part by an “equivalent” may gravely impair safety. 7.1. CLEANING Disconnect the unit completely. Use a soft cloth, dampened with soapy water. Rinse with a damp cloth and dry rapidly with a dry cloth or forced air. Do not use alcohol, solvents, or hydrocarbons. 7.2.
8. WARRANTY Except as otherwise stated, our warranty is valid for twelve months starting from the date on which the equipment was sold. Extract from our General Conditions of Sale provided on request.