
Installation Manual


7
4. Reassemble Vehicle
a. Fender liner and splashguard: Install the fender liner, lower splash guard and any hardware that was removed in
steps 2f through 2g.
NOTE: Failure to install the fender liner will result in diminished performance and increase the potential for
engine damage due to water ingestion in rainy conditions.
b. Wheel: Install the passenger side wheel using the factory torque specication (see owner’s manual).
c. Position the inlet pipes for the best tment. Be sure that the pipes or any other components do not contact any part
of the vehicle. Tighten the rubber mount, all bolts, and hose clamps.
d. Check for proper hood clearance. Re-adjust pipes if necessary and re-tighten them.
e. Inspect the engine bay for any loose tools and check that all fasteners that were moved or removed are properly
tightened.
f. Reconnect negative battery terminals and start engine. Let the vehicle idle for 3 minutes. Perform a nal inspection
before driving the vehicle.
5. CARB Sticker Placement
a. The C.A.R.B. exemption sticker, (attached), must be visible under the hood so that an emissions inspector can see
it when the vehicle is required to be tested for emissions. California requires testing every two years, other states
may vary.
6. Service and Maintenance
a. It is recommended that you service your AEM
®
Dryow™ lter every 20,000 miles for optimum performance. Use
AEM Dryow cleaning kit part # 21-110.
b. Use aluminum polish to clean your polished AEM intake tube.
c. Use window cleaner to clean your powder coated AEM intake tube. (NOTE: DO NOT USE aluminum polish on
powder coated AEM intake tubes)
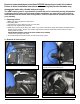
Stock air box system installed.
AEM
®
intake system installed
For technical inquiries
e-mail us at
sales@aemintakes.com
or
call us at
800.992.3000