080410-2 DigiSender MODEL: DX2000-LCD Plug’n’Go™ LCD ® 5.8GHz Single Input ‘Plug Style’ Wireless AV Sender WATCH A VIDEO INSTALLATION & & TROUBLESHOOTING TROUBLESHOOTING GUIDE GUIDE Available Available online online at: at: www.aei.eu/video www.aei.
DX2000-LCD - DigiSender® Plug’n’Go™ LCD Table of Contents Introduction Step 1 - Unpack your Plug’n’Go™ LCD Step 2 - Install the Transmitter Step 3 - Install the Receiver Step 4 - Using the Plug’n’Go™ LCD Plug’n’Go™ LCD Advanced Function Upgrades and Accessories Troubleshooting Picture Problems Audio Problems Problems Controlling Your Source Equipment Technical Support Declaration of Conformity Page 02 03 04 05 06 07-08 08 09 10-13 10-11 12 13 14 15 Please read this instruction manual carefully prior to
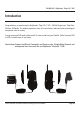
DX2000-LCD - DigiSender® Plug’n’Go™ LCD Introduction Congratulations on purchasing the DigiSender® Plug’n’Go™ LCD - 5.8GHz Single Input ‘Plug Style’ Wireless AV Sender. This product represents state of the art wireless audio and video technology at exceptional value for money. You can now enjoy DVD quality video and Hi-Fi stereo sound from your Satellite, Cable, Freeview, DVD or VCR in another room in your home.
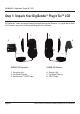
DX2000-LCD - DigiSender® Plug’n’Go™ LCD Step 1: Unpack Your DigiSender® Plug’n’Go™ LCD All DigiSender® orders are computer weight checked when packed. However, it is a good idea to check all kit contents are present before proceeding with the installation. 1. 2. 4. 5. 3. Page 04 6. DX2000-LCD Transmitter DX2000-LCD Receiver 1. Transmitter Unit 2. Pre-Wired IR Emitter 3. DigiConnector™ SCART Input 4. Receiver Unit 5. Pre-Wired IR Sensor 6.
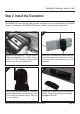
DX2000-LCD - DigiSender® Plug’n’Go™ LCD Step 2: Install the Transmitter The DX2000-LCD Transmitter will send the audio and video from a connected source (your Satellite receiver for example) to the DX2000-LCD Receiver, located in another room in your home. 1. 2. Connect the DigiConnector™ to your Satellite, Cable or Freeview box. Use the SCART socket labelled ‘TV’ or ‘OUT’. Connect any existing SCART lead into the rear of the DigiConnector™. Connect the Transmitter into a Mains Extension Lead.
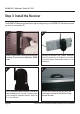
DX2000-LCD - DigiSender® Plug’n’Go™ LCD Step 3: Install the Receiver The DX2000-LCD Receiver will pick up the signals being sent by your DX2000-LCD Transmitter and output them to a connected TV. 1. 2. Locate a vacant SCART socket on the back of your receiving TV and insert the DigiSender® SCART cable. Connect the Receiver into a Mains Extension Lead. The positioning of the Receiver can affect the picture quality so being able to move it is an advantage. 3. 4.
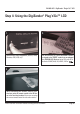
DX2000-LCD - DigiSender® Plug’n’Go™ LCD Step 4: Using the DigiSender® Plug’n’Go™ LCD 1. 2. Switch on the source equipment (Satellite, Cable, Freeview, DVD, VCR, etc.). On the receiving TV, select the SCART channel assigned to the SCART socket that you plugged the DX2000-LCD Receiver in to. This may be labelled as SCART, AUX, AV, VIDEO, VCR or . 3. When controlling your Satellite, Cable or Freeview box, point the remote control at the IR Sensor in the receiving location.
DX2000-LCD - DigiSender® Plug’n’Go™ LCD Using the DigiSender® Plug’n’Go™ LCD Advanced Functions Changing the Audio/Video Channel The DigiSender® Plug’n’Go™ LCD features 4 Audio/Video Channels. Each of these Audio/Video Channels slightly changes the frequency on which the DigiSender® Plug’n’Go™ LCD operates.
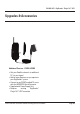
DX2000-LCD - DigiSender® Plug’n’Go™ LCD Upgrades & Accessories Additional Receiver - DX200-LCDRX • Get your Satellite channels to additional TV’s in your home! • Add as many Receivers as you require to your DigiSender® system • Connect to any SCART enabled TV or use with the MOD01PIS Aerial Converter • Supplied with Power Supply Unit • Requires existing DigiSender® Plug’n’Go™ LCD Transmitter Please read this instruction manual carefully prior to installation Page 09
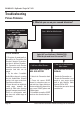
DX2000-LCD - DigiSender® Plug’n’Go™ LCD Troubleshooting Picture Problems Q: What do you see on your second television? The picture is present but poor quality POOR RANGE 1. The picture & sound quality is affected by the Transmitter and Receiver’s location. Try positioning them in different locations. The Transmitter and Receiver should be connected to a mains extension lead that can be moved. 2.
DX2000-LCD - DigiSender® Plug’n’Go™ LCD cont... I see a snowstorm effect or plain blue screen Switch OFF your DigiSender® RECEIVER. Q: What do you now see at the second TV? I now see a Black screen I still see a snowstorm or blue picture NOT RECEIVING SIGNAL WRONG TV CHANNEL SELECTED 1. Switch the DigiSender® Receiver back on. 2. Ensure the DigiSender® Transmitter is switched on. 3.
DX2000-LCD - DigiSender® Plug’n’Go™ LCD Troubleshooting Audio Problems I can see the picture but can’t hear anything. The sound is distorted. Q: What seems to be the problem with the sound? There is a buzzing sound present. It seems to get worse during on-screen menus or bright pictures. There is a hissing sound and the volume must be turned up high on the second TV to hear anything. Page 12 1. Disconnect both the Transmitter AND Receiver SCART cables.
DX2000-LCD - DigiSender® Plug’n’Go™ LCD Troubleshooting Problems Controlling the Source Equipment If you have any difficulty operating your source equipment remote control in your second room please follow the advice below below: 1. Ensure you are using the correct remote control in the second room. For instance, if you are trying to control your Satellite Receiver you will need to use the Satellite remote control. 2. Ensure the IR Emitter is facing the IR Sensor on your source equipment. 3.
DX2000-LCD - DigiSender® Plug’n’Go™ LCD Technical Support AEI Security & Communications Ltd is dedicated to providing our customers with first class customer care and technical support. During busy periods we would suggest using the web option to obtain support. 1. On the web... Free technical advice is available online 24/7 at our dedicated support web site: www.aei.eu 2. By telephone... We have a dedicated helpline, open Monday to Friday, 10AM - 3PM.
SPECIFICATIONS DX2000-LCD Transmitter : Remote Relay Receiver Audio/Video Frequency Modulation Video Input Level Colour Video Input Audio Input Level Audio Bandwidth Input Connectors Power Source 433.92MHz 5.7250GHz ~ 5.8750GHz FM 1V PP/75Ω Phase Alternate Line (PAL) 1.