
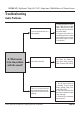
Troubleshooting guide


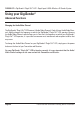

Obis aut et pe nisin pre nonectius ipis ipicit eum
dem nos net etur modipissi alit in eumet ipsunto te
nobitatur sunt, et, sandae ratur sincimus.
4.
Obis aut et pe nisin pre nonectius ipis ipicit eum
dem nos net etur modipissi alit in eumet ipsunto te
nobitatur sunt, et, sandae ratur sincimus.
4.
Page 05Please read the instructions carefully prior to installation
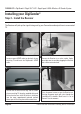
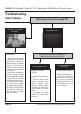
Connect the Transmitter to a mains socket. You
might want to consider plugging the Transmitter
into a mains extension lead, as being able to move
the unit around will help in getting the very best
picture.
2.
Position the IR Emitter in front of your source de-
vice (satellite, cable, freeview, DVD, etc.) with the
lens facing the equipments IR Sensor.
3.
Connect the DigiConnector™ to your Satellite,
Cable or Freeview box. Use the SCART socket la-
belled ‘TV’ or ‘OUT’. Connect any existing SCART
lead into the rear of the DigiConnector™.
1.
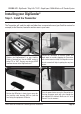
Installing your DigiSender®
Step 2 - Install the Transmitter
The Transmitter will send the audio and video from a connected source (your Satellite receiver for
example) to the Receiver, located in another room in your home.
DX2000-LCD - DigiSender® Plug’n’Go™ LCD - Single Input 5.8GHz Wireless AV Sender System
Press the power button to turn the Transmitter on.
Pressing the power again will cycle through the
four available A/V channels. Make sure it is set to
Channel 1 for the moment.
4.