Model: DGXDSDV112 Single Input HDMI AV Sender System WATCH A VIDEO INSTALLATION & & TROUBLESHOOTING TROUBLESHOOTING GUIDE GUIDE Available Available online online at: at: www.aei.eu/video www.aei.
DGXDSDV112 - DigiSender® XD HDMI - Single Input HDMI AV Sender System Contents Introduction 03 Installing your DigiSender® XD HDMI Step 1 - Unpack your DigiSender® XD HDMI Step 2 - Install the Transmitter Step 3 - Install the IR Systeme Technik™ Remote Relay Kit Step 4 - Install the Receiver Step 5 - Test Your Setup Using the Test Mode 04 - 10 04 05 06 07 08-10 Using your DigiSender® XD HDMI Standard Operation Re-Syncing the Transmitter and Receive
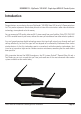
DGXDSDV112 - DigiSender® XD HDMI - Single Input HDMI AV Sender System Introduction Congratulations on purchasing the new DigiSender® XD HDMI from AEI Security & Communications Ltd. This product represents the absolute pinnacle of state-of-the-art wireless audio video distribution technology, at exceptional value for money.
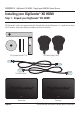
DGXDSDV112 - DigiSender® XD HDMI - Single Input HDMI AV Sender System Installing your DigiSender® XD HDMI Step 1 - Unpack your DigiSender® XD HDMI All DigiSender® orders are computer weight checked when packed. However, it is a good idea to check all kit contents are present before proceeding with the installation.
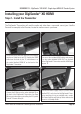
DGXDSDV112 - DigiSender® XD HDMI - Single Input HDMI AV Sender System Installing your DigiSender® XD HDMI Step 2 - Install the Transmitter The DigiSender® Transmitter will send the audio and video from a connected source (your Satellite Receiver for example) to the Receiver, located in another room in your home. 1. 2. Locate the HDMI cable that goes from your Satellite receiver or Cable box to your TV.
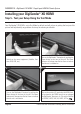
DGXDSDV112 - DigiSender® XD HDMI - Single Input HDMI AV Sender System Installing your DigiSender® XD HDMI Step 3 - Install the IR Systeme Technik Remote Relay Kit™ The IR Systeme Technik™ Remote Relay Kit includes various accessories that will help you in setting it up the Remote Relay system correctly. Once set up, this Remote Relay system will enable you to control your source equipment (your Satellite receiver for example), with its remote control, from the receiving location.
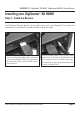
DGXDSDV112 - DigiSender® XD HDMI - Single Input HDMI AV Sender System Installing your DigiSender® XD HDMI Step 4 - Install the Receiver The DigiSender® Receiver will pick up the signals being sent by your DigiSender® Transmitter and output them to a connected TV, located in another room in your home. 1. 2. Use one of the included HDMI cables and connect it to the socket labelled ‘HDMI OUT’ on the back of the DigiSender® Receiver and the HDMI input on your receiving TV.
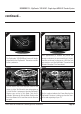
DGXDSDV112 - DigiSender® XD HDMI - Single Input HDMI AV Sender System Installing your DigiSender® XD HDMI Step 5 - Test your Setup Using the Test Mode Your DigiSender® XD HDMI is set to Test Mode by default and will aid you in getting the best possible picture and help identify any problems that may arise during installation. 1. 2. Switch on the source equipment (Satellite, Freeview, DVD, VCR, etc.). Turn on the DigiSender® Transmitter by pushing the Power button on the front of the unit.
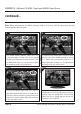
DGXDSDV112 - DigiSender® XD HDMI - Single Input HDMI AV Sender System continued... 5. 6. The DigiSender® XD HDMI Boot Screen will be displayed whilst the DigiSender® Transmitter and Receiver synchronise. After approximately 5 seconds the picture will change to whatever you are transmitting. If the picture does not change, or changes to a Test Card, you may need to re-sync the DigiSender® Transmitter and Receiver. See page 12 for more details. 7. 8.
DGXDSDV112 - DigiSender® XD HDMI - Single Input HDMI AV Sender System continued... Note: When switching from Test Mode to Normal mode, or vice versa, it will be necessary to turn the unit off and then back on again. 9. 10. The second number indicates Frame Loss. This is the percentage of Frames that are not getting through to the DigiSender® Receiver correctly. If you are getting high Frame Loss you may need to adjust the positioning of the units and/or aerials.
DGXDSDV112 - DigiSender® XD HDMI - Single Input HDMI AV Sender System Using your DigiSender® XD HDMI Standard Operation 1. 2. Switch on the source equipment (Satellite, Freeview, DVD, VCR, etc.). Turn on the DigiSender® Transmitter by pushing the Power button on the front of the unit. The Power Indicator will change from Red to Green to indicate that the unit is switched on. 3. 4. Turn on the DigiSender® Receiver by pushing the Power button on the front of the unit.
DGXDSDV112 - DigiSender® XD HDMI - Single Input HDMI AV Sender System Using your DigiSender® XD HDMI Re-syncing the Transmitter and Receiver Should you need to re-sync the DigiSender® Transmitter and Receiver at any point, this can be achieved by following the instructions below. 1. 2. Turn on both the DigiSender® Transmitter and Receiver. Press and hold the ‘Pair’ button on the back of the DigiSender® Transmitter and Receiver, simultaneously, for 5 seconds and then release.
DGXDSDV112 - DigiSender® XD HDMI - Single Input HDMI AV Sender System Troubleshooting Frequently Asked Questions Q. I can only watch the same channel as the lounge, is that right? A. That is correct. This is because your Satellite receiver, Cable box or Freeview box is only able to output one channel at a time. Q. The Remote Relay is intermittent or not working, how can i fix it? A. Most of the time this is due to one of two things: 1.
DGXDSDV112 - DigiSender® XD HDMI - Single Input HDMI AV Sender System Troubleshooting Technical Support AEI Security & Communications Ltd is dedicated to providing our customers with first class customer care and technical support. 1. Website Free technical advice is available online 24/7 at our dedicated support web site: www.aei.eu 2. Online Videos Watch online Installation and Troubleshooting Video Guides at: www.aei.eu/video 3. Email Email our technical department directly at: support@aei.eu 4.
D E CLA R AT IO N O F CO N F O R M IT Y 01022007/01/DG-DV-DX We, AEI Security & Communications Ltd. Weslake Industrial Park, Harbour Road, Rye, East Sussex, TN31 7TE, United Kingdom declare under our sole responsibility that the products bearing the series code prefixed: DGx, DVx, DXx (x refers to the specific model number) are in conformity with the essential requirements of Directive 1995/5/EC.
SPECIFICATIONS Transmitter Connections Receiver Outputs HDMI version HDCP Operating Frequency Remote Control Compatiblity Audio Input Level Audio Bandwidth Range Power Dimensions Weight 1x HDMI Input, 1x HDMI Output 1x HDMI 1.3 Compliant 2.4GHz Digital RC5, RC6 1.0v PP (Mod 1KHz, Dev 15KHz) 20Hz - 22KHz (-3dB) 150m (clear line of sight) 5V DC, 1.0A L: 90mm, W: 140mm, H: 25mm 0.23kg CW140812-3 © 2012 AEI Security & Communications Ltd. All rights reserved.