30510-3 MODEL: CTVM300LCDDM DIGITAL WIRELESS CAMERA MONITORING SYSTEM WITH LCD MONITOR & DOCKING STATION PERFECT FOR BABY MONITORING & SECURITY APPLICATIONS
CTVM300LCDDM - DIGITAL WIRELESS CAMERA MONITORING SYSTEM Contents Introduction 03 Kit Contents & Features 04 Preparing the Camera 05 Preparing the LCD Monitor 06 Syncing the Camera and LCD Monitor 07 Using the Digital Wireless Camera Monitoring System Menu Settings Adjusting the Menu Settings Using the LCD Monitor Docking Station 08 08 08 09 Adding extra Cameras 10 Troubleshooting Frequently Asked Questions Tech
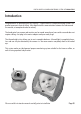
DIGITAL WIRELESS CAMERA MONITORING SYSTEM - CTVM300LCDDM Introduction Congratulations on purchasing the AEI Security™ Digital Wireless Camera Monitoring System. This product represents state of the art, fully digital wireless communication between the camera and the monitor, at exceptional value for money. The handy wire free camera and monitor can be moved around your home with ease and does not require cabling.
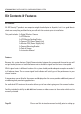
CTVM300LCDDM - DIGITAL WIRELESS CAMERA MONITORING SYSTEM Kit Contents & Features Kit Contents All AEI Security™ products are computer weight checked prior to dispatch, but it is a good idea to check over everything and familiarise yourself with the contents prior to installation.
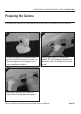
DIGITAL WIRELESS CAMERA MONITORING SYSTEM - CTVM300LCDDM Preparing the Camera The Camera will transmit the sound and picture through walls and ceilings to the LCD Monitor. 1. 2. Position the camera in the desired location. If you wish to attach the camera to a wall, use the mounting bracket and supplied screws after completing installation. Connect the Camera PSU to the socket labelled ‘DC 5V IN’ and plug it into an available mains socket. The Power LED will light up red. 3.
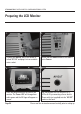
CTVM300LCDDM - DIGITAL WIRELESS CAMERA MONITORING SYSTEM Preparing the LCD Monitor 1. 2. Connect the Monitor PSU to the socket labelled ‘DC 12V’ and plug it into an available mains socket. Ensure that the Mode Switch on the back is set to Camera. 3. 4. Press the power button on the front of the monitor. The ‘Power LED’ will change from red to green and the AEI logo will appear on screen. You can connect the LCD monitor to a TV, VCR or Hi-Fi by connecting a 3.
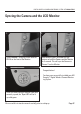
DIGITAL WIRELESS CAMERA MONITORING SYSTEM - CTVM300LCDDM Syncing the Camera and the LCD Monitor 1. 2. Select Channel 1 using the button labelled CH1-4 on the front of the Monitor. Simultaneously press and hold the sync buttons on both the Camera and the Monitor for 3 seconds. This will sync the Camera to Channel 1 on the Monitor. 3. Congratulations! You have now successfully installed your AEI Security™ Digital Wireless Camera Monitoring System.
CTVM300LCDDM - DIGITAL WIRELESS CAMERA MONITORING SYSTEM Using the Digital Wireless Camera Monitoring System Menu Settings Picture Brightness Contrast Colour Audio Volume Function - This will allow you to display the screen normally or upside down. Normal Down S-ROLOC - This allows you to change the Video Colour mode. For best results, leave it set to AUTO. AUTO SECAM PAL NTSC Preset Sleep - Allows you specify a period of time after which the monitor will switch off. Time - Sets the current time.
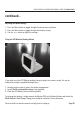
DIGITAL WIRELESS CAMERA MONITORING SYSTEM - CTVM300LCDDM continued... Adjusting the Menu Settings 1 - Press the Menu button to toggle through the various menu selections. 2 - Press the Select button to toggle through and select a setting. 3 - Use the - or + button to adjust the settings. Using the LCD Monitor Docking Station If you wish to use the LCD Monitor without having to plug it into a mains socket, this can be achieved by using the supplied Docking Station.
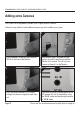
CTVM300LCDDM - DIGITAL WIRELESS CAMERA MONITORING SYSTEM Adding extra Cameras This system can be expanded to include up to 4 Digital Wireless Cameras. Follow the steps below for each additional camera you wish to add to your system. 1. 2. Select Channel 2 using the button labelled CH1-4 on the front of the Monitor. Simultaneously press and hold the sync buttons on both the new Camera and the Monitor for 3 seconds. This will sync the Camera to Channel 2 on the Monitor. 3. 4.
DIGITAL WIRELESS CAMERA MONITORING SYSTEM - CTVM300LCDDM Troubleshooting Frequently Asked Questions There is no power on the Camera or Monitor • Make sure that the correct power supply is connected, they are clearly labelled. • Ensure that the Camera and the Monitor are turned on. Check the ‘Power LED’. There is no sound or picture • Take a look at the ‘Sync LED’. If it is flashing, this shows that the Camera and the Monitor have not been correctly synced or they are out of range.
SPECIFICATIONS Camera: Frequency Channels Antenna Max. Range Sensitivity Optical Size Effective Resolution White Balance Night Vision Range Mic. Range Power 2.4GHz Digital 4 Directional 300ft (clear line of sight) 10dBm CE 1/4” 640 x 480 Auto 1 - 2 Metres 2 - 3 Metres DC 5V LCD Monitor : Frequency Channels Antenna Max. Range LCD Size Effective Resolution Max. Sound Output Power 2.