Dear customer, 98 547 01 Thank you for buying an AEG microwave oven. Before using your AEG microwave with grill for the first time, please read the instruction book thoroughly. This will enable you to take advantage of all the features that the appliance offers. It will also ensure trouble-free operation and prevent unnecessary service calls. A Important information concerning your safety or the operation of your appliance is noted by this symbol and for mentions such as "Warning®, “Take care”.
Contents Important information Ecologically responsible disposal of packaging and old appliances Safety Instructions General For trouble free and safe operation Microwaves . Gil} General operating instructions Suitable ovenware . What else to note.. installing and Connecting Electrical Connection ...t Product Description The appliance Control panel Accessories . .. Special accessories . Before using the appliance Cleaning Installing the accessories Setting the clock .. “At a glance” operating instructions .
Contents Cooking charts and Tips Microwave tables Practical tips for use . Tips on microwaving . Test procedures Cooking chart for grilling only . Cooking chart for grilling and microwaving . Tips on roasting and grilling Housecleaning Whatsoever, ..o AEG Service and Spare Parts ...
Important information & BB Ecologically responsible disposal of packaging materials and old appliances Packaging materials AEG microwave ovens require effective packaging to protect them during transportation, Only the minimum packaging necessary is used. Packaging materials {e.q. foil or Styrofoam) can place children at risk. Danger of suffocation. Keep packaging material away from children. All packaging materials used are environment friendly and recyclable.
Safety instructions A General «The appliance should only be operated with the turntable and tum table support inserted, #0 Only suitable microwave ovenware should be used. «Ta protect the appliance against corrosion from moisture {condensation) in the cavity or on the door, wipe these areas dry after each use. «Do not leave the appliance unattended when warming or cooking food in disposable containers made of plastic, paper, or other flammable materials.
Microwaves & » Whenever heating liquid, please also place a teaspoon in the container to avoid delayed boiling. During delayed boiling, the boiling temperature is attained without the typical steam bubbles rising.
Safety instructions « Baby food in jars or bottles should always be heated without a lid or top, and well stirred or shaken after heating, to ensure uniform distribution of the heat. Always check the temperature before feeding to your child, » The hot food in a microwave oven will heat up the ovenware. Always use oven gloves for handling hot dishes. « Never cook your food for too long or at too high a power setting. Some areas of the food can dry out or even ignite.
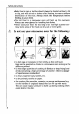
Grill » The viewing window heats up during all functions, so keep small children away from the appliance. + To close the door when the viewing window is hot, press the lower right hand side of the door, » The cooking area, the grill heating elements, the shelf racks, the turntable and the anti-splash glass plate become very hot during all functions, You should therefore take care before touching anything.
1 General operating instructions Suitable ovenware X suitable ~ unsuitable '} excluding silver, gold, platinum or metal decoration 2 does not include glaze containing metal 3) please respect the maximum temperature stated by the manufacturer 4 do not use the grill shelf together with metal recipients.
[ What else to note... « Food comes in all shapes, sizes and textures. The quantities also vary. For these reasons the time and amount of energy needed to defrost, heat or cook will lase vary. As a general rule : Double the quantity = nearly double the time Please refer to the cooking charts, To be on the safe side, always select the shorter cooking time. Then extend the time as necessary. » Microwaves work by making the food heat itself up.
i2 installing and Connecting Electrical Connection Any electrical work required to install this appliance should be carried out by a qualified electrician or competent person. WARNING THIS APPLIANCE MUST BE EARTHED, The manufacturer declines any liability should these safety measures not be observed. Before switching on, make sure the electricity supply voltage is the same as that indicated on the appliance rating plate. The rating plate is located at the back of the appliance.
The wire colored green and yellow must be connected to the terminal marked with the letter "E” or by the earth symbol matzo colored green and yellow. The wire colored blue must be connected to the terminal marked “L* or colored brown. Upon competition there must be no cut, or stray strand of wire present and the cord clamp must be secure over the outer sheath, WARNING: A cut off plug inserted into 2 13 amp socket is 2 serious safety {shock] hazard. Ensure that the cut off plug is disposed of safely.
Product description 14 Product Description The appliance A Control panel B Turntable € Door seal D Door lathe and cater E Viewing window F Interior lighting G Grill heating element H Removable shelf rack
The control panel Y —F A Display for time of day, cooking time, function mode, power etc. B Multi-function button @ser to display the selected microwave power, defrosting and cooking times, ete, C Power knob with signal light to select microwave power, D Rotary knob to select the cooking time @ or the weight 1@r when using automatic programmed. E Button for automatic programmed ¥ Or for defrosting,cooking and combings. F CLEAR bitten © to cancel settings or interrupt a programmer underway.
Product description 16 Accessories The turntable and turntable support shouts be installed as shown in the diagram. Take care to ensure the turntable support is properly in place. The turntable may turn clockwise or counterclockwise during operation. Do not try to rotate the roller ring manually, as you could damage the drive system. Grill-shelf For grilling of eg. meat and poultry; for gratin or toasting. Oven-proof glass dish This oven-proof glass dish is for general use.
Special accessories May be ordered either through your retailer or AEG Service Center. Anti-splash glass plate This is situated above the grill heating element and protects the oven ceiling from cooking fat and grease. Take care when installing to ensure the rough side faces upwards and the smooth side downwards, Before using the appliance Cleaning Wipe the front of the appliance with a damp cloth. Do not use abrasive cleaning agents {these can damage the surface).
Before using the appliance ¥ Setting the clock Example: 12:15 hrs 1. Plug the appliance into the mains. The display starts to flash "00:00" and then “AEG™. The dots between the digits blink rapidly. 2. Press the multi-function button @ser beneath the display (top deft side). The dots between the digits blink faster. 3. While keeping the multi-function button @ser pressed, set the time of day with the rotary knob Release the button as soon as the time of day is displayed.
"At a glance” operating instructions () 4 1% the oven is not started within 4 minutes, the settings are automatically antecedence ; time of day reappears in the display.
the new selection reaches® (000 ~ in the display, the cooking time is over and an audible signal sounds three times. The appliance and the interior lighting switch off.
Modes of operation The appliance features the following functions : Microwave only In this mode, microwaves generate heat directly in the food. This mode is highly suitable for warming, for example, ready cooked food and drinks, the defrosting of meat or vegetables, and for cooking food (ike fish and vegetables. Grilling Heat is generated by a grilling element set in the ceiling of the oven. This is particularly suitable for toasting and grilling e.g. steaks and sausages.
Modes of operation 22 Microwaves only Setting Example: 1 minute 15 seconds on microwave output level 850 Watt 1. Set the required microwave power by turning the power knob. The signal lamp fights up. The time of day disappears from the display and the required microwave power appears: turn to the left = lower power turn to the right= higher power 8 50 display. 2. Set the require by turning the The chosen time appears in the ride cooking time Rotary knob @. Ol 15 selected down. time 3.
(Il Notes on microwave power levels The following list shows you the power settings and what they can be used for during microwave operation : Fistfight and-heath Mealymouthed
Modes of operation Automatic Programmed Programmers for defrosting, cooking and combination caking are available, After having selected the programmer, merely enter the weight of the dish, the rest of the programming is done automatically. The following gives you an overview of which food can be defrosted, cooked or combination cooked with which programmer. Automatic defrost "} Cover legs and wings with slumming foot before defrosting.
Automatic cooking programmed i i i . Cook covered, in a heat-resistant glass dish, whenever possible. A triple bell rings halfway through cook time. If caking over 500 g of vegetables, stir once or twice, Please add water in the following amounts 1 for fresh vegetables 100 500 tablespoons / 500 1000 tablespoons. for frozen vegetables : 100 500 tablespoons / 500 1000 tablespoons.
Modes of operation Combination rooking (cooking and rifling} oy working with a weight from 1200 2000 g, you should use a deep heat-resistant dish, set it directly on the turntable, do not cover. Put chicken pieces (200 -1199 g) directly on the shelf (level 3). 2 e pork roast is cooked in a deep heat-resistant dish, set directly on the turntable, Do not cover. The automatic cook times are for refrigerated dishes {+ 5 °C}.
How to use automatic programmed Example : defrosting 1 kg chicken 1. Press the button for automatic programmed ¥ O until the desired programmer appears in the display. dl 2. Use the Rotary knob to set the weight 1 . 1000 3. Press the START button @, The display shows the necessary time. 24:45 4. If you want to modify the settings, you have to press the Clear-button © and start again. Midway through the programmer, three short veils will be heard. Stir or turn the food item at this time.
Sades of operation 28 QUICK-Start g How to set The Quick-Start button ¢ provides full microwave power for from 30 seconds up to 2 minutes and 30 seconds, by 30 second-intervals. Each time you push the Quick-START button <, the programmer time is increased by 30 seconds. Example : heating a cup of water (1 min. 30 sec) 1. Press the START-button three times. The time appears in the display and the programmer begins. The microwave power signet lamp fights up. 01:30 2.
Grilling B How to set Example: 20 minutes with &9 1. Turn the power knob <2 until reaching 0" The time of day disappears. 0 2. Set the required gritting time by using the Rotary knob @. 20:00 3. Press the button for the grill function. The signal light for grill comes on. The highest grill power level GP3 appears in the display, Each time you press the button, a lower grill power level is reached. 1} GP3 4, Press the START-button . The per-set time will start to count down.
Modes of operation 30 Combined Microwave and Grill 6 How to set Example; 20 minutes with 850 Watt microwave power and grill power level P2 1. Set the required microwave power output using the Power knob« . The time of day disappears and the required microwave power appears in the display (in watts). The microwave power signal lamp lights up. g50 2. Set the required time using the Rotary knob @. 20:00 3. Press button [ for Grill function twice. The grill power level PR appears in the display.
Minute timer with alarm The minute timer with alarm can also be used as a general purpose reminder. For example, you could use it to set the time it takes to boil the egg that you are cooking on the hob. The timer works without switching on the appliance, as Jon as no other functions have been selected. Hew to set: electable microwave power s using the Power knob <3 (all the way to the left) and make sure the grill is off, 2.Set the required time with the Rotary knob @.
1 Cook all vegetables in a covered container. Cooking fish Standee . Weight: ik 35 food being cooked.
Cooking charts and tips 36 a Practical tips for use General s After switching off your appliance, let food stand inside for a few minutes to allow even heat distribution (standing time). s Remove any aluminum foil or metal containing packaging before preparing the food. »Metal objects must be placed at least 2 em away from the cooking space walls and door. Otherwise arcing can occur, resulting in damage to the appliance. Cooking ~Whenever possible cook in covered containers.
Tips on microwaving You can't find cooking details for specific quantity of food. The food is too dry. The food is not yet defrosted, heated through or cooked on completion of programmer time. The food is overclocked on the outside and under cooked in the middle on completion of cooking time. Base programming on a similar type of food.
Cooking charts and tips Test procedures {Microwave output power 850 Watt] The quality and operation of microwave ovens are established by recognized test institutes by testing specific dishes. 1 Place directly on turntable unless otherwise instructed. The turntable has to be switched on. 2 Place toast on wire shelf (level 3) 31 Place fillet steaks on wire shelf (eve! 3).
Cooking charts and tips Cooking chart for grilling and microwaving 40 [ the grill temperatures and times given are for guidance Monty, as they depend on the type and quality of the meat. Grilling is ideal for Aat pieces of meat and fish, Unless otherwise stated, the settings given in the table are for use in 2 cold oven. Flat foods should be turned only once, Larger, rounder pieces should be turned more often, Tips on roasting and grilling The gratin is too dark in color. Check the wire sheaf level.
{i] Cleaning and care The Appliance Exterior Wipe the front of the appliance using a soft cloth and a mild, warm detergent solution. Do not use abrasive cleaning substances, strong detergents or coarse abrasive cleaning materials. Cooking area The interior will remain in good condition for a long time so long as you don't use scouring pads or rough abrasive materials. Use mild dish washing liquid to clean the interior. It is essential to clean the microwave oven after each use of the grill function.
What to do if... = .the microwave appliance is not working properly 2 Check that ~the fuses in the fuse cupboard are working, ~there has not been a power cut. -If the fuses continue to blow, please contact a qualified electrician. ..the microwave function is not working ? Check ~the door is properly closed, ~the door seals and their surfaces are clean, ~the START-button > has been pressed.
AEG Service and Spare Parts If after carrying out the necessary checks listed in the chapter "What 1o do there is still a fault with your appliance please contact your local AEG Service Force Center. In guarantee customer should ensure that the suggested checks have been made as the engineer will make a charge if the fault is not 2 ¢ . Help us to help you When contacting AEG Service Force, please determine your type of inquiry, When you contact us we need to know: 1.Your name, address and pesto code. 2.
Customer care For general inquiries regarding your AEG appliance, or further information on AEG products please contact our Customer Care department. Guarantee Conditions AEG offer the following guarantee to the first purchaser of this appliance: 1.The guarantee is valid for 12 months commencing when the appliance is handed over to the first retail purchaser, which must be verified by purchase invoice or similar documentation. The guarantee does not cover commercial use. 2.
European Guarantee If you should move to another country within Europe then your guarantee moves with you to your new home subject to the following qualifications: « The guarantee starts from the date you first purchased your product. * The guarantee is for the same period and to the same extent for labor and parts as exist in the new country of use for this brand or range of products, » This guarantee relates to you and cannot be transferred to another user.
AEG Exaggerate AG Posthaste 1036 D-80327 Kornberg 1 © Copyright by AEG H271 271 800 1084/03 150 AEG Domestic Appliances Lid Customer Care Department 55-77 High Street Slough Berkshire SL1 1DZ Telephone: 08705 350350