
User manual


INSTALLATION
23
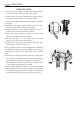
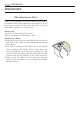
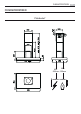
FLUE ASSEMBLY - MOUNTING THE HOOD BODY
• Position the upper chimney section and fix the
upper part to the frame using the 2 screws 12c
(2,9 x 6,5) provided.
• Similarly,positionthelowerchimneysectionand
fix the lower part to the frame using the 2 screws
12c (2,9 x 6,5) provided.
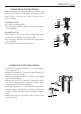
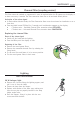
Before fixing the hood body to the frame:
• Screwthe2screws12f half way into the holes
provided in the sides of the bottom of the frame.
• Removethegreasefiltersfromthehoodcanopy.
• Removeanyactivatedcharcoalfilters.
• Liftthehoodcanopyandengagethescrews12f
in the slots (A) as far as they will go.
• Workingfrombelow,fixthehoodcanopytothe
frame (B), using the 4 screws 12q and 4 washers
22 provided, then tighten all the screws securely.
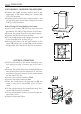
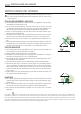
ELECTRICAL CONNECTION
• Connect the hood to the mainsthrougha two-
pole switch ha-ving a contact gap of at least 3
mm.
• Removethegreasefilters(seeparagraphMainte-
nance) being sure that the connector of the feed-
ing cable is correctly inserted in the socket placed
on the side of the fan.
• ConnectthecontrolconnectorCmd.
• ConnectthelightsconnectorLux.
• Placetheconnectorsinthejunctionbox24 and
close it using the 2 screws 12e (2,9 x 9,5) pro-
vided.
• Fixthejunctionboxtothehoodbodyusingthe2
screws 12c (2,9 x 6,5) provided.
• Fortherecirculationversion,fittheactivatedcar-
bon odour fil-ter.
• Replacethegreasefilters.