
Operation Manual

36
ENGLISH
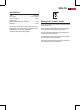
Not shown
“RELEASE” button below the water tank. Releasing device of
the water tank
Instructions
Unpacking
• Remove any protective foils and stickers from the soleplate.
• Please unwind the lead completely.
Electrical connection
• Make sure that the iron voltage (see name plate) and the
line voltage match.
•
Caution: Overload!
► If you use extension leads, these should have a cable
cross-section of at least 1.5 mm².
► Do not use any multiple sockets, as this device is too
powerful.
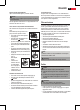
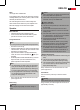
Handle Function (9)
The handle connected to the base serves to
- carry the device when disconnected from mains power
supply and
- switch the device on and off when connected to mains
power supply. Moving the handle down will switch the
device on, while moving the handle up will switch the
device off.
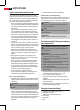
• Move the handle up until it locks
into place to carry the device
(Fig. D). A “click” sound indicates
that the handle is locked. You
can carry the device at the
handle.
• Simultaneously press both
“UNLOCK” buttons (7) to unlock
the handle and move it down
(Fig. E).
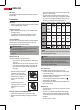
Electronic Temperature SETTING Button (2)
• Observe the ironing instructions on the clothes label.
• Select the temperature setting according to the following
table.
Fig. D
Fig. E
• Turn woolen clothes inside out to avoid shiny spots on the
fabric due to steam ironing.
• The instructions in the table only refer to fabrics with no
additional surface treatment (gloss, impregnation, wrinkles,
etc.). Select a low temperature setting for fabrics with ad-
ditional surface treatment and iron them inside out.
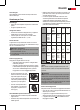
Display 1. NYLON 2. POLY-
ESTER
3. RAYON
4. COTTON
5. LINEN
Fabric Synthetics
Silk
Nylon
Acrylics
Acetate
Wool
Polyester
Synthetics
Wool
Polyester
Cotton
Wool
Cotton
Linen
Tempera-
ture
Lowest Low Medium High Highest
Symbol
on
clothes
label
to
Ironing
instruc-
tion
Iron
without
steam
Iron with-
out steam
inside out
Iron with
steam
inside out
Iron with
steam
inside out
Iron with
steam
Steam
selection
Note:
The iron heats up faster than it cools down. Start ironing with
the lowest temperature setting.
Caution:
When changing from a higher to a lower temperature the blue
indicator starts ashing fast. This means that the temperature
is too high for the setting. Do not singe your laundry!
Only continue ironing after the blue indicator stops ashing
and an acoustic signal is emitted.
Auto Off Function
The appliance features an automatic cut-off function.
• The steam ironing unit automatically turns off when idling
for approx. 60 minutes.
• The device switches off automatically after using the same
temperature setting for 60 minutes.
• 5 acoustic signals sound and the red POWER icon
starts ashing on the display.
• Reset the desired temperature with the “SETTING” button
(2) to continue ironing.
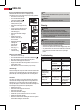
Water tank (8)
• The water tank has a recessed grip on the bottom so that it
can be removed.
• The lock of the water tank is also the lime lter cartridge.
Take out the lime lter cartridge to ll with water. Proceed
as described under “How can I replenish the water during
operation?”
• The tank volume is 1.7 litres.
. With this
The mains plug should only be inserted into a correctly
installed 230 V ~ 50 Hz socket with earthing contact.
Connected Wattage
The station has a total maximum wattage of 2200W
connected load a separate supply line protected by a 16A
household circuit breaker is recommended.