
Installation manual


ACM Series Dehumidifying Dryers Page 53
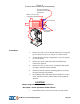
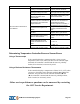
Figure 12
Process Heater Location and Disassembly
Procedures
1. Remove the four (4) 10-32 button head screws securing the
process heater access cover using a 1/8” Allen wrench.
2. Sketch the heater wiring configuration so you can properly
re-wire the heater.
3. Remove the wires to the heater plate assembly being
removed or replaced.
4. Remove the two (2) 4-40 screws securing the heater plate
assembly, and slide out the assembly.
5. Remove the heater from the mounting plate by removing
the large brass nuts and washers.
6. Re-install the heater and heater plate assemblies in reverse
order. Install new heater gaskets and securely tighten all
fasteners.
CAUTION!
Heater loops should not touch each other.
“Hot spots” lead to premature heater failure!
7. Reinstall the wires based on the sketch you made earlier.
Undo (6) 10-32 Button
Head Screws using 1/8
A
llen Wrench
1" Wide x 1/8" Thick High
Temperature Gasket
(2) 4-40 screws
Hi Temperature
Snap Switch