VME 9309TS
Danke, dass Sie sich für ein Produkt von Audiovox entschieden haben. Wir hoffen, Ihnen die Funktion des Geräts mit den in dieser Bedienungsanleitung beschriebenen Anweisungen einfach und verständlich erklären zu können. Bitte nehmen Sie sich einige Minuten Zeit um sich mit der Bedienungsanleitung zubefassen. Dies erleichtert Ihnen dann später die Bedienung des Gerätes.
VORBEREITUNG Wir gratulieren Ihnen zu dem Kauf des mobilen Audiovox VME 9309TS-Multimedia-Receivers. Sie sollten diese Anleitung vollständig lesen, bevor Sie mit der Montage des Geräts beginnen. Wir empfehlen, die Montage des Audiovox VME 9309TS-Receivers von einem zuverlässigen Fachhändler vornehmen zu lassen.
Werkzeuge und Material Zur Montage des VME 9309TS-Receivers benötigen Sie die folgenden Werkzeuge und Materialien: • Torx-, Schlitz- und Kreuz-Schraubendreher • Seitenschneider und Abisolierzange • Werkzeug zum Herausnehmen des eingebauten Radios (Schraubendreher, Steckschlüsselsatz oder andere Werkzeuge) • Isolierband • Crimpzange • Spannungsmesser/Stromprüfer • Crimpverbindungen • 18-adriges Anschlusskabel • 16- bis 18-adriges Lautsprecherkabel Unterbrechen der Stromversorgung durch die Batterie Schalten
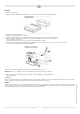
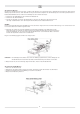
MONTAGE 1. Vorbereiten der Montage Drücken Sie auf die Metallklammern auf beiden Seiten, und nehmen Sie das Radio aus dem Einbaugehäuse. 2. Montieren Sie das Einbaugehäuse. a. Montieren Sie gegebenenfalls einen Adapter. b. Montieren Sie das Einbaugehäuse in den Adapter oder das Armaturenbrett. Verwenden Sie dazu nur die mitgelieferten Schrauben. Drücken Sie das Gehäuse nicht gewaltsam in die Öffnung, und achten Sie darauf, dass es sich nicht verbiegt oder verformt. c.
Abschließen der Montage Nachdem Sie alle Kabel angeschlossen haben, schalten Sie das Gerät ein, um sicherzustellen, dass es betriebsbereit ist. Beachten Sie dabei, dass die Zündung eingeschaltet sein muss. Kann das Gerät nicht eingeschaltet werden, überprüfen Sie die Verkabelung, bis Sie den Fehler gefunden haben. Sobald das Gerät betriebsbereit ist, schalten Sie die Zündung aus und montieren das Chassis. 1. Schließen Sie den Kabeladapter an den vorhandenen Kabelbaum an. 2.
Technische Änderungen und Irrtum vorbehalten.
BEDIENELEMENTE UND ANZEIGEN Bedienung der Schalter 1. Öffnen/Schließen Drücken Sie diese Taste, um den automatischen Ausfahr-Mechanismus zu aktivieren, und stellen Sie die gewünschte Position des TFT-Monitors ein. Drücken Sie erneut auf diese Taste, um den TFT-Monitor wieder einzufahren. 2. /WIDE/NAV Bei eingefahrenem Monitor wird durch die Taste der Sendersuchlauf Richtung niedrigerer Frequenzen gestartet.
Technische Änderungen und Irrtum vorbehalten.
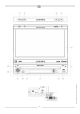
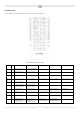
FERNBEDIENUNG Die Fernbedienung des VME 9309TS-Receivers dient zum steuern des Grundgerätes. Tabelle 1: Funktionen auf der Fernbedienung Name Ref.nr. DVD VCD TUNER CD/MP3 USB MENU 1 Hauptmenü der Disk öffnen Während des VCD-Betriebs die PBC-Wiedergabesteuerung ein/ausschalten TITLE 2 Titelmenü der Disk öffnen Die ersten 10 Sekunden jedes Kapitels/Titels anspielen MUTE 3 Audioausgabe ein- bzw. ausschalten Audioausgabe ein- bzw. ausschalten Audioausgabe ein- bzw.
Ref.nr.
VERWENDEN DES TFT-MONITORS Aus- und Einfahren des TFT-Monitors Ausfahren des TFT-Monitors Drücken Sie auf der Gerätevorderseite auf die Taste OPEN (1) oder auf der Fernbedienung auf die Taste des Monitors in die Wiedergabeposition zu aktivieren. Einfahren des TFT-Monitors Drücken Sie auf der Gerätevorderseite auf die Taste OPEN (1) oder auf der Fernbedienung auf die Taste des Monitors in das Gehäuse zu aktivieren.
Handbremsensperre • Wenn das PRK SW-Kabel an den Bremsschalter angeschlossen ist, kann auf dem TFT-Monitor nur dann ein Video anzeigt werden, wenn die Handbremse gezogen wurde. • Diese Funktion wird allerdings deaktiviert, wenn die Videoquelle in den Modus CAMERA geschaltet wird. • Ist die Handbremsensperre aktiviert, wird auf dem vorderen Monitor die Meldung „Parking is On“ angezeigt, sodass der Fahrer während der Fahrt kein Video sehen kann.
Zurücksetzen des Systems Um eine Systemstörung zu beheben oder einen nicht zulässigen Bedienvorgang zurückzusetzen, drücken Sie die Taste RESET (10) in der unteren linken Ecke des Geräts mit der Spitze eines Kugelschreibers. Durch das Zurücksetzen des Systems werden die Werkseinstellungen des Geräts wiederhergestellt. HINWEIS: Wird das Gerät während der Wiedergabe einer DVD zurückgesetzt, wird die Wiedergabe nach dem Zurücksetzen fortgesetzt.
Technische Änderungen und Irrtum vorbehalten.
Optionen des Untermenüs LANGUAGE Wenn eine DVD mehrere Untertitel- oder Audiosprachen unterstützt, stehen alle verfügbaren Sprachen während der Wiedergabe zur Auswahl. Wird die ausgewählte Sprache nicht von der DVD unterstützt, wird die Standardsprache verwendet.
Optionen des Untermenüs RATING Das DVD-System verfügt über eine integrierte Kindersicherung, damit nicht berechtigte Personen keinen Zugriff auf Disk-Inhalte haben, die nur für bestimmte Zuschauergruppen bestimmt sind. Standardmäßig ist die Kindersicherung auf die höchste Einstellung (ohne Einschränkungen) eingestellt. Die Kindersicherung kann nur durch die Eingabe des richtigen Kennwortes aufgehoben werden. Nach Eingabe des Kennworts kann die Kindersicherung konfiguriert werden.
BEDIENUNG DES RADIOS 1. Anzeige des aktuell ausgewählten Radiobands 2. Anzeige der Radiofrequenz / des Sendernamens 3. Uhrzeit 4. Anzeige für Sendebetrieb in Stereo 5. Anzeige für starkes Signal lokal empfangbarer Sender 6. Gespeicherte Radiosender: Touchpunkt zum Aufrufen gespeicherter Sender 7. Radiotextinformationen: 8. EQ: Touchpunkt zum Aufrufen des „Equalizer“ 9. Touchpunkt zum Aufrufen des Bildschirms für die Direkteingabe 10. Anzeige des aktuell gespeicherten Senders 11.
Umstellen auf Radioquelle • • Berühren Sie die obere linke Ecke des Bildschirms (den RADIO-Kreis), um das SOURCE MENU anzuzeigen. Berühren Sie RADIO. Drücken Sie auf der Gerätevorderseite die Taste SRC (6) oder die entsprechende Taste auf der Fernbedienung (8), um auf die Quelle AM/FM (UKW/MW) oder RADIO umzuschalten.
Manuelles Speichern eines Senders 1. 2. 3. 4. Stellen Sie den gewünschten Sender (Frequenz) manuell ein. Drücken Sie die Taste MEM auf dem Bildschirm, und wählen Sie die gewünschte Festsendertaste (P1 – P6). Der Sender wird unter der gewählten Nummer gespeichert. Anstelle der Frequenz wird die ID des Programmdienstes (z. B. NDR, WDR usw.) gespeichert. Automatisches Speichern (AS) der Sender mit dem stärksten Signal 1. 2. 3. 4.
Zugreifen auf den DVD-Modus Um den DVD-Modus zu aktivieren, wenn bereits eine Disk eingelegt wurde, drücken Sie auf der Gerätevorderseite auf die Taste SRC (6) oder auf die entsprechende Taste der Fernbedienung (8), bis am unteren Rand des Monitors DISC angezeigt wird. Steuern der Wiedergabe Berühren Sie den Touchscreen, um auf die Steuerungen zuzugreifen.
Öffnen des DVD-Menüs Drücken Sie auf der Fernbedienung auf die Taste MENU (1), um das DVD-Hauptmenü aufzurufen. Verwenden Sie die Tasten >>, <<, >>|, |<< um einen Titel aus dem Menü auszuwählen, oder berühren Sie den Titel auf dem Bildschirm. Drücken Sie auf der Fernbedienung auf die Taste TITLE (2), oder berühren Sie den Titel auf dem Bildschirm, um einen anderen Titel für die Wiedergabe auszuwählen. Drücken Sie zum Bestätigen der Auswahl und zum Starten der Wiedergabe die Play-Taste.
Verwenden Sie die Taste , um Titel oder Kapitel auszuwählen oder die Zeit einzugeben. • Title (Titel): _/# • Chapter (Kapitel): _ _/## • Time (Zeit): _ _:_ _:_ _ Geben Sie den gewünschten Titel, das Kapitel/den Track oder die Zeit über den Zahlenblock auf dem Bildschirm ein, und drücken Sie ENTER. Um den Bildschirm ohne Treffen einer Auswahl zu verlassen, berühren Sie EXIT. Um Ihre Eingabe zu löschen und erneut zu beginnen, berühren Sie die Taste CLEAR.
DVD/CD AUDIO-BETRIEB Die Anweisungen für die Steuerung des TFT-Monitors und zum Einlegen/Auswerfen von Medien sind für DVDs und CDs gleich. Informationen zu diesen Themen finden Sie im Abschnitt zum DVD/Video-CD-Betrieb.
Steuern der Wiedergabe Stoppen der Wiedergabe Berühren Sie auf dem Bildschirm die Taste , oder drücken Sie auf der Fernbedienung auf die Taste (20), um die Disk-Wiedergabe zu stoppen. Um die Wiedergabe fortzusetzen, berühren Sie die Taste auf dem Bildschirm. Anhalten der Wiedergabe Berühren Sie die Taste auf dem Bildschirm, um die Disk-Wiedergabe anzuhalten oder fortzusetzen.
Kompatibilität mit dem MP3-Format Die nachfolgend aufgeführten Dateinamenformate sind mit diesem Gerät kompatibel: • ISO 9660 – Dateiname: 12 Zeichen, Dateierweiterung: 3 Zeichen • ISO 9660 – Dateiname: 31 Zeichen, Dateierweiterung: 3 Zeichen • Joliet – 64 Zeichen Entspricht der Name des Ordners oder der Datei nicht dem ISO 9660-Dateisystemstandard, ist eine korrekte Anzeige oder Wiedergabe unter Umständen nicht möglich.
MP3 und USB-Benutzeroberfläche Im Folgenden sind die Bildschirmanzeigen und die Touchpunkte für die MP3-Wiedergabe aufgeführt. 1. 2. 3. 4. 5. 6. 7. 8. 9. 10. 11. 12. 13. 14. 15. 16. 17.
FEHLERBEHEBUNG Problem Ursache Lösung Die Sicherung für das Radio ist durchgebrannt Setzen Sie eine neue Sicherung des richtigen einschalTyps und mit der richtigen Amperezahl ein Setzen Sie eine neue Sicherung des richtigen Typs und mit der richtigen Amperezahl ein Drücken Sie die Taste RESET in der unteren rechten Ecke auf der Gerätevorderseite ALLGEMEINES Das Gerät lässt sich nicht ten Die Sicherung für die Autobatterie ist durchgebrannt Unzulässiger Bedienvorgang Das Gerät spricht nicht auf die Fe
RADIO Schwache Empfangssignale bei der Sendersuche Die Autoantenne ist nicht vollständig ausgefahren Die Autoantenne ist nicht korrekt angeschlossen Die Funktion LOCAL ist aktiviert Die Disk ist verbogen oder verkratzt Überprüfen Sie den Antennenanschluss Überprüfen Sie den Antennenanschluss Es wird eine inkompatible Disk verwendet Die Altersangabe der Disk steht im Konflikt zu der über die Kindersicherung festgelegten Beschränkung Der Ländercode der Disk ist nicht mit dem Gerät kompatibel Deaktivieren
Pflege und Wartung 1. Verwenden Sie zur Reinigung der Gerätevorderseite oder des Monitors ein sauberes Tuch und ein neutrales Reinigungsmittel. Ein raues Tuch und ein nicht neutrales Reinigungsmittel (zum Beispiel Alkohol) können die Konsole oder den Monitor verkratzen oder die Farbe lösen. 2. Sprühen Sie keine flüssigen Reinigungsmittel oder Wasser auf das Gerät. 3. Wenn der Player zu heiß wird, wird automatisch ein Schutzmechanismus aktiviert, der die Wiedergabe der Disk stoppt.
VME 9309TS
Thank you for choosing a Audiovox product. We hope you will find the instructions in this owner’s manual clear and easy to follow. If you take a few minutes to look through it, you’ll learn how to use all the features of your new Audiovox VME 9309TS Mobile Multimedia Receiver for maximum enjoyment.
PREPARATION Congratulations on your purchase of the Audiovox VME 9309TS Mobile Multimedia Receiver. It’s a good idea to read all of the instructions before beginning the installation. We recommend having your Audiovox VME 9309TS installed by a reputable installation shop.
Optional Equipment • NAV101/NAV102 The VME 9309TS is "navigation ready." Before accessing any navigation features, you must purchase and install the NAV module. All installation and operating instructions will be included with the NAV navigation module. Once the NAV is connected and operating properly, the NAV source mode will become active. While the NAV is not installed, the NAV option appears gray, indicating the function is not available. • Rear Camera The VME 9309TS is "camera ready.
INSTALLATION Pre-installation 1. Press the metal levers on both sides to remove the halfsleeve from the radio. 2. Install the half-sleeve. a. Install adapter if necessary (optional). b. Install half-sleeve into adapter or dashboard (use only the supplied screws). Do not force the sleeve into the opening or cause it to bend or bow. c. Locate the series of bend-tabs along the top, bottom and sides of the mounting sleeve.
NOTE: For proper operation of the CD/DVD player, the chassis must be mounted within 20° of horizontal. Make sure the unit is mounted within this limitation. 4. Attach one end of the perforated support strap (supplied) to the screw stud on the rear of the chassis using the hex nut provided. Fasten the other end of the perforated strap to a secure part of the dashboard either above or below the radio using the screw and hex nut provided. Bend the strap to position it as necessary.
Subject to technical changes Wiring Diagram 7
CONTROLS AND INDICATORS Button Operation 1. OPEN/CLOSE Press to activate the automatic mechanical system and move the TFT monitor into viewing position. Press again to close the TFT. 2. WIDE/NAV/DISP When the monitor is retracted the station search function is started in the direction of lower frequencies by pressing button . If button is pres- sed briefly when the monitor is extended, the image switches between Full and Standby mode for the monitor.
9 Subject to technical changes
REMOTE CONTROL Subject to technical changes NOTE: Your remote control may differ slightly from the one pictured here. The above diagram is for illustrative purposes only.
11 31 32 33 34 35 30 29 11 12 13 14 15 16 17 18 19 20 21 22 23 24 25 26 27 28 10 1 2 3 4 5 6 7 8 9 Ref. No.
USING THE TFT MONITOR Open/Close TFT Monitor Open TFT Monitor Press the OPEN button (1) on the front panel or press the ( panel into the viewing position. ) button (25) on the remote control to activate the mechanism that moves the display Close TFT Monitor Press the OPEN button (1) on the front panel or press the ( ment.
Parameter Adjustment Procedure 1. Enter Picture Quality Setting Mode: Press the PIC button (24) on the remote control or the BAND/PC button (4) on the monitor. 2. Select Item to Set: Press the AUDIO button (5) on the control panel to select “BRIGHT” or “CONTRAST”. 3. Set Parameters: Press the +/– buttons (15, 16) on the remote or turn the rotary encoder (5) on the control panel. 4.
OPERATING INSTRUCTIONS Power On / Off Press the /SRC button (6) on the unit (or the / POWER button (4) on the remote control) to turn the unit on. The buttons on the front of the unit light up and the current mode status appears in the LCD (7). You can also turn on the unit by pressing the OPEN button (1) and opening the TFT screen. Press and hold the button to power off the unit.The monitor is drawn back into the main compartment.
SETUP MENU To access system settings, press the SETUP button (31) on the remote control or touch the button The “GENERAL” sub-menu appears highlighted in blue. on the screen to enter the “SETUP” menu. Accessing Menu Items Touch the sub-menu name to select a sub-menu (Language, Audio, RDS, etc.). The features available for adjustment under the highlighted sub-menu option will appear in the center of the screen. Adjusting a Feature Subject to technical changes 1.
Subject to technical changes General Sub Menu Features 16
Language Sub-menu Features If a DVD supports more than 1 Subtitle or Audio language, all the languages are available for selection during playback. If the selected language is not supported by the DVD, then the default language is used. Setting Options Function RDS On Unit will display Radio Data System information when available. Off TA/Vol On Off Clock timesupported by RDS Manual Clocktime adjustment Volumen increasement for traffic announcements.
Rating Sub-menu Features The DVD system has a built-in parental lock feature to prevent unauthorized persons from viewing restricted disc content. By default, the rating system is unlocked. Once setup, the parental lock is released only by entering the correct password. Once the password is entered, rating is available for setup. The default password is 0000. Setting Options Function Password Rating Load Factory Enter a 4-digit password to activate the “Rating” feature. 1. 2. 3. 4. 5. 6. 7. 8.
1. Current radio band indicator 2. Radio frequency indicator 3. Clock 4. Stereo broadcasting indicator 5. Strong Local signal broadcasting indicator 6. Preset radio stations: Touch to recall preset stations 7. RDS Information: PS (Program Service), PTY (Program Type), RT (Radio Text) 8. Touch for quick access to Equalizer level settings 9. Touch to access the direct entry screen 10. Current preset station indicator 11. |<<: Touch to seek backward 12. >>|: Touch to seek forward 13.
Switch to Radio Tuner source • Touch the top left corner of the screen (the RADIO circle) to view the SOURCE MENU. Touch “Radio”. • Press the SRC button (6) on the front panel or remote control (8) to switch to the AM/FM or RADIO source. Select FM/AM Band Touch the BAND button (15) on the screen, or press the BAND button on the unit (4) or remote control (20) to change between the following bands: FM1, FM2, FM3, AM1, and AM2 NOTE: The BAND button on the unit only works when the TFT is closed.
Recalling and Storing broadcaster using the presets and the Automatic Storing ( AS) Function: Recalling a Station 1. Select a band (if needed) 2. Touch an on-screen button (P1- P6) to select the corresponding stored station. Manual Storing of a Station 1. 2. 3. 4. Please manual tune to the desired broadcaster (Frequency) Push the MEM on-screen button and then select the desired preset (P1- P6) The broadcaster will be stored at the selected one Instead of the frequency the Program Service ID (i.e.
DVD/VCD VIDEO OPERATION NOTE: When properly installed, DVD video cannot be displayed on the main TFT screen unless the parking brake is applied. If you attempt to play a DVD while the vehicle is moving, the TFT screen displays “PARKING” with a blue background. Rear video screens, if applicable, will operate normally. Opening/Closing the TFT Video Screen Opening the TFT Screen To open the TFT video screen, press the OPEN button (1). The unit beeps and then opens.
Stopping Playback Touch the stop button ( ) on the screen or press the / BAND button (20) on the remote control to stop DVD play. Pausing Playback Touch the pause button (||) on the screen (or press the >/|| button on the remote control) to suspend disc playback. Press the > button on the screen to resume disc playback. Slow Motion Playback Press the << button (22) on the remote control or the << button on the screen to play the current title in slow motion.
Accessing the DVD Menu Press the MENU button (1) on the remote control to recall the main DVD menu. Press the TITLE button (2) on the remote control or on screen to select a different title for playback. Press the >/|| button (18) on the remote control to confirm your selection and begin playback. You can also select a title using the touch screen. Moving Through Chapters Press the >>| button (19) on the remote control or the >>| button on screen to advance to the next chapter on the DVD.
Touch Screen Direct Entry To select a chapter/track directly, touch the button on screen control to display the direct entry menu. • Title (Titel): _/# • Chapter (Kapitel): _ _/## • Time (Zeit): _ _:_ _:_ _ Enter the desired chapter/track using the on-screen number pad. Press the enter button (arrow) to tune to the selected station. To exit the screen without changing the station, touch Exit. To clear your entry and start over, touch Clear.
NOTE: During VCD playback, press the AUDIO button (5) on the remote control to choose between Left Channel, Right Channel, and Stereo. PBC (Play Back Control - VCD Only) For VCDs with play back functionality, play back control (PBC) provides additional controls for VCD playback. Press the MENU button (1) on the remote control to toggle the PBC function “On”/”Off”. Once PBC is on, playback starts from track one of the play list.
Subject to technical changes Regional Coding:Both the DVD-Player and discs are coded by region. These region codes must match in order for the disc to play. If the codes do not match, the disc won’t play. This unit’s code is 2. DVD’s with other region codes cannot be played in this unit.
DVD/CD AUDIO OPERATION Instructions for TFT control and Insert/Eject are the same for DVD and CD operation. Please see the DVD/Disc Video Operation section for information about these topics. The VME 9309TS will play music or other audio files from the following disc media: • CD-DA • CD-R/RW • DVD • DVD+R/RW • DVD-R/RW Upon inserting a disc with the TFT screen open, the disc and track title (if available), along with the track number and playing time appear on the screen.
Controlling Playback Stopping Playback Touch the button on screen or press the /BAND button (20) on the remote control to stop disc play. To resume playback, touch the button on screen or press the >/|| button on the remote control (18). Pausing Playback Touch the button on screen to suspend or resume disc playback. Moving Through Tracks Press the >>| button (19) on the remote control or on screen to advance to the next track on the disc.
MP3/USB/WMA-Operation Instructions for TFT control and Insert/Eject are the same for DVD and MP3 operation. Please see the DVD/Disc Video Operation section for information about these topics. MP3/WMA Media and File Requirements This player allows you to play back MP3 and WMA files recorded onto CD-R/RWs, DVD+R/RWs, and DVD-R/RWs. For CD-RW discs, please make sure it is formatted using the full method and not the quick method to prevent illegal disc operation.
MP3 User Interface The on-screen indicators and touch key areas for MP3 playback are outlined below. 1. Current track and total number of tracks on root of disc 2. Elapsed playing time, track length 3. Current time 4. Track titles 5. ID3 information 6. II : Touch to play/pause disc playback 7. DIR-: to previous directory 8. >>|: Touch to move to next track 9. |<<: Touch to move to previous track 10. / >>: Touch to navigate playlist 11. /<<: Touch to navigate playlist 12.
TROUBLESHOOTING Problem Cause Corrective Action Unit will not power on Radio Fuse blown Car battery fuse blown Illegal operation Install new fuse with correct rating Install new fuse with correct rating Press the RESET button located in the bottom right corner of the front panel Remote control does not function Battery depleted Battery installed incorrectly Replace battery with new one Remove battery and install correctly No/low audio output Improper audio output connection Volume set too low Impr
Image blurred, distorted, or dark Disc is illegally copied Use original disc PCB cannot be used during VCD playback PCB is not available on the disc No repeat or searching while playing VCD PCB is on Turn PCB off Disc is dirty or scratched File is damaged/bad recording Clean disc or replace Recreate disc with good files MP3 Interruption occurred during playback Incorrect playback message displayed Message is longer than LCD can display Message Displayed Cause Loading Disc is being read No
Care and Maintenance 1. Use only a clean silicone cloth and neutral detergent to clean the front panel or monitor. A rough cloth and nonneutral detergent (such as alcohol) may result in scratching or discoloration. 2. Do not get water or cleaning fluids on the unit. 3. If the temperature inside the player gets too hot, a protective circuit automatically stops play of the disc. If this occurs, allow the unit to cool before operating the player again. 4.
SPECIFICATIONS DVD/CD Player Compatible Disc Media: DVD + R / RW (Single and Dual Layer) and CD-R / RW Compatible Media Formats: CD-DA, MP3, WMA, VCD, SVCD, AVI, MPEG1 / 2, XviD, DivX and Kodak picture CD (JPEG).
VME 9309TS
Gracias por elegir un producto Audiovox. Esperamos que encuentre las instrucciones de este manual de usuario claras y faciles de seguir. Si se toma unos minutos para leerlo aprenderá a utilizar todas las funciones de su nuevo receptor móvil multimedia Audiovox VME 9309 TS para disfrutarlo al máximo.
PREPARACIÓN Felicidades por su reciente compra del receptor multimedia Audiovox VME 9309TS. Es una buena idea leer todas las instrucciones antes de iniciar la instalación. Le recomendamos que solicite a una empresa instaladora que instale su Audiovox VME 9309TS.
Equipamiento opcional • NAV101/NAV102 El VME 9309TS está “preparado para navegación”. Antes de acceder a cualquier función de navegación deberá adquirir e instalar el módulo NAV. Todas las instrucciones de uso se incluirán con el módulo de navegación NAV. Una vez conectado el módulo NAV y puesto en funcionamiento, se activará el modo de fuente NAV. Si no se instala NAV, la opción NAV aparecerá sombreada, indicando que la función no está disponible.
INSTALACIÓN Preinstalación 1. Pulse las palancas metálicas situadas a ambos lados para retirar la carcasa superior de la radio. 2. Instale la carcasa superior. a. Si es necesario, instale el adaptador (opcional). b. Instale la carcasa superior en el adaptador o en el salpicadero (utilice únicamente los tornillos suministrados). No fuerce la carcasa para evitar doblarla o combarla. c. Localice las pestañas ubicadas en las partes superior, inferior y laterales de la carcasa de montaje.
Instalación final Después de completar las conexiones de cableado, encienda el aparato para confirmar su funcionamiento (el motor debe estar arrancado). Si el aparato no funciona, vuelva a comprobar todo el cableado hasta corregir el problema. Una vez instalado correctamente, apague el motor y continúe con el montaje final del chasis. 1. Conecte el adaptador de cable al arnés de cableado existente. 2. Conecte el conductor de la antena. 3.
Sujeto a cambios técnicos Diagrama de cableado 7
CONTROLES E INDICADORES Funcionamiento de los botones 1. ABRIR / CERRAR Pulse este botón para activar el sistema mecánico automático y desplazar el monitor TFT a su posición de visualización. Púlselo de nuevo para cerrar la pantalla TFT. 2. /WIDE/NAV La búsqueda de canales hacia las frecuencias bajas se inicia con el monitor dentro del compartimento y pulsando el botón 2.
9 Sujeto a cambios técnicos
CONTROL REMOTO El control remoto del VME 9309TS controla las zonas delantera y trasera. NOTA: Su control remoto podría ser ligeramente diferente del que se muestra en la imagen. El diagrama anterior tiene sólo fines ilustrativos.
11 31 32 33 34 35 30 29 11 12 13 14 15 16 17 18 19 20 21 22 23 24 25 26 27 28 10 1 2 3 4 5 6 7 8 9 Ref. No.
USO DEL MONITOR TFT Abrir/Cerrar el monitor TFT Abrir el monitor TFT Pulse el botón OPEN (1) en el panel frontal, o el botón ( ) (25) en el control remoto para activar el mecanismo que desplaza el panel de pantalla hasta la posición de visualización. Cerrar el monitor TFT Pulse el botón OPEN (1) en el panel frontal, o el botón ( ) (25) en el control remoto para activar el mecanismo que desplaza el panel de pantalla hacia el compartimento.
Desactivar freno de mano • Si está conectado el cable “PRK SW” al interruptor de freno, la pantalla del monitor TFT sólo mostrará vídeo cuando el vehículo esté en marcha. • La función de freno de mano se desactivará si la fuente de vídeo es CAMERA. • Si utiliza la función de desactivación de freno de mano, el monitor frontal mostrará el mensaje “Parking Is On”, evitando que el conductor pueda ver contenidos mientras conduce. Las pantallas de vídeo traseras no se verán afectadas.
Reinicio de sistema Para corregir un error de sistema o alguna otra operación ilegal, utilice la punta de un bolígrafo para pulsar el botón de RESET (10) ubicado en la esquina inferior derecha del equipo. Después de realizar un reinicio de sistema, la unidad restaurará todos los valores predeterminados. NOTA: Si se reinicia el equipo durante la reproducción de un DVD, el DVD continuará la reproducción una vez finalizado el reinicio..
Sujeto a cambios técnicos General Sub Menu Features 15
Funciones del submenú de idioma Si un DVD es compatible con más de un idioma de subtítulos o audio puede seleccionar todos los idiomas disponibles durante la reproducción. Si el idioma seleccionado no es compatible con el DVD se utilizará el idioma predeterminado. Configuración Opciones Función OSD English German Italian El menú en pantalla aparecará en inglés. El menú en pantalla aparecará en alemán. El menú en pantalla aparecará en italiano.
Funciones del submenú de calificación El sistema DVD posee una función de bloqueo paterno integrada para evitar que personas sin autorización vean contenidos restringidos. De forma predeterminada, el sistema de calificación está configurado al nivel más alto (sin restricciones). El bloqueo paterno sólo se libera introduciendo la contraseña correcta. Una vez introducida la contraseña es posible modificar la calificación. Para reiniciar la contraseña, acceda al menú “RATING” e introduzca la contraseña actual.
USO DEL SINTONIZADOR 1. Indicador de banda de radio actual 2. Indicador de frecuencia de radio 3. Reloj 4. Indicador de emisión estéreo 5. Indicador de emisión de señal local fuerte 6. Emisoras predefinidas: toque esta opción para abrir las emisoras predefinidas 7. Información RDS: Texto de radio 8. EQ: Toque esta opción para ver el Analizador de espectro > Ecualizador 9. Toque esta opción para acceder a la pantalla de entrada directa 10. Indicador de emisora predefinida actual 11.
Cambia a la fuente de sintonizador de radio • Toque la esquina superior izquierda de la pantalla (el círculo de RADIO) para ver el menú. SOURCE. Toque en “RADIO”. • Pulse el botón SRC (6) en el panel frontal o el control remoto (8) para cambiar a la fuente de RADIO AM/FM. Seleccionar la banda FM o AM Toque el botón BAND (15) en la pantalla o el control remoto (20) para cambiar entre las bandas siguientes: FM1, FM2, FM3, AM1, y AM2.
Almacenamiento manual e una emisora. 1. Sintonice manualmente la emisora deseada (frecuencia). 2. Presione el botón MEM en pantalla y seleccione la emisora predefinida que desee (P1 - P6). 3. La emisora se almacenará en la posición seleccionada. 4. En lugar de la frecuencia, se almacenará el identificador de servicio del programa (p. ej. BBC). Almacenamiento automático (AS) de las emisoras con señal más fuerte 1. Presione el botón de almacenamiento automático (AS) en la pantalla durante 2 segundos. 2.
Acceder al modo DVD Para cambiar al modo DVD al insertar un disco, pulse el botón SRC (6) en el panel frontal o en el control remoto (8) hasta que aparezca la palabra “DISC” en la parte inferior de la pantalla. Control de reproducción Para acceder a los controles en pantalla toque la pantalla. Toque el botón 1/2 para ver una segunda página de controles. Pausar la reproducción Toque el botón de pausa (||) en la pantalla (o pulse el botón >/|| en el control remoto) para suspender la reproducción del disco.
Acceder al menú del DVD Pulse el botón MENU (1) en el control remoto para abrir el menú principal del DVD. Utilice el mando para seleccionar un título en el menú o toque el título en la pantalla. Pulse el botón TITLE (2) en el control remoto o en la pantalla para seleccionar un título diferente a reproducir. Pulse el botón ENTER (mando) para confirmar su selección e iniciar la reproducción. También puede seleccionar un título utilizando la pantalla táctil.
Utilice el botón ( ) para seleccionar el título, capítulo o tiempo • Title (Titel): _/# • Chapter (Kapitel): _ _/## • Time (Zeit): _ _:_ _:_ _ Introduzca el título, capítulo/pista o tiempo que desee utilizando el teclado numérico en pantalla y pulse el botón Enter. Para salir de la pantalla sin hacer una selección, toque en el botón Exit. Para eliminar el dato introducido y volver a empezar, toque el botón Clear.
24
USO DE AUDIO DE DVD/CD Las instrucciones para el control de la pantalla TFT y la Inserción/Expulsión son las mismas que para el uso del DVD o CD. Consulte la sección de Uso de vídeos DVD para más información sobre estos temas.
Control de reproducción Detener la reproducción Toque el botón en la pantalla o pulse el botón (20) en el control remoto para detener la reproducción del disco. Para continuar con la reproducción toque el botón en la pantalla o pulse el botón del mando. Pausar la reproducción Toque el botón 4 en la pantalla o pulse el botón del mando para suspender o continuar la reproducción.
Compatibilidad de formatos MP3 Los formatos de nombres de archivo que se muestran a continuación son compatibles con este equipo: • ISO 9660 – nombre de archivo: 12 caracteres, extensión de archivo: 3 caracteres • ISO 9660 – nombre de archivo: 31 caracteres, extensión de archivo: 3 caracteres • Joliet – 64 caracteres Si el archivo o carpeta no se adapta a la norma ISO 9660 sobre sistemas de archivos, puede que no se muestre o reproduzca correctamente.
Interfaz de usuario MP3/USB Los indicadores en pantalla y áreas táctiles del reproductor de MP3 se describen a continuación. 1. La pista actual y el número total de pistas en la raíz del disco. 2. Tiempo de reproducción transcurrido / duración de la pista. 3. Tiempo actual. 4. Títulos de las pistas. 5. Información ID3. 6. II : Toque para pausar/reproducir el disco. 7. < : Toque para detener la reproducción del disco. 8. >>|: Toque para pasar a la pista siguiente. 9.
RESOLUCIÓN DE PROBLEMAS Problema Causa Acción correctora El fusible de radio se ha fundido El fusible de la batería del vehículo se ha fundido Uso ilegal Instale un fusible nuevo del valor correcto Instale un fusible nuevo del valor correcto El control remoto no funciona La batería está gastada La batería no está bien instalada Reemplace la batería por otra nueva Extraiga la batería e instálela correctamente No hay salida de sonido o su nivel es muy bajo La conexión de salida de audio es incorrecta
TUNER Búsqueda de emisoras débiles La antena del vehículo no está completamente extendida La antena del vehículo no está conectada correctamente La función LOCAL está desactivada El disco está arañado o doblado El disco está sucio o mojado La lente láser está sucia Está utilizando un disco incompatible La calificación del disco excede el límite del bloqueo paterno El código de región del disco no es compatible con el equipo Conecte el cable de control de la antena del vehículo correctamente Conecte el cab
Cuidados y mantenimiento 1. Utilice sólo un paño de silicona y un detergente neutro para limpiar el panel frontal o el monitor. El uso de un paño duro y un detergente no neutro (como alcohol) podría provocar arañados o decoloración. 2. No derrame agua u otros líquidos sobre el equipo. 3. Si la temperatura del reproductor es demasiado alta, un circuito protector detendrá automáticamente la reproducción del disco. Si ocurre esto, deje que el equipo se enfríe antes de utilizar de nuevo el reproductor. 4.
D Wir gratulieren Ihnen! Durch Ihre kluge Wahl sind Sie Besitzer eines AUDIOVOX Mobile Video-Produktes geworden. AUDIOVOX Mobile Video-Produkte erfreuen sich aufgrund der hohen Qualität eines ausgezeichneten Rufes weltweit. Dieser hohe Qualitätsstandard ermöglicht es für AUDIOVOX Mobile Video-Produkte 2 Jahre Garantie zu gewähren. Die Produkte werden während des gesamten Fertigungsvorganges laufend kontrolliert und geprüft. Im Servicefall beachten Sie bitte folgendes: 1.
GARANTIEKARTE WARRANTY CARD Typ/ Type Serien-Nr./Serial-No.
Audiovox Audio Produkte GmbH Lise-Meitner-Str. 9 • D-50259 Pulheim • Germany Tel. ++49 (0) 2234 807-0 • Fax++49 (0) 2234 807-399 www.audiovox-germany.