
User's Manual
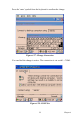
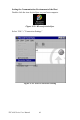
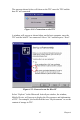
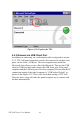
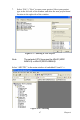
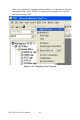
Table Of Contents
- Chapter 1 General Information
- Chapter 2 System Setup
- Chapter 3 System Tuning
- Chapter 4 Windows CE .NET 4.2
- Figure 4.1: Windows CE on TPC-60S
- 4.1 TPC Utilities
- 4.2 Networking
- 4.2.1 Network via Ethernet
- 4.2.2 Network via Serial Port
- Figure 4.24: PC Connection
- Figure 4.25: PC Connection Properties
- Figure 4.26: Change Connection
- Figure 4.27: Change Connection
- Figure 4.28: COM1 Set
- Figure 4.29: Microsoft ActiveSync
- Figure 4.30: Select Connection Setting
- Figure 4.31: Configure Connection Setting
- Figure 4.32: Get Connected
- Figure 4.33: Run Repllog.exe on the TPC
- Figure 4.34: Connection on the TPC
- Figure 4.35: Connection on the Host PC
- Figure 4.36: Explore the TPC
- 4.2.3 Network via USB Client Port
- 4.3 Application Program Development
- 4.4 Wireless LAN Utility for TPC-61S
- Appendix A Watchdog Timer Programming
- Appendix B Fuse Specifications
- Appendix C Pin Assignments

47 Chapter 4
7. Select “File”->”New” to open a new project. Select your project
type in the left side of the window and enter the new project name/
location in the right side of the window.
Figure 4.37: Starting a New Project
Select “ADVTPC” in the main window of embedded Visual C++.
Figure 4.38: Selecting
Note The selected CPU type must be Win32 (WCE
ARM V4) or Win32 (WCE ARMV4I).