
User's Manual
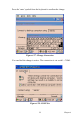
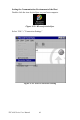
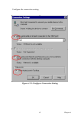
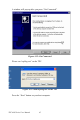
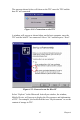
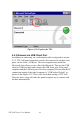
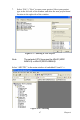
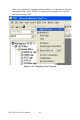
Table Of Contents
- Chapter 1 General Information
- Chapter 2 System Setup
- Chapter 3 System Tuning
- Chapter 4 Windows CE .NET 4.2
- Figure 4.1: Windows CE on TPC-60S
- 4.1 TPC Utilities
- 4.2 Networking
- 4.2.1 Network via Ethernet
- 4.2.2 Network via Serial Port
- Figure 4.24: PC Connection
- Figure 4.25: PC Connection Properties
- Figure 4.26: Change Connection
- Figure 4.27: Change Connection
- Figure 4.28: COM1 Set
- Figure 4.29: Microsoft ActiveSync
- Figure 4.30: Select Connection Setting
- Figure 4.31: Configure Connection Setting
- Figure 4.32: Get Connected
- Figure 4.33: Run Repllog.exe on the TPC
- Figure 4.34: Connection on the TPC
- Figure 4.35: Connection on the Host PC
- Figure 4.36: Explore the TPC
- 4.2.3 Network via USB Client Port
- 4.3 Application Program Development
- 4.4 Wireless LAN Utility for TPC-61S
- Appendix A Watchdog Timer Programming
- Appendix B Fuse Specifications
- Appendix C Pin Assignments
TPC-60S Series User Manual 46
4.3.2 Building Windows CE .NET Runtime
Build the Windows CE .NET runtime with the eMbedded Visual tools.
This section demonstrates step by step how to develop a custom applica-
tion.
1. Install Microsoft eMbedded Visual C++: The Microsoft eMbedded
Visual C++ tool is a desktop development environment for creating
applications and system components for Windows CE .NET-pow-
ered devices. This version features new capabilities such as C++
exception handling, Run Time Type Information (RTTI), and a
plethora of new debugger functionalities. Before you begin to
develop your application, you must install Microsoft eMbedded
Visual C++ first
2. Insert the TPC CD into the CD-ROM in the host PC.
3. Install the TPC Software Development Kit for eMbedded Visual
C++ from the support CD-ROM.
4. Install Microsoft ActiveSync from the support CD-ROM
5. Build the connection between the host and TPC via ActiveSync.
For further information about ActiveSync, please refer to section
4.2.2.
6. Execute eMbedded Visual C++.