
User's Manual
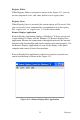
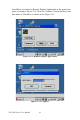
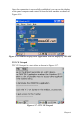
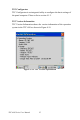
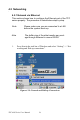
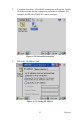
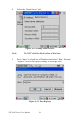
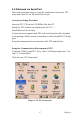
Table Of Contents
- Chapter 1 General Information
- Chapter 2 System Setup
- Chapter 3 System Tuning
- Chapter 4 Windows CE .NET 4.2
- Figure 4.1: Windows CE on TPC-60S
- 4.1 TPC Utilities
- 4.2 Networking
- 4.2.1 Network via Ethernet
- 4.2.2 Network via Serial Port
- Figure 4.24: PC Connection
- Figure 4.25: PC Connection Properties
- Figure 4.26: Change Connection
- Figure 4.27: Change Connection
- Figure 4.28: COM1 Set
- Figure 4.29: Microsoft ActiveSync
- Figure 4.30: Select Connection Setting
- Figure 4.31: Configure Connection Setting
- Figure 4.32: Get Connected
- Figure 4.33: Run Repllog.exe on the TPC
- Figure 4.34: Connection on the TPC
- Figure 4.35: Connection on the Host PC
- Figure 4.36: Explore the TPC
- 4.2.3 Network via USB Client Port
- 4.3 Application Program Development
- 4.4 Wireless LAN Utility for TPC-61S
- Appendix A Watchdog Timer Programming
- Appendix B Fuse Specifications
- Appendix C Pin Assignments

37 Chapter 4
4.2.2 Network via Serial Port
This section introduces how to setup the connection between the TPC
series and a host PC via Microsoft ActiveSync.
ActiveSync Setting Procedure
Insert the TPC CD into the CD-ROM of the host PC
Install the TPC software development kit for eVC++.
Install Microsoft ActiveSync.
Connect the host computer and TPC with a null modem cable (included
in the package). Make sure the connection is solid on both RS-232 Serial
ports.
Setup the communication environment of the TPC and the host
Setup the Communication Environment of TPC
Configure COM1 on the TPC. Press “Start” in Windows and select “Set-
ting”-> “Control Panel”
Click the icon “PC Connection”
Figure 4.24: PC Connection