
User's Manual


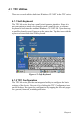
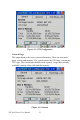

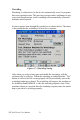
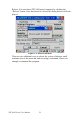
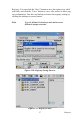
Table Of Contents
- Chapter 1 General Information
- Chapter 2 System Setup
- Chapter 3 System Tuning
- Chapter 4 Windows CE .NET 4.2
- Figure 4.1: Windows CE on TPC-60S
- 4.1 TPC Utilities
- 4.2 Networking
- 4.2.1 Network via Ethernet
- 4.2.2 Network via Serial Port
- Figure 4.24: PC Connection
- Figure 4.25: PC Connection Properties
- Figure 4.26: Change Connection
- Figure 4.27: Change Connection
- Figure 4.28: COM1 Set
- Figure 4.29: Microsoft ActiveSync
- Figure 4.30: Select Connection Setting
- Figure 4.31: Configure Connection Setting
- Figure 4.32: Get Connected
- Figure 4.33: Run Repllog.exe on the TPC
- Figure 4.34: Connection on the TPC
- Figure 4.35: Connection on the Host PC
- Figure 4.36: Explore the TPC
- 4.2.3 Network via USB Client Port
- 4.3 Application Program Development
- 4.4 Wireless LAN Utility for TPC-61S
- Appendix A Watchdog Timer Programming
- Appendix B Fuse Specifications
- Appendix C Pin Assignments

23 Chapter 4
Network
This page shows information about the active network adapter. You can
select the network adapter from the combo box as shown in Figure 4.5.
Release the current IP and retrieve the new IP through the provided but-
ton, “Renew”.
Use the “Ping” button to ping a specified IP address if you wish to test the
connection.
Figure 4.5: Network
You can get more detailed IP information through “Advanced Network”.
The information contains the default gateway, DHCP server, WINS and
DNS server address as shown in Figure 4.6 below.
Figure 4.6: Advanced Network