
User's Manual


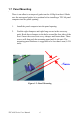
Table Of Contents
- Chapter 1 General Information
- Chapter 2 System Setup
- Chapter 3 System Tuning
- Chapter 4 Windows CE .NET 4.2
- Figure 4.1: Windows CE on TPC-60S
- 4.1 TPC Utilities
- 4.2 Networking
- 4.2.1 Network via Ethernet
- 4.2.2 Network via Serial Port
- Figure 4.24: PC Connection
- Figure 4.25: PC Connection Properties
- Figure 4.26: Change Connection
- Figure 4.27: Change Connection
- Figure 4.28: COM1 Set
- Figure 4.29: Microsoft ActiveSync
- Figure 4.30: Select Connection Setting
- Figure 4.31: Configure Connection Setting
- Figure 4.32: Get Connected
- Figure 4.33: Run Repllog.exe on the TPC
- Figure 4.34: Connection on the TPC
- Figure 4.35: Connection on the Host PC
- Figure 4.36: Explore the TPC
- 4.2.3 Network via USB Client Port
- 4.3 Application Program Development
- 4.4 Wireless LAN Utility for TPC-61S
- Appendix A Watchdog Timer Programming
- Appendix B Fuse Specifications
- Appendix C Pin Assignments

TPC-60S Series User Manual 6
1.7 Panel Mounting
There is an adhesive waterproof gasket on the Al-Mg front bezel. Make
sure the waterproof gasket is in position before installing a TPC-60 panel
computer into the panel opening.
1. Install the panel computer into the panel opening.
2. Find the eight clampers and eight long screws in the accessory
pack. Hook these clampers to the holes around the four sides of the
bezel. Insert the screws into every clamper and fasten them. These
screws will then push the mounting panel and fix the unit. The
mounting panel thickness is suggested to be less than 6 mm (0.236
inch).
Figure 1.2: Panel Mounting