
User's Manual
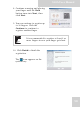
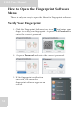
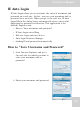
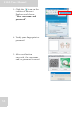
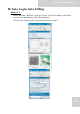
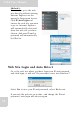

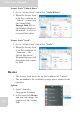
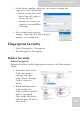
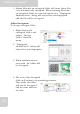
Table Of Contents
- Table of Contents
- Preface
- Safety Instructions
- Rugged and Ready to Go
- Getting Started
- Installing the Rubber Bumpers
- Removing the Rubber Bumpers
- Using the Power Switch
- Inserting a Memory Card
- Removing a Memory Card
- Installing a 3G SIM Card
- Removing 3G SIM Card (optional)
- Installing a WWAN Module (optional)
- Installing an MSR (optional)
- Installing a 1D Barcode Scanner (optional)
- Installing an RFID (optional)
- Upgrading Components
- Making Connections
- Turning On
- Wireless Connections
- Using the Modules
- Using the Fingerprint Software
- Advanced Settings
- Troubleshooting
- Appendix

S10A User Manual
57
Secure Lock “Unlock Drive”:
1. Go to “Secure Lock” and select “Unlock Drive”.
2. When the Secure Lock
is on the condition of
“Unlock”, you can see
the Virtual Disk
Encrypt Disk (P:) in
the Windows Explorer.
Meanwhile, it acts as
a virtual hard drive.
Secure Lock “Lock”:
1. Go to “Secure Lock” and select “Lock”.
2. When the Secure Lock
is on the condition of
“Unmount”, the
Virtual Disk in the
Windows Explorer will
disappear and cannot
be used.
Resize
• The Secure Lock has to be on the condition of “Unlock”.
• The maximum is the available storage space shown on the
interface.
Option
1. Open “Menu for
Fingerprint Software”.
2. Select and click Resize,
and you can change the
capacity of the Virtual
Disk.