
User's Manual
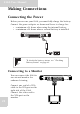
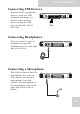
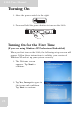
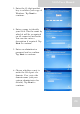
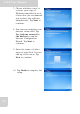
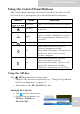
Table Of Contents
- Table of Contents
- Preface
- Safety Instructions
- Rugged and Ready to Go
- Getting Started
- Installing the Rubber Bumpers
- Removing the Rubber Bumpers
- Using the Power Switch
- Inserting a Memory Card
- Removing a Memory Card
- Installing a 3G SIM Card
- Removing 3G SIM Card (optional)
- Installing a WWAN Module (optional)
- Installing an MSR (optional)
- Installing a 1D Barcode Scanner (optional)
- Installing an RFID (optional)
- Upgrading Components
- Making Connections
- Turning On
- Wireless Connections
- Using the Modules
- Using the Fingerprint Software
- Advanced Settings
- Troubleshooting
- Appendix

S10A User Manual
21
Making Connections
Connecting the Power
Before you can use your S10A, you must fully charge the battery.
Connect the power adapter as shown and leave to charge for:
• a minimum of 4 hours when using the internal battery
• a minimum of 8 hours when a second battery is installed
Connecting to a Monitor
You can connect the S10A to
an external monitor for
enhanced viewing.
Connect one end of a VGA
cable to the VGA port on the
right side of the S10A.
Connect the other end to
the VGA port on the
monitor.
To check the battery status, see “Checking
Battery Status” on page 69.
Note