
User's Manual
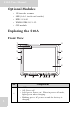
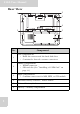
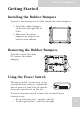
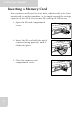
Table Of Contents
- Table of Contents
- Preface
- Safety Instructions
- Rugged and Ready to Go
- Getting Started
- Installing the Rubber Bumpers
- Removing the Rubber Bumpers
- Using the Power Switch
- Inserting a Memory Card
- Removing a Memory Card
- Installing a 3G SIM Card
- Removing 3G SIM Card (optional)
- Installing a WWAN Module (optional)
- Installing an MSR (optional)
- Installing a 1D Barcode Scanner (optional)
- Installing an RFID (optional)
- Upgrading Components
- Making Connections
- Turning On
- Wireless Connections
- Using the Modules
- Using the Fingerprint Software
- Advanced Settings
- Troubleshooting
- Appendix

S10A User Manual
4
2
HDD LED
• Lights green to indicate hard disk drive activity.
3
WLAN LED
• Off: No RF signal / No LAN connection
• Solid green: WLAN connected
• Blinking green: TX/RX transmission
4Microphone
5
S1 / Brightness button
• Functions as a barcode switch key when a barcode
scanner is connected, otherwise, can be assigned as a
function key (F4).
• When mode is enabled, press to decrease brightness.
6
S2 / Brightness button
• Can be assigned as a function key (F5).
• When mode is enabled, press to increase brightness.
7
Rubber bumper indents
• Lock the rubber bumpers
8 Touch-sensitive display
9Speakers
10 Function keys
11 Fingerprint scanner
12 Keyboard button
13 Mode button
14 Enter button
No. Component