
User`s guide

Chapter 2 Tutorials
This chapter teaches you step-by-step how to create an application in
LabVIEW. It also guides you through the Search Examples feature to
help you find examples in LabVIEW.
You will learn to do the following:
- Use the Search Examples feature to find and run an example
- Create a new program in LabVIEW
The VI you build generates data, analyzes it, then writes it to a file.
Tip: For more detailed information, please refer to examples in the directory path
LabVIEW\Examples\Advantech. You can copy and paste the useful blocks into your
programs to make programming faster and easier.
2.1 Search for Examples
In order to make you familiar with LabVIEW efficiently, the Advantech 32-bit DLL driver
provides lots of examples describing how to design LabVIEW applications.
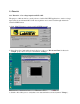
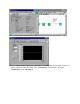
You can follow the steps below to run or view LabVIEW example programs:
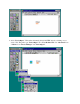
Step 1. Click Open VIs to see a listing of LabVIEW examples.
Step 2. Click Advantech in the Examples directory.
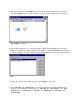
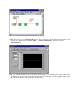
Step 3. Double click AI to open this demonstration VI.
Step 4. Click the Run button on the front panel toolbar to see how a LabVIEW VI runs.
Step 5. Stop the program by clicking the Stop button.
2.2 Build a Virtual Instrument
This exercise demonstrates how simple it is to chart, analyze, and save a VI program in LabVIEW.
Create a User Interface
You can create a graphical user interface on the front panel using controls and indicators from the
Controls palette.
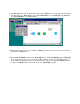
1. Create a new VI by selecting New VI in the LabVIEW dialog box.
2. On the new front panel, choose Edit>>Select Palette Set>>Basic.
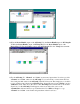
3. Select Vertical Toggle Switch from the Controls>>Boolean subpalette. Select icons from the
palette in the same way you select items from a menu.
4. Move your pointer into the front panel and click to place the toggle switch on the front panel.
5. Type Power into the label for the toggle switch. If the label disappears, choose Show Label from
the pop-up menu on the toggle switch. To access the pop-up menu, right-click on the toggle switch.