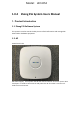
Model:LEO-D52 1.0.4 Zkong ESL System Users Manual 1. Product Introduction 1.1. Zkong ESL Software System This system is used to control the ESL picture refresh information and manage ESL、 AP and other hardware equipment. 1.2. AP AP works with ESL. PoE Power Supply:use to power the AP and connect internet. There are 2 ports. One is PoE port. It’s used to connect to AP and power the AP. The other is Lan Port. It’s used to connect internet.
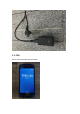
1.3. PDA PDA is used to bind ESL and commodity.
1.4. ESL(Electronic Shelf Label) ESL works when it locates near the AP. 2. Account Related Operation 2.1. Acquire MerchantAdmin and StoreAdmin account on ESL platform Firstly, your company provides your business license to the salesman to put on record. After confirming the Integrity of the information, we will create a new merchant, a merchant admin account and a password of merchant admin account for your company. The salesman will hand over the merchant admin account name and password to your company.
password. 2.3. Add New Store PS: One Merchant can add several stores. AP, ESL, PDA, Commodities and templates are all related with stores. 1. After logging in the system, click “Organization” - “Stores List”-”AddStore”, then it will pop up an AddStore pop-up window. 2. Fill in StoreName and other information, click Confirm.
2.4. Add New Store Account 1. 2. 3. 4. 5. Click ”Account” into the Account Manage page Click ”AddAccount” to pop up the AddAccount page Choose the new Store we just added Fill in Account and Password Click Confirm and then finish adding the Store Account 2.5. Add/Edit Template Category and Type Template Category and Type are the identification fields when Commodity matches template. Please set up it in advance because it will be used in Commodity and Template modules.
1. Click “Template” first, then click “Template Type” to enter the template type management page. 2. Click “ add new template category” , then you can add custom template category 3. Click the new template category we just added to enter the template type management page under this template category. 4. Click “+”, then you can add template type under this category. 2.6. Import Merchant template and manage template 1. Store template module can import merchant template.
2.7. Log in with store account 1. Click the upper right corner of the login account, then click exit.Log out of the current login account 2.
3. Add Store Template 3.1. Single Commodity Template 1. Click "template" - "store template" - "Single Commodity Template" to enter the store template page 2. Click “import Merchant template” and select the merchant template to import. 3. Click “new store template” and edit the basic information of the template (1) fill in the template name (2) choose the size, resolution, color and ESL model. (3) select template category and template type, which are used to match the commodities with corresponding type.
4. Edit template details (1) add and edit parts according to requirements (2) When finished, click the “submit” in the upper right corner 3.2. Multi-Commodity Template 1. Click "template" - "store template" - "Multi-Commodity Template" to enter the store more goods template page 2. Click “import merchant template” and select the merchant template to import.
3. Click “new store template” and edit the basic information of the template (1) fill in the template name (2) choose the size, resolution, color and ESL model. 4.
3.3. Segment code screen template 1. Click "template" - "store template" - "segment code screen template" to enter the store segment code screen template page 2. Click “import merchant template” and select the merchant template to import. 3. Click “new store template” and edit the basic information of the template (1) fill in the template name (2) choose the size, resolution, color and ESL model.
3.4. Unbind Template 1. Click "template" - "store template" - "3.4.Unbind Template" to enter the store unbind template page 2. Click “import merchant template” and select the merchant template to import. 3. Click “new store template” and edit the basic information of the template (1) fill in the template name (2) choose the size, resolution, color and ESL model.
4. Edit template details (1) add and edit parts according to requirements (2) When finished, click the “submit” in the upper right corner 4. Import Commodities information 4.1.
4.2. Fill in commodities information in the template 1. Open “item_export_template excel” Excel file 2. every title with a “ * ” must be filled in 3. Delete the Sample commodity information, fill in the commodity information. You can’t move, add or delete the colgroup. If you do, the excel file will be useless. *Instruction for filling in EXCEL file: All items with red * must be filled in When finish filling in, save the “item_export_template” table. 4.3.
1. Connect Base Station AP 1.
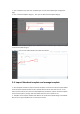
2. The Lan port of the PoE module is connected to the router, as shown below Note: the address allocation of router is automatically obtained 3. Activate the ESL Put ESL near the online Base Station AP(less than 15m radius area). After 10 minutes, they will be activated automatically.
2. Add new Base Station AP After logging in the system, click "device" -- "base station" -- "add", and pop up with the add new AP window. *New AP filling in example: Device MAC: there’s a device MAC on the back of every base station AP. Please fill in the MAC address inside the red frame without “:”. All of the “0” in MAC address is number 0 rather than the letter o.
When finishing filling in, click “ Confirm”, then you can have a look at the status of Base Station AP in the list.
3. Bind ESL with Commodity 3.1. bind single ESL in the backstage Click the “Device”, then Click “ESL”, after that click “binging commodities” in the “binded” page. Fill in the bar code of commodities and ESL MAC to be bound in the pop-up window of binding relations, and click "show immediately after binding". 3.2. batch bind ESL in the backstage 1. Download batch binding template. Click "Device" - “ESL” - “binding by list” - “download template” to download the template. 2.
3. Import the template file with all Commodity and ESL barcode information. 3.3. Use PDA to bind commodity with ESL The power-on button of PDA is a small button on the side. Press it for a long time will switch on/off the machine. Press it once will wake up the screen. After waking up, set the PDA to connect to the wi-fi that can access the Internet, and operation of it is just like the way on a mobile phone.
commodity information, scan the black barcode on the bottom right corner of the ESL. When PDA displays “submit successfully”, the operation is successful. Wait for the ESL to update the display information by itself.
4. Edit the commodity information 4.1. batch edit product information 1. Edit commodity information in the “item_export_template” commodity information table. Save after edit. Do not edit *Barcode of Commodity*! When you change it, you will add a new commodity and you have to bind it again. 2. Import “item_export_template” Commodity information table (1) Click "commodities" -- "Import By list" --"import" to select the “item_export_template” table that has already been filled in.
After uploading successfully, the corresponding electronic price tag will automatically change the display information 4.2. edit single product information 1. add single commodity Click Commodities and then click “List of goods”. Click “Add” to the add new commodity page. After filling in all of the information, click “save”.
2. Edit and delete single commodity In this page, you can click “edit” and “delete” to manage corresponding commodity.
FCC STATEMENT : This device complies with Part 15 of the FCC Rules. Operation is subject to the following two conditions: (1) This device may not cause harmful interference, and (2) This device must accept any interference received, including interference that may cause undesired operation. Warning: Changes or modifications not expressly approved by the party responsible for compliance could void the user's authority to operate the equipment.