
User's Manual
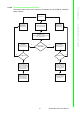
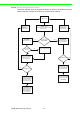
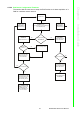

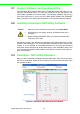
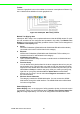
Table Of Contents
- ADAM-2000 Series
- 1 Understanding Your System
- 1.1 Introduction
- Figure 1.1 ADAM-2000 Series System Architecture
- Figure 1.2 ADAM-2000 Series Operating Distance
- 1.1.1 IEEE 802.15.4 Wireless Standard
- 1.1.2 Wireless Sensor Network
- 1.1.3 Low-power Consumption and Battery-Powered Design
- 1.1.4 Sensor Embedded Design
- 1.1.5 Wireless Signal Indicator
- 1.1.6 Industrial Standard Modbus Protocol
- 1.1.7 SCADA Software Support
- 1.1.8 Advantech Software Alignment
- 1.2 Specifications
- 1.3 Dimensions
- 1.4 Mounting
- 1.5 Wiring & Connections
- 1.1 Introduction
- 2 Selecting Your Hardware
- 3 Module Introduction
- 4 Installation Guide
- 5 Software Configuration Guide
- 5.1 System Software Configuration Utility
- 5.2 Installing AdamApax .NET Utility Software
- 5.3 AdamApax .NET Utility Operation
- Figure 5.1 AdamApax .NET Utility Operation Window
- Figure 5.2 AdamApax .NET Utility Toolbar
- 5.3.1 USB Driver Installation
- 5.3.2 Search and Configure the ADAM-2000 Series
- Figure 5.3 ADAM-2000 Series AdamApax .NET Utility Support
- Figure 5.4 Search the USB interface ADAM-2000 devices on the host PC for the virtual COM port.
- Figure 5.5 Search the COM port for the ADAM-2000 devices.
- Figure 5.6 Searching the network dialog
- Figure 5.7 Searching the ADAM-2000 coordinators.
- Figure 5.8 ADAM-2000 devices lists on the Tree View and Information page.
- Figure 5.9 The overview of ADAM-2000 end devices.
- Figure 5.10 The overview of ADAM-2000 routers
- 5.3.2.1 Gateway - ADAM-2520Z
- 5.3.2.2 Router - ADAM-2510Z
- 5.3.2.3 End Device - ADAM-2017PZ, ADAM-2031Z, ADAM-2051Z, ADAM-2051PZ
- 5.3.3 Network Topology of ADAM-2000 Series
- 5.3.4 Module Locate Function of ADAM-2000 Series (Except ADAM- 2520Z)
- 5.3.5 Group Configuration
- A ADAM-2000 Series Functions
- B Troubleshooting
- 1 Understanding Your System

49 ADAM-2000 Series User Manual
Chapter 5 Software Configuration Guide
The operation window consists of four areas --- the Menus, the Toolbar, the Module
Tree Display Area and the Status Display Area.
Menus
The menus at the top of the operation window contain:
File Menu:
1. Open Favorite Group - You can configure your favorite group and save the con-
figuration into one file. Using this option, you can load your configuration file for
favorite group.
2. Save Favorite Group - You can configure your favorite group and save the con-
figuration into one file. Using this option, you can save your favorite group into
one configuration file.
3. Auto-Initial Group - If you want to have the same favorite group configuration
when you exit AdamApax .NET Utility and launch it again, you need to check
this option.
4. Exit - Exit AdamApax.NET Utility.
Tools Menu:
1. Search- Search all the ADAM-2000, ADAM-4000, ADAM-5000 and ADAM-6000
modules you connected.
2. Add Devices to Group - You can add ADAM-2000 modules to your favorite
group by this option. You need to select the device you want to add in the Mod-
ule Tree Display area (it will be described below) first, and then select this
option to add.
3. Print Screen - You can save current AdamApax .NET Utility screen into an
image file by this option.
Setup Menu:
1. Favorite Group - You can configure your favorite group including add one new
device, modify or delete one current device, sort current devices and diagnose
connection to one device.
2. Refresh COM and LAN node - AdamApax .NET Utility will refresh the serial and
LAN network connection situation.
3. Add COM Port Tree Nodes - This option is used to add serial COM ports in
AdamApax.NET Utility.
4. Show TreeView - Check this option to display the Module Tree Display area.
Help Menu:
1. Check Up-to-Date on the Web - Choose this option, it will automatically connect
to Advantech download website.You can download the latest utility there.
2. About AdamApax .NET Utility- Choose this option, you can see version of
AdamApax .NET Utility installed on your computer.
Note!
The Favorite Group function is for the ADAM-4000, ADAM-5000/TCP and
ADAM-6000