
Use Instructions
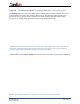
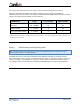
Table Of Contents
- Device Description
- Indications for Use
- Components Included with the Cardi/o Remote Patient Monitor System
- CARDI/O® USE INSTRUCTIONS
- Cardi/o® Overview
- Cardi/o® Remote Patient Monitor (RMP) may be use for synchronous telehealth consultations where real-time intermittent spot-checking of vital signs may be desired; and for asynchronous telehealth consultations where historical data can be viewed and d...
- Step 1. Connect the Cardi/o® Sensor to the Internet via WiFi
- Scan the barcode containing a unique ID that is located on the sensor device with a smart phone, then input the local WiFi passcode to complete the Sensor connection.
- Determine whether the Cardi/o® RMP will be for intermittent use or long-term use and position the Sensor device according to Figure A or Figure B below.
- Step 2.A Positioning Cardi/o® for Intermittent Use – tabletop option
- Step 2.B Positioning Cardi/o® for Long Term Use – wall-mount option
- Step 3. Accessing Patient Data
- Step 4. Managing Patient Alerts
- Step 5. Downloading and Reporting Data
- Cardi/o® Sensor Return or Disposal
- Troubleshooting
- Contact Information
- Product Specifications
- General Symbols

IFU-EUA Rev. 01
Date: 01Sep2020
Page 6 of 17
CARDI/O
®
USE INSTRUCTIONS
Note: It is recommended that healthcare providers advise users on correct placement of the Cardi/o
®
Sensor. To collect data the Cardi/o
®
Sensor must be connected to the Internet.
Cardi/o
®
Overview
Cardi/o
®
Remote Patient Monitor (RMP) may be use for synchronous telehealth consultations where
real-time intermittent spot-checking of vital signs may be desired; and for asynchronous telehealth
consultations where historical data can be viewed and downloaded. Follow Steps 1 through 2.B to
configure the Sensor device for WiFi connection and proper set up/positioning of the Sensor device for
usage. Follow Steps 3 through 5 to access patient data via the Cardi/o
®
mobile app and
Cardi/o
®
Central Dashboard web-app.
Step 1. Connect the Cardi/o
®
Sensor to the Internet via WiFi
Scan the barcode containing a unique ID that is located on the sensor device with a smart phone, then
input the local WiFi passcode to complete the Sensor connection.
Determine whether the Cardi/o
®
RMP will be for intermittent use or long-term use and position the
Sensor device according to Figure A or Figure B below.
Step 2.A Positioning Cardi/o
®
for Intermittent Use – tabletop option
Note: Orientation of the Logo Side is important when positioning the device to collect data on the patient.
See Figure A below for a view of the Cardi/o
®
Sensor set on a tabletop, showing the logo side in
relation to the patient.
Figure A: Use Cardi/o
®
for sterile, no-contact vital signs capture. The data will automatically upload
to the Cardi/o
®
patient record.