
User's Manual


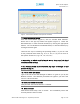
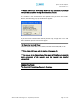
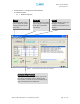
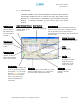
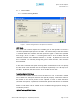
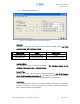
Table Of Contents
- Introduction of Epoch-M1P
- Overview
- Warnings and Hazards
- Epoch-M1P Parts List
- Epoch-M1P Software Installation and Requirements
- 1.4.1 Minimum PCS Requirements
- 1.4.2 Epoch-M1P Software Installation
- ** Refer to the Software Setup Guide
- ** Refer to the USB Setup Guide
- Pre-Installation using Epoch-M1P Software
- Step by Step Instructions for Installation
- User Manual V1.0 using Epoch-M1P Software
- Menu Structure
- Using the Epoch-M1P Software
- Alarms
- Default Control Settings
- Maintenance Guide for Epoch-M1P
- Periodic Inspection Checklist
- Preventive Measures for Optimal Operation
- Troubleshooting
- Tx & Rx LEDs
- Common Installation Problems
- Warranty and Repair Policy
- General Warranty
- Limitations of Warranty

Epoch-M1P RF Repeater
User Manual V1.0
Using the USB cable (included in the box), connect one end of the cable to
the Epoch-M1P’s USB port located on the right side of the repeater and
the other end to the PC’s USB port as shown in Figure 2.
** Install the USB driver and the Epoch-M1P Manager Software prior to
installation.
8. Turn On the Power for Epoch-M1P
Make sure that the donor and server antennas and the power cable are
securely connected to the correct ports. Turn the power switch on,
located on the right side of the repeater.
9. Launch the Epoch-M1P Software
Open the Epoch-M1P Software. You will see the Status Menu.
** For more detailed information on the Epoch-M1P Sof ware, please
refer to Section 2 on page 15.
t
r t
** If only one o bo h of the LEDs are not blinking: (1) check the physical
USB cable connection or (2) check if the repeater power is turned on.
10. Go to the Install Window
Now with the blinking TX and RX status LEDs on the Status Window, go to
the Install Window. You will see the following:
Figure 3 - Installation Window of the Epoch-M1P Software
Advanced RF Technologies, Inc. Proprietary Document Page 12 of 38