
User's Manual
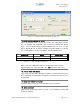
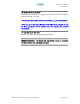
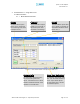
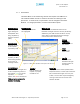
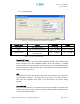
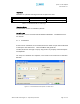
Table Of Contents
- Installation Guide for Epoch-S02
- Environmental requirements
- Warnings and Hazards
- Tools and Recommendations for Installation
- Epoch-S02 Parts List
- Step by Step Instructions for Installation
- User Manual V1.1 using OMS V4.01
- Menu Structure
- Using the Epoch-S02 OMS V4.01
- Alarms
- Default Control Settings
- Maintenance Guide for Epoch-S02 OMS V4.01
- Periodic Inspection Checklist
- Preventive Measures for Optimal Operation
- Troubleshooting
- Epoch-S02 OMS V4.01 Scenarios
- Heartbeat Scenarios
- Warranty and Repair Policy
- General Warranty
- Specific Product Warranty Instructions
- A.1 Minimum Requirements
- A.2 Epoch-S02 OMS V4.01 Installation/Startup
- Appendix B: Specifications

Epoch-S02 RF Repeater
User Manual V1.1
Figure 1.5.1 Installation Window of the Epoch-S02 OMS V4.01
12. Select the desired band or bands
Select the desired band or bands by clicking the appropriate buttons.
You can deselect the undesired band or bands by clicking the button
again. You can select among 15 band combinations; A, B, C, D, E, F, AD,
AE, AF, BD, BE, BF, CD, CE and EF. Neither two 5 MHz bands, e.g., DE nor
two 15 MHz bands, e.g., AB, are allowed. The default band is A.
Control Item Action Setting Value
15 MHz Band Band Selection A/B/C
5 MHz Band Band Selection D/E/F
NOTE: Only one 5 MHz band and one 15 MHz band can be chosen
simultaneously (i.e. A and D, B and E, etc.; not A and B, E and F, etc.).
13. Provide SNMP Information
Type in the Site ID and the Manager IP address as given to you by Sprint
PCS. Once both the parameters are typed in, you must click “Set” for it to
be executed.
14. Check the Modem Connection
Check the “Auto Connection” box and then click on “Connect.”
Table 1.5.1 15 MHz and 5 MHz Band Options
15. Click on Install
After the first three steps, click on “Install.” This installation process will
take a few minutes.
Advanced RF Technologies, Inc. Proprietary Document Page 12 of 31