
User's Manual


Page 35
>SW4&5 RLY
SW4&5 RLY
LOCK
>LOCK
NORMAL
>UNLOCK
LOCK
SW4&5 RLY
>TOG/TOG
>ON/OFF+S
NORMAL
UNLOCK
>SW4&5 RLY
>TOG/TOG&E
SW4&5 RLY
NORMAL
SW4&5 RLY
>NORMAL
>ON/OFF&E
SW4&5 RLY
>BACK
UNLOCK
LOCK
LOCK
NORMAL
>SW4&5 RLY
SW4&5 RLY
>MAGNET
>LOCK
>BACK
NORMALUNLOCK
SW4&5 RLY
>UNLOCK
>SW4 RLY
>ON/OFF
SW4&5 RLY
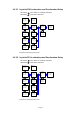
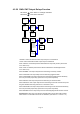
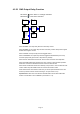
4.2.17 SW4+SW5 Output Relays Function
PS1 button is the “Enter” or “Change” command.
PS2 button is the “Next” command.
“UNLOCK” means both SW4 and SW5 output relays are not interlocked.
“LOCK” means both SW4 and SW5 output relays are interlocked.
When “UNLOCK” is selected proceed to SW4 and SW5 output relay function (see section
4.2.18 and 4.2.19)
When “LOCK” is selected proceed to the selections listed below and disregard section
4.2.18 and 4.2.19)
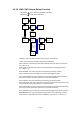
Select “NORMAL” both output relays become interlocking momentary contacts.
Select “TOG/TOG” both output relays become interlocking toggled contacts.
Select “TOG/TOG&E” both output relays become interlocking toggled contacts affected by
the e-stop command (output relay opens when e-stop button is pressed).
Select “ON/OFF” both output relays become interlocking On and Off contacts.
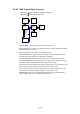
Select “ON/OFF+S” both output relays become interlocking On and Off contacts. Must press
the green START button along with the On or Off button to work.
Select “ON/OFF&E” both output relays become interlocking On and Off contacts affected by
the e-stop command (output relay opens when e-stop button is pressed).
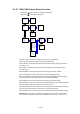
Select “MAGNET” the two output relays become interlocking Magnet ON and OFF contacts.
Important note: When one of the above is selected make sure the same SW4 and SW5
button function on transmitter are both set to “NORMAL” (see section 4.1.13 and 4.1.14).