
Product Info


BASIC CONFIGURATION
59
The technical materials and information contained in this document are strictly confidential and the exclusive property of Advanced Microwave Engineering s.r.l.
These materials and information are intended solely for the purpose designated and may not be used otherwise.
It is not permitted to disclose or reproduce them in whole or in part without express written permission.
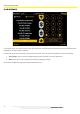
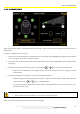
11.6.3 LR SENSORS POWER
Adjust the LR sensor power to change detection distance of the Tag as well as that of the pedestrian worker in the Pre-
Warning area.
In order to change the power of sensors:
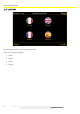
Select the sensor by pressing the corresponding icon: the selection will be highlighted by a green ring around the
icon. In the figure, sensor No. 2 has been selected.
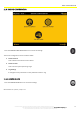
Once the sensor is selected, the number of the sensor will be shown in the ‘SENSOR NR.’ field on the right side of
the display.
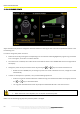
Change the power of the pre-selected sensor by pressing the and keys to increase and decrease it:
o Beside the word POWER, the percentage of power set will be indicated. Once set, changes are saved
automatically.
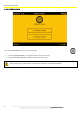
In order to check power in operation, carry out the following operations:
o Position a Tag at the minimum distance at which the Tag is to be detected (see chapter 8.6). Define the
range by means of the and keys, as described above.
o The Tag code detected will be shown by the phrase TAG DETECTED with a red circle next to it if it is a
pedestrian worker’s Tag.
The same operations must be carried out for all the sensors in operation.
When the sensor is at a 0% power, it is not off, but at minimum power.
NOTE: Use the 'Searching Tag' key every time the power is changed.