
Installation Manual
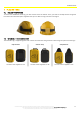
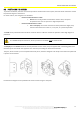

PLACING TAGS
12
The technical materials and information contained in this document are strictly confidential and the exclusive property of Advanced Microwave Engineering s.r.l.
These materials and information are intended solely for the purpose designated and may not be used otherwise.
It is not permitted to disclose or reproduce them in whole or in part without express written permission.
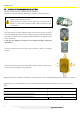
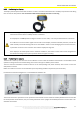
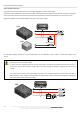
7.3 PROCEDURE FOR CHANGING THE BATTERY
The battery inside the Tag is a CR2450 button cell battery.
To replace it, remove the yellow rubber piece, and then replace the battery.
Caution: respect the correct polarity; insert the battery with the
negative pole towards the circuit.
While replacing the battery in the helmet tag, be careful not to
damage or disconnect the small coaxial cables connected to the
circuit board.
Once the battery has been replaced, make sure that the Tag has turned on
correctly. Depending on the version, it can emit a long initial sound followed by
three short sounds, or only one long flash followed by three short flashes of the
LED on the board.
If this does not happen, the device has not started correctly; contact the
manufacturer.
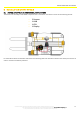
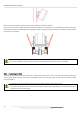
Put the tag back into the slot at the correct position as shown in the figure
opposite.
Position the soft rubber piece back into place, and then press it in all directions
so that it correctly adheres to the rigid piece.
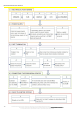
Battery life depends on the daily activations of the tag when it is near a vehicle equipped with the anti-collision system.
Typically, there are three identified scenarios; the following table summarises the battery life associated to each of
them:
Type of scenario Estimated duration in years
Driver use* 1.5
Pedestrian worker with high interference with vehicles 2
Pedestrian worker with low interference with vehicles 3/5
*Equipped with an inhibitor in the cabin (FILTERSENS)
<