CARD READER AND THERMAL PRINTER User Guide Copyright 2004, AMSI
FCC COMPLIANCE STATEMENT: Note: This equipment has been tested and found to comply with the limits for a Class A digital device, pursuant to part 15 of the FCC Rules. These limits are designed to provide reasonable protection against harmful interference when the equipment is operated in a commercial environment.
TABLE OF CONTENTS Introduction......................................................................................................................... 4 Connectors and Controls..................................................................................................... 5 Turning the unit On and Off ............................................................................................... 5 Data Connector .........................................................................................
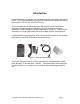
Introduction Pocket Merchant is a complete, self contained magnetic card reader and thermal printer. The Pocket Merchant can read credit cards, driver’s licenses, as well as print receipts in 42, 32 and 16 column formats. The Pocket Merchant is designed to work with Pocket Verifier Professional, WebConnect, Merchant Mover, iMerchant, AirVerify, and other merchant processing software packages for either Palm OS or Pocket PC.
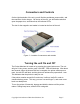
Connectors and Controls On the right hand side of the unit, you will find the pushbutton power switch, and the connector for the charger. On the top of the unit, you will find the tabs that open the paper door, and below that, the indicator LED’s. The slot for the magnetic card reader is located at the front of the unit. Figure 2 – Location of connectors and controls Turning the unit On and Off The Pocket Merchant is turned on by pressing the power button once.
For any reason, if the printer fails to respond to the power button, or fails to print or read properly, there is a reset button on the back of the printer. See Resetting the printer. Data Connector On the left side of the printer, there is a connector for the data cable. The connector can only be properly inserted on way, as shown in the picture below. Some cables have a sticker marked “TOP” in order to prevent incorrect insertion. Figure 3 – Data connector orientation.
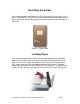
Resetting the printer Your Pocket Merchant and reader has a CPU and memory, just like your PDA. If the error light stays on, or the printer will not respond to a print command or card swipe, the unit can be reset by pressing the button recessed in the underside of the printer. Figure 4 – Reset button Loading Paper Your Pocket Merchant printer has the easiest paper loading system available. Simply open the paper door by squeezing the paper door release tabs.
Charging Pocket Merchant Your Pocket Merchant needs to be charged periodically. Included with the Pocket Merchant is a Universal Charger, and 110V power cord. The Universal Charger can operate on any voltage from 110VAC to 220VAC at 50 or 60 Hz (cycles). Your charger comes with a 110V power cord, but you can use an inexpensive adaptor if you travel overseas. When the adaptor is plugged into the wall outlet and the Pocket Merchant, both the charge indicators on the charger and the printer will illuminate.
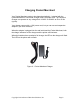
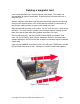
Swiping a magnetic card Your Pocket Merchant has a 2-track magnetic card reader. This reader can accommodate all types of credit cards, as well as driver’s licenses that have a magnetic stripe. With the magnetic stripe down, and facing into the printer, slide the card through the slot in the direction shown. You will see that the card slot is a little wider on the left side, making it easier to get the card started in the slot. Wipe the card with a smooth, even motion.
Configuring your Software These screens show the Pocket PC, but the Palm OS screens are almost identical: After logging in, you will see the main menu screen. Figure 8 – Main Menu The icon in the lower right quadrant is our options menu. tap on this. Figure 9 – Select Options Copyright 2004 Advanced Merchant Solutions, Inc.
Figure 10 - Options You can now see the options available. If you have multiple PDA's on a single account, entering a unique number in the REP ID field will identify them in Transaction Central. You can also select which card reader you will be using. We will be using the Pocket Merchant. The Condense Receipts option will print 42 columns, and produce a 3 inch receipt. This gives you 64 receipts per roll of Pocket merchant paper. The next checkbox determines if you will be sending signatures to the server.
Customizing your receipts You can customize your receipts, using the following interface. We are showing the Pocket PC version of the software, but the Palm OS screens are similar, and have the same functionality.
Print Samples make customizing your receipts easy. Right on the configuration page is a button that will print a sample receipt with your selected options! This lets you see your changes and new receipt formats instantly! You can mix Plain / Bold / Left / Right / Center, etc….You can also override the character size (i.e., select "BCN" for header 1 and the company name will always be Bold, Centered, and Normal font – even when small fonts is checked in Options.
Pocket Merchant Communications All communications between the Pocket Merchant and the PC / PDA are performed at: 9600 baud, No Parity, 1 Stop Bit, 8 Data Bits. (9600,8,N,1). The Pocket Merchant is capable of accepting RS-232 signals at either the standard RS-232 levels, or at TTL levels. This allows the device use a straight through data cable on PDA’s that have a level converter module on their own RS-232 Data cable.
The buffer data is deleted after being printed. . The printing area set by ESC W is reset to the default setting. The printer does not execute paper cutting. This command sets the print position to the beginning of the line. This command is enabled only in page mode. [Reference ] ESC FF,ESC L,ESC S CR Print and carriage return Hex 0D Decimal 13 [Description ] When auto-line feed is enabled, this command functions in the same way as LF. When auto-line feed is disabled, this command is ignored.
all the characters on the line are aligned at the baseline. ESC E can also turn on or off emphasized mode. However,the setting of the last received command is effective. ESC -can also turn on or off underline mode. However, the setting of the last received command is effective. GS !Can also select character size. However, the setting of the last received command is effective.
ESC 3 n Select line spacing Hex 1B 33 n Decimal 27 51 n [Range ] 0 ≤≤n ≤255 [Description ] Sets the line spacing to [n × vertical or horizontal motion unit ] inches. [Notes ] The line spacing can be set independently in standard mode and in page mode. The horizontal and vertical motion unit are specified by GS P. Changing the horizontal or vertical motion unit does not affect the current line spacing. The GS P command can change the horizontal (and vertical)motion unit.
[Notes ] The horizontal tab position is stored as a value of [character width × beginning of the line. The character width includes the right-side character spacing, and double-width characters are set with twice the width of normal characters. This command cancels the previous horizontal tab settings. When setting n =8,the print position is moved to column 9 by sending HT. Up to 32 tab positions (k = 32) can be set. Data exceeding 32 tab positions is processed as normal data.
Printer output is the same in double-strike mode and in emphasized mode. Double-strike mode can not be used for the bit image.downloaded bit image, and bar code. [Default ] n =0 [Reference ]ESC E ESC J n Print and feed paper Hex 1B 4A n Decimal 27 74 n [Range ] 0 ≤≤n ≤255 [Description ] Prints the data in the print buffer and feed the paper [n × vertical or horizontal motion unit ] inches. [Notes ] After printing is completed, this command sets the print starting position to the beginning of the line.
This command does not affect printing in page mode. Lines are justified within the specified printing area. Spaces set by HT,ESC $,and ESC \are all justified. [Default ] n =0 N Justification 1.49,31H Left justification 0.48,30H Centering 2.
Sets the left margin using nL and nH. The left margin is set to [(nL +nH × 256)× horizontal motion unit ] inches. [Notes ] This command is effective only at the beginning of a line. If this command is input in page mode, the printer performs only internal flag operations. This command does not affect printing in page mode. If the setting exceeds the printable area, the maximum value of the printable area is used. The horizontal and vertical motion unit are specified by GS P.
1 0 1 2 3 UPC-A UPC-E JAN13 (EAN) JAN8 (EAN) 11≤k ≤12 11≤k ≤12 12≤k ≤12 7≤k ≤8 4 CODE39 1≤k 5 ITF 1≤k (even number) 6 CODABAR 1≤k 65 66 67 68 UPC-A UPC-E JAN13(EAN) JAN8(EAN) 11≤n ≤12 11≤n ≤12 12≤n ≤13 7≤n ≤8 69 CODE39 1≤n ≤255 70 ITF 1≤n ≤255 (even number) 71 CODABAR 1≤n ≤255 72 73 CODE93 CODE128 1≤n ≤255 2≤n ≤255 2 48 ≤d ≤57 48 ≤d ≤57 48 ≤d ≤57 48 ≤d ≤57 48 ≤d ≤57 65 ≤d ≤90, 32,36,37,43,45,46,47 48 ≤d ≤57 48 ≤d ≤57 65 ≤d ≤ 68,36,43 45,46,47,48 48 ≤d ≤57 48 ≤d ≤57 48 ≤d ≤57 48
When data exists in the print buffer, the printer processes the data following m as normal data. After printing bar code, this command sets the print position to the beginning of the line. This command is not affected by print modes (emphasized, double-strike, underline, or character size), except for upside-down mode. [Notes in page mode ] This command develops bar code data in the print buffer, but does not print it.
POCKET MERCHANT MAGNETIC CARD READER Specifications: CARD STANDARD READING METHOD TRACK USED READING DENSITY READING CAPACITY CARD THICKNESS ISO-7811 F2F(FM) TRACK1 TRACK2 ISO I (IATA) ISO II (ABA) 210 BPI 75 BPI 79 40 CHARACTERS CHARACTERS (7-BIT CODE) (5-BIT CODE) 0.76 +0.08mm -Card Feeding Speed :20 to 120 cm/sec -Head Life Time :Approximately 500,000 passes -Card Jitter: Less than 18 % Track encoding: Copyright 2004 Advanced Merchant Solutions, Inc.
Pocket Merchant track read data: Here is an actual Pocket Merchant track read output and breakdown (the card number has been modified for obvious reasons): Start Sentinel and Format Character Primary Account Number (PAN) Cardholder Name Field Separator Padded with space(s) ASCII 32 Field Separator %B4012888888881881^IDEUE/DENNIS¤¤¤¤¤¤¤¤¤¤¤¤^030710100 000019302000000315000000?4012888888881881=0307101193020 315? End of Track indicator Copyright 2004 Advanced Merchant Solutions, Inc.
Pocket Merchant Warranty This limited warranty is provided to the original consumer and covers Pocket Merchant printers sold by or through Advanced Merchant Solutions, Inc.. The telephone number for warranty information is 1-714-4490211. The warranty period for the Pocket Merchant is 12 months from the date of purchase. The warranty period for any Options or accessories is ninety (90) days from the date of purchase.
Copyright 2004 Advanced Merchant Solutions, Inc.