WEB Connect™ Professional Edition Pocket PC Version User Guide Copyright © 2002, AMSI / Payment Resources International. All rights reserved.
WEB Connect™ End-User License Agreement (EULA) This Advanced Merchant Solutions, Inc. End-User License Agreement (EULA) is a legal agreement between you (either an individual or a single entity) and Payment Resources International for the AMSI / Payment Resources International software product identified above, which includes computer software and may include associated media, printed materials, and online or electronic documentation.
Table of Contents Welcome ............................................................................................................................................. 1 Installing WEB Connect...................................................................................................................... 1 Installation .............................................................................................................................................. 1 Registering Booster .....................
WEB Connect Edition Tutorial (Pocket PC Edition) Welcome Welcome to WEB Connect. This document is a step-by-step tutorial outlining the major features of WEB Connect. Each tutorial takes under 10 minutes to perform. As such, it is recommended that you use these tutorials along with your PDA. Installing WEB Connect Please follow the instructions below to install WEB Connect onto your Pocket PC.
Launching WEB Connect After installation, WEB Connect will be installed in the Programs Directory. To launch WEB Connect for the first time, 1. Click on the Start Menu. 2. Select Programs. 3. In the Programs Directory, select WEBConnect Depending on how your Pocket PC is setup, you may not see the complete title (i.e., WEBConn…). This will launch WEB Connect and start the activation process. You may also want to all a shortcut to your Menu bar.
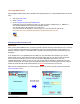
Tutorial 1. Enter your Merchant ID in to the Merchant ID text area. The test account number is: 10600 or 10011 2. Enter your Serial Number into the Serial Number text area. The serial number for either test account is: ser1234 Note: When starting the communication process, your Pocket PC may display additional messages. the exact message you will see at this point will vary from PDA to PDA.
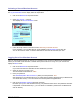
Activating a Second Merchant Account If you activated the MerchantAnywhere Test Account, you can always activate another account at anytime from the Log-On Information screen. Simply follow the steps below. 1. Click on the Merchant ID drop-down list box. 2. Select New account… in the list. This displays the Account Activation screen. 3. Follow the steps outlined in the above section: Activating a Merchant Account. Upon completion, your new Merchant ID will be available in the Merchant ID drop-down list.
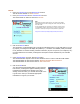
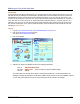
5. Click on the OK button. This brings you to the Menu screen where you can perform sales using credit cards, transfer funds from checking or savings accounts, enter the Transaction Manager (see: Using the Transaction Manager), and set up options. Information related to this screen is shown below. Menu Screen Functions Title displays the name of the Merchant Account.
Making your First Credit Card Sale Introduction In this tutorial you will take a Credit Card sale. You can follow step-by-step using the test account or your own Merchant Account, by adding the exact data that is presented here. The card number used in this tutorial is for demonstration purposes only and will not be processed by the system. If you are using the test account, you can also use any credit card - even your own. The test account will not process any transactions.
While the Wizard helps in entering data in a logical manner, you can also bring up the keypad by clicking on the respective field entry. Below is the process for entering data when using the Wizard. When using Pocket Merchant or PDA Swipe to swipe a credit card, only the Amount Keypad will be shown (more information about swiped transaction can be found under: Credit Card Sales with PalmReader Plus/Pocket Merchant and a Physical Credit Card. Enter the Expiration Date by clicking on the respective field.
6. Enter the Invoice Number. Entering the invoice is optional. If the invoice field is left blank, then PVP CE will be added as a default value. In the example below AMS001 is entered. 7. Enter a Tip by clicking on the Tip Field (optional). If you are in the service industry, you may request to have a tip added to the amount. This is optional. Click on the Tip field and hand it to the client (The amount is shown in the caption).
9. Click on the Send button. Once the information is verified and the customer signs, the next step in to transmit the data to the transaction server for credit card approval. After clicking on the Send button, communication will start. Buttons that need to establish a communications link with the Internet are color-coded differently from all other buttons. At this stage, one of three things can happen: • The credit card gets approved. • The credit card gets declined.
Working with a Declined Credit Card There are many reasons why a card can get declined. Yet, for whatever reason, WEB Connect allows you to return to the previous Credit Card Sale screen for entering a new card or different information. If for some reason, you want to keep a declined transaction, you can always click on the Store button from the Credit Card Verification screen. Important Note: Declined Cards are not automatically saved like Approved Transactions.
Credit Card Sales with Pocket Merchant and a Physical Credit Card Introduction In the previous example, you made your first sale by entering the customer’s credit card and billing information. While the Pocket PC allow you the ability to enter text using handwriting recognition or an on-screen keyboard, there is still room for making mistakes entering an address, person's name or card number. This, compounded with working in the field, can be a daunting task.
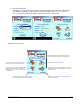
Performing Quick Credit Card Sales After following the Setting Up Your PDA for Quick Sales instructions above, you are ready to see how easy and fast it is to take and validate credit cards for your sales. 1. After launching WEB Connect, click the OK button. Since the Remember Password box is checked, the current Merchant Account password (i.e., account 10600) is already present. All you need to do is click on the OK button. 2. Click on the Credit Card Processing picture. 3.
5. Click on the Next… button. 6. Ask the customer to verify the information and to sign in the Signature box. Sign here. 7. Click on the Send button. Once the credit card is approved, you are ready for another sale, or you can print a receipt and have it signed (see Working with an Approved Credit Card for details). Approved transactions with no invoice display PVP CE.
Making an Account Transfer Sale Introduction This option is primarily so your business can accept checks by telephone, fax machine, or e-mail. If your customer can physically hand you a check, YOU ARE BETTER OFF ACCEPTING IT, AND PHYSICALLY DEPOSITING IT IN YOUR BANK. The bad check protection statutes and laws generally apply only to physical checks, with pen-and-ink signature. In addition, the customer can challenge and reverse the electronic check up to sixty days after it is issued.
Tutorial 1. Log on to your Merchant Account or the MerchantAnywhere Test Account. 2. Click on the Account Transfers picture. This opens the Bank Account Transfer screen. 3. Enter the following information: Name: Invoice: Amy Peterson AMS002 or leave empty (default is: PVP CE) 4. Choose Checking from the ABA/Bank Info list. The default is checking, but you can choose checking or savings.
6. Fill in the remaining information. Enter the Routing and Account numbers below, or use one of your own checks. The test account (10600) will not actually process any checks and you will not be charged any transaction fees. See the Introduction for details on locating the routing and account numbers. Routing #: Account #: Amount $: 122-000001 1245-780042 24.95 ⇓ 7. Enter a Tip by clicking on the Tip Field (optional).
8. Click on the Next… button. Bank Account Transfer Verification screen is displayed. Here you can request a signature before sending the information to the transaction server for requesting payment. It is a good idea to give the customer your PDA device at this time, so that they can verify that the account information and amount are correct. They also add a signature (optional). 9. Click on the Send button.
Using the Transaction Manager Introduction The Transaction Manager screen is the area where you can view completed and pending transactions for Credit Cards and Bank Account Transfers. It is also the entry point for allowing voids and credits of completed credit card transactions. This section of the tutorial is designed to give you a basic over view of what the Transaction Manager can do. The data contained in the Transaction Manager will depend on what processes you have already performed.
Issuing a Void from the Transaction Manager Introduction After a Credit Card transaction is completed, the transaction server submits the record for end-of-day closeout (batch processing). If a closeout has not yet been performed, WEB Connect allows you to void a transaction. Issuing a void or a credit depends solely on whether a closeout has occurred.
4. Click on the first item in the list. This opens up the Credit Card: Approved screen with additional information. 5. Click on the Void/Credit button. WEB Connect sends a request to the transaction server and determines if the batch was closed out. Is the batched Closed? NO YES Batch still opened. Issue a void? Batch closed. Issue a credit? YES - Transaction voided and removed from the Transaction Manager. YES - The Credit Transaction screen appears.
Issuing a Credit from the Transaction Manager Introduction If a transaction is already closed out (i.e., the batch has been sent to the bank for processing at the end of the day), then a void cannot be issued. In such cases, it is necessary to do a credit. WEB Connect allows you to do full or partial credits. The tutorial below shows you how to issue a partial credit, once a transaction is already closed out. Tutorial 1. Enter a value for the Credit not exceeding the amount displayed.
Working with Un-Approved Transactions from the Transaction Manager Introduction There may be times when you are unable to perform a wireless approval for a credit card or account transfer after taking all the information (See Working with Transactions in a Weak/Non-Wireless Area for details). In this case, you save the information to the Transaction Manager for processing at a later date. The tutorial below explains how to do this processing. Tutorial 1. Open the Transaction Manager. 2.
Using IR/Serial Options Introduction WEB Connect also has a number of other exciting features not normally found in traditional POS terminals. These are Rep ID classification and Server-Side Signature Storage. In addition, the options screen allows you to setup your Pocket PC to use one of our printers (Pocket Printer 4 or Pocket Merchant) and to setup a card reader or check reader.
Server-Side Signature Storage There may be times when you want to store the client's signature on the server. when the signature is stored on the server, you can retrieve it through the WEB-Based Transaction Manager (i.e., Transaction Central). The default setting for this feature is set to OFF. It is recommended that Signatures be sent only in areas where wireless connectivity is optimal and that a high connection speed can be established, as signature data can contain up to 2000 bytes.