RF Home Automation User Manual for HomePro ZTH100 Wireless Controller Version 1.26 HomePro by ADVANCED CONTROL TECHNOLOGIES, INC. 1 ZTH100 Operating Instructions (Version 1.
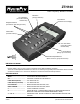
ZTH100 RF Home Automation Radio Frequency Wireless Controller ALL ON Button (Turns all included modules ON) OK Button (Accepts selection) Menu Button (Activates menu display) Navigation Buttons (Scroll left or right through menus) Clear Button (Cancels actions) ALL OFF Button (Turns all included modules OFF) Scene Button (Brings up scene menu) Numbered Speed Buttons (Quick access to groups and scenes) BEFORE YOU BEGIN... READ ALL INSTRUCTIONS Remove battery cover on rear of control.
The HomePro Z-Wave Lighting and Appliance Control System gives you the following functionality. Safety and Security RF Home Automation WIRELESS CONTROLLER This user manual is designed to guide you through the setup and features of the HomePro Z-Wave Lighting and Appliance Control System. You will be amazed at the possibilities for control. You can easily enhance the comfort and security of your home or office.
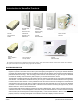
Introduction to HomePro Products ZDP100 Plug-In Dimmer Module ZDW100 Wall Dimmer ZRW100 Wall Switch ZDW120 2-Wire Wall Dimmer ZRW103 3-Way Wall Switch ZDW103 3-Way Wall Dimmer ZTW100 Wall Transmitter ZRP100 Plug-In Appliance Module ZIR000 PIR Occupancy & Security Sensor AS101 Auxiliary Wall Switch ZRF113 Fixture Receiver ZTT000 Wall Thermostat This controller is designed to work with the HomePro products shown.
Table of Contents 1. INTRODUCTION PAGE 1.1 Getting Started................................................................................................................ 6 2. TIME 2.1 Setting the Time...................................................................................................................... 6 3. GENERAL OPERATION 3.1 Wireless Controller software features..................................................................................... 6 3.2 Power Down and Display Time-out.....
1. INTRODUCTION 1.1 GETTING STARTED Congratulations on your purchase of the ZTH100 and other HomePro components. This manual will guide you in understanding the full capabilities of the HomePro System and operation of the Wireless Controller. Remove battery cover of ZTH100 Controller and install two AA batteries noting the correct direction. 2. TIME 2.1 SETTING THE TIME To set time, begin by pressing “MENU” button. Note: Use arrow buttons to scroll though hours and minutes 3. GENERAL OPERATION 3.
4. HOW TO USE THE ZTH100 FEATURES 4.1 MENU NAVIGATION AND SELECTION Pushing the “Menu” button will activate the menu display.: a. and b. activates the currently selected menu item and recalls information from thermostat. c. buttons are used to navigate through the menu. All menu levels wrap around. (or Clear) cancels the currently selected item and will in most instances step back to the previously selected menu level. If used from top menu level the Controller will return to clock display.
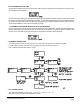
4.2.1 ADD MODULE TO GROUP Adding a module to a group using the menu is done this way: A group is a set of one or more modules that are to be operated together as if they were one device. More specifically, every module that is included in a group will switch on or off together as that group is turned on and off. When a group is activated, each Lamp Module in that group turns on, returning to its last dim level – a level that in general, will differ from module to module.
4.2.3 EXCEEDING MODULE LIMIT. This ZTH100 Controller supports up to 64 modules. If the user tries to add more than 64 modules to a group or scene this message will be displayed: However the module will be given a valid ID and it will be used as a repeater if it supports this functionality, but it cannot be directly controlled by this ZTH100 Wireless Controller.
4.2.6 REMOVE MODULES FROM GROUP/SCENE. Clear cancels the current selection. Navigation buttons only work if more than one group or scene exists. 4.2.7 DELETE GROUP/SCENE Scroll left or right to find scene. ZTH100 Operating Instructions (Version 1.26) 033005 10 HomePro by ADVANCED CONTROL TECHNOLOGIES, INC.
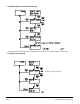
If no active groups or scenes exists the following occurs: 4.3 TIMER The timer menu consists of the following menus: Timer information is stored in the Wireless Controller – not in the module. 4.3.1 CREATE/EDIT A TIMER There are eight timers available for the user. Each timer controls one of the existing groups as chosen by the user. If an existing timer is selected that timer will be edited. Pressing the clear button will cancel the editing and leave the timer as it was.
Once a timer has been selected the following flow is executed when creating/editing a timer: If a group is named the group name will be shown. ZTH100 Operating Instructions (Version 1.26) 033005 12 HomePro by ADVANCED CONTROL TECHNOLOGIES, INC.
4.3.2 DELETE TIMER When a timer is no longer needed it can be deleted using “Delete a timer” menu. 4.4 ADD THERMOSTAT The ZTH100 will support only one (1) thermostat. If more than one (1) thermostat needs supported, then more ZTH100’s will be required. Scroll to the Setup Menu and Press OK. Scroll to “Add Tstat To Network” and Press OK. ZTH100 will prompt “Press Button On Unit”. Once thermostat is added, the ZTH100 will show “Tstat Incl’d, with Support”.
If instead you press OK, you will be directed to the thermostat modes of control (i.e.. Cooling, Heating, etc.). In each case, the remote will retrieve the current setting of the thermostat and then allow you to change that setting (depending on what is supported by the thermostat). 4.4.3 THERMOSTAT MODES The ZTH100 supports HEAT MODE, COOL MODE, AUTO MODE, AUTO CHANGEOVER MODE, DRY AIR MODE, FAN MODE ONLY, FURNACE MODE, MOIST AIR MODE. Scroll left or right to select.
4.5 REMOVING THERMOSTAT To Remove Thermostat from Network, Scroll to Setup Menu, Choose “Reset Unit” and Press OK. (See Setup Menu 4.6). 4.6 SETUP The setup menu is used to access system functions. The layout is as follows: 4.6.1 ASSOCIATION MENU Allows you to associate other units to a module that supports this feature. When you select “Associate Units” above, the following menu will appear: ADD ASSOCIATION Used when you want to associate one unit to another unit.
REMOVE ASSOCIATION Used when you want to remove an association in a unit . The unit in which the association is removed is the source module and the unit being removed is the destination module. When you select “Remove Association”, you will be prompted to select a group number. What each group does is solely dependent upon the source module. What each group is sent is also dependent upon source module. Refer to the instructions that came with the source module.
REQUEST TOTAL GROUPS Although typically this information would be provided in the slave modules instructions, this function will allow you to determine how many groups a device supports. When you select “Request Total Groups”, you will be prompted to “Press Button On Unit” . Refer to instructions of unit on exactly what to do in this situation as you may have to do more than simply pressing a button. After you have done so, the ZTH100 will show: where N is the number of groups in the ZTH100.
SET CONFIG Allows you to set configuration settings to a unit that supports such functionality. When you select “Set Config”, you will be prompted with Consult the instructions that came with the unit you are configuring as to what each parameter number configures.
Setting a device to “Exclude All On Only” will cause the Z-Wave device to respond to All Off commands but not the All On command. Setting a device to “Exclude All Off Only” will cause the Z-Wave device to respond to All On commands but not the All Off command. 4.6.5 COPY REMOTE CONTROL TO ANOTHER WIRELESS CONTROLLER. This menu is used to copy information from the Master Wireless Controller to other controllers, so that they may command modules known by the Master Wireless Controller.
Considerations: 1. It is important to note that all information on the receiving controller will be deleted before any information is received. 2. Burglar deterrent and timer information is not copied to the secondary controller. 3. Slave Wireless Controllers cannot be used to add newly acquired or reset modules to the network. 4.
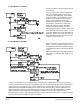
4.6.5.2 RECEIVE INFORMATION FROM MASTER WIRELESS CONTROLLER The flow of the “Receive information” menu is shown below. 4.6.6 RESETTING MODULES (INCLUDES PLUG IN LAMP, APPLIANCE AND WALL MOUNT) If a module is to be moved to a new position or added to a new network, it has to be reset before doing so. This is done using this menu. HomePro by ADVANCED CONTROL TECHNOLOGIES, INC. 21 ZTH100 Operating Instructions (Version 1.
4.6.7 RESET WIRELESS CONTROLLER The Wireless Controller can be reset in two different ways, by “user data only” selection or “factory default”. User data only will only reset groups, scenes and names. The Wireless Controller will still retain information about the modules that have been added to the network. A factory default reset should be used with extreme care.
5.1.3 LOW BATTERY INDICATION. This message indicates that it is time to replace the batteries. It will go away when the batteries have been replaced. 5.2 USING OPERATION MODE Operation mode is the mode where the following display is indicated: This mode is also the idle mode to which the Controller returns after performing operations. Push OK or C button to activate display if asleep (blank). In this chapter the functions available in operation mode will be described. 5.2.
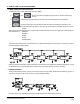
5.2.1.2 HOLDING A SPEED BUTTON DOWN. Once a group is created on a speed button, it will start dimming when the speed button is held down. This figure illustrates the display during dimming: NOTE: If the group on the speed button is unused the user will be presented with the option to include a module when holding down a speed button. This is done with the following display: ZTH100 Operating Instructions (Version 1.26) 033005 24 HomePro by ADVANCED CONTROL TECHNOLOGIES, INC.
5.2.2 CONTROLLING GROUPS USING NAVIGATION BUTTONS. Another way to access groups is to use the navigation buttons (“<“,”>”) from the operation state. This is the only way to control the groups from 7 to 64. Also note that it is only existing groups that show up when the user toggles through the list. If a group is named the name will be shown instead of the number. In order to switch a group ON or OFF the “OK” button is pressed briefly.
6. OTHER INFORMATION The Wireless Controller supports 64 HomePro modules. If the user adds Z-Wave devices other than HomePro to the network, those modules will use one of the HomePro modules identification, if they are assigned as one of the first 64 modules. However since the protocol supports up to 232 modules it is possible to create a setup with 64 HomePro modules and numerous modules of other types. The HomePro modules must be added to the network before other types of modules are included.