eH880 and ACR880 SDE Setup Manual info@acs.com.hk Subject to change without prior notice www.acs.com.
Revision History Version Date Prepared By 1.4 06 October 2009 Richelle Arjona Description • Changed device photo in front page Page 2 of 20 eH880 and ACR880 SDE Setup Manual Document Title Here Version 1.4 Document Title Here info@acs.com.hk www.acs.com.
Table of Contents 1.0. Introduction ............................................................................................................... 5 1.1. 1.2. Purpose ........................................................................................................................................5 Scope and Limitations ..................................................................................................................5 2.0. Overview .................................................
Figures Figure 1: Cross-Over Cable............................................................................................................ 11 Figure 2: Straight Cable.................................................................................................................. 11 Figure 3: RJ45 Cables with Jacks Connected................................................................................ 12 Figure 4: Use the Cross-over Cable for PC Host to Device Setup.............................
1.0. Introduction 1.1. Purpose The purpose of this documentation is to explain how to setup a software development environment to develop application programs for the eH880 / ACR880 system. The eH880 / ACR880 device is equipped with a 32-bit CPU running the embedded Linux 2.6.12 OS. For detailed hardware / software capability of the eH880 / ACR880, refer to their respective manuals. The software development environment consists of a suite of software tools that are typically run on a PC Linux system.
2.0. Overview • It is assumed that the user has basic knowledge in using computers and operating Linux OS. • Section 3.0 discusses the Linux OS limitations and requirements as well as the compiler instructions upon installation. • Section 4.0 lists the device’s connectivity in both the hardware and software aspects. • Section 5.0 details the folder restrictions when customizing the files inside the device. • Appendix A shows the processes in connecting the eH880 to the Ethernet network.
3.0. Compiler and Library Installation on PC Linux 3.1. Requirements 3.1.1. Operating System A Linux based system is required for developing software for eH880. Since the development of the software consists of cross-compilation technique, the developers are expected to have sufficient knowledge to operate Linux system and compile programs using gcc (GNU compiler collection) at least in i386(PC) systems. Developers may use one of the following Linux distributions to develop eH880 software.
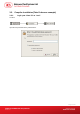
3.2. Compiler Installation(Take Fedora as example) 3.2.1. Login your Linux PC as “root”. Location Input the root password in the password box. Page 8 of 20 eH880 and ACR880 SDE Setup Manual Document Title Here Version 1.4 Document Title Here info@acs.com.hk www.acs.com.
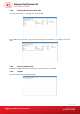
3.2.2. Incorporate the necessary files Go to the root directory “/”, by typing “cd /” on the prompt. Once inside the root directory, copy the file "arm-linux-gcc-3.4.1.tar.bz2" to "/" directory of your PC Linux 3.2.3. Extract complier files Extract the complier files by the command "tar -jxvf arm-linux-gcc-3.4.1.tar.bz2" 3.2.4. Logout Input exit on the command prompt to logout. Page 9 of 20 eH880 and ACR880 SDE Setup Manual Document Title Here Version 1.4 Document Title Here info@acs.com.
3.3. Setup your environment 3.3.1. Login your PC Linux with your username. 3.3.2. Modify Scripts Modify your login shell script to include “/usr/local/arm/3.4.1/bin” in the search path. For bash shell, Add the line "export PATH=/usr/local/arm/3.4.1/bin:$PATH" at the end of /.bashrc 3.3.3. Logout 3.4. Extract Library 3.4.1. Login your PC Linux with your own username. 3.4.2. Copy Files Copy the file "eH880-sdk-yyyymmdd.
4.0. Device Connection to Host Computer 4.1. Ethernet 4.1.1. Cable Restrictions The eH880/ACR880 uses an RJ45 straight cable to connect to a router/ hub. However, a crossover RJ45 cable is used when the device is directly connected to the host pc. See Appendix A for cable types. To connect the PC Linux to the device using the RJ45 cable, insert both ends of the cable jack to the designated ports found on each party.
Figure 3: 4.1.3. RJ45 Cables with Jacks Connected Login Information The IP can be obtained by pressing key when the demo program is running To login and access the eh880, use console (RS232, refer to 4.2) or telnet/ssh (refer to 4.1) to login the device. (username: root, password: cdy123) 4.2. RS232 4.2.1.
5.0. Program/Files Uploading 5.1. eH880 / ACR880 File Structure The eH880/ACR880 follows the common Linux file directory structure. The root file system is readonly. The eH880/ACR880 files are stored in the following directories: /usr/local/RO/ For read-only files, such as the unit name and serial number, and other system files. /usr/local/RW For read-write files. Developers can store their software application and data files in this directory.
5.2. Ethernet Connection 5.2.1. Device to PC Host PC (Windows) Figure 4: 5.2.2. eH880 Use the Cross-over Cable for PC Host to Device Setup. Device to Hub/ Switch to PC Host Linux Server (NFS Server) PC (Windows) Network Switch eH880 DHCP Server Figure 5: Use the Straight Cable for Device to Hub/Switch Setup Page 14 of 20 eH880 and ACR880 SDE Setup Manual Document Title Here Version 1.4 Document Title Here info@acs.com.hk www.acs.com.
5.3. Upload Types 5.3.1. ¾ ¾ FTP (File Transfer Protocol) "ftp" and "ncftp" are installed in the device User can login into the device and initiate FTP connection to a host computer; and user can use these two commands to transfer files. 5.3.2. SFTP (Secure FTP) ¾ An SFTP daemon is installed in the device. ¾ User can use an SFTP client to login (with above login info) the device and transfer files. 5.3.3.
Appendix A. Connecting eH880 to the Ethernet Network Appendix A.1. Configuring Ethernet Port Each eH880 Demo Unit has a built-in Ethernet port. The eH880 unit is pre-configured to get an IP from DHCP servers. After the demo program showed on the screen. Press F4 to view the IP address of the eH880. It is possible to change the IP manually After the telnet session has been established, an ‘ifconfig’ command to view the IP address assignment can be issued.
3. Input the following command to add an entry to routing table. # route add –net 127.0.0.0 netmask 255.0.0.0 lo 4. Input the “route” command to show the routing table. ~ # route Kernel IP routing table Destination Gateway 127.0.0.0 * Genmask 255.0.0.0 U Flags Metric Ref 0 0 0 lo Use Iface Appendix A.1.2. Setting Up Static IP Address Assume you want to setup the following IP address for eH880 unit: IP Address Subnet Mask Gateway : : : 192.168.1.100 255.255.255.0 192.168.1.1 1.
Appendix A.1.3. Setting up Dynamic IP Address If it is necessary to setup the dynamic IP address for eH880 unit, input the following command to get the IP address from DHCP server: # udhcpc –b –i eth0 Appendix A.2. Setting up Network File System (NFS) Server Appendix A.2.1 PC Side The exported directories of NFS server are controlled by “/etc/exports” configuration file. To share the directory of Linux Server with eH880 unit, you need to edit the file.
User can also execute a program inside the mounted directory directly without implicit transfer. The mount command will "mirror" the directory /home/user in your PC Linux (with IP = xxx.xxx.xxx.xxx) to /mnt/ext1 in the eH880 Note that "1024" in the above example is necessary to ensure reliability when transferring big files. Note also that the NFS service in your PC Linux have to be configured correctly to open permission of the directory that is going to be mounted.
233 root 234 root 235 root 236 root 237 root 238 root 248 root 252 root 253 root 254 root 257 root ~$ 832 S 832 S 832 S 832 S 832 S 832 S 580 S 512 S 480 S 752 S 664 R Appendix A.4. eH880_Demo4 eH880_Demo4 eH880_Demo4 eH880_Demo4 eH880_Demo4 eH880_Demo4 udhcpc -i eth0 -b more /usr/sbin/telnetd -sh ps Miscellaneous Information Appendix A.4.