
User's Manual
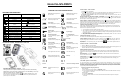

TRANSMITTER OPERATION
Transmitter
Button
System Function Remark
Lock Doors & Arm System
Panic function Press and Hold for 3 seconds
Car Locator Under armed mode
-
Arm and Delete The 2 Stage
Shock Sensor
Press twice within 3 seconds
- Arm System and Hidden Alarm
Function
Press within 3 seconds and Hold
button for 2 seconds
+
Silent Arming / Disarming Ignition in "off" position.
+
Active Anti Car-Jacking Mode
Ignition in "on" position press and hold for 2
seconds
Unlock Doors & Disarm System
-
Two Steps Door Unlock & Disarm
System
Press twice within 3 seconds.
Trunk Release (Channel 3) Press and Hold for 2 seconds
-
Passive Arming By-pass While the system Disarmed.
Activate or Turn Off The Remote
Start
Press button once.
+
Channel # 4 Timer Output (4)
Optional
+
Switching code For 2nd Car
Operation.
For regular SL-91 remote transmitter Only
ACTIVE LOCKING
–
LOCK & ARMING:
1. Press button on transmitter.
2. The siren or horn will chirp once and the parking lights will flash once indicating that the system is now
armed. The vehicle doors will lock upon arming when interfaced with the security system.
Note: Defective sensor reminder: If the siren or horn sounds 3 chirps, then you have left a door, trunk, or
hood lid ajar. (OPTIONAL)
SILENT LOCKING AND UNLOCKING: ARMING / DISARMING: Press the
+ button together on the
transmitter to LOCK or UNLOCK your security system, No chirp sound will be heard; arm / disarm confirmation
will be through the vehicles parking lights only.
SHOCK SENSOR / OPTIONAL SENSOR BY-PASS: Pressing the button on the transmitter twice within 3
seconds will arm the security system and by-pass the shock sensor. The system will chirp one additional time to
confirm the sensor bypass mode was activated. The sensor bypass feature is programmed to activate for one
arming cycle only. The security system will return to normal operation during the next arming cycle
PASSIVE LOCKING OR ARMING: Programmable
Active arming / disarming is controlling your security system via the remote transmitter. This security system is
equipped with an optional Passive Arming feature, which allows the security system to arm 30 seconds after the
last door is closed. Operation is as follows.
1. Turn the ignition to the “OFF” position and exit the vehicle.
2. After all entrances are closed, the security system LED will flash fast for 30 seconds. If you reopen any
door / hood / trunk, the security system LED will stop flashing. It will begin flashing again once all vehicle
entrances are closed.
3. After 30-second timer has elapsed, the security system will automatically “ARM”. The siren or horn will
chirp [1] time and the parking lights will flash [1] time.
PASSIVE DOOR LOCKING:
Programmable
The vehicle doors will automatically lock after passive arming cycle has been completed.
PASSIVE ARMING BY-PASS:
While the system is disarmed, Press the
button twice, the system will
respond with [1] chirp and LED will turn “ON”. The security system will remain in this temporary state for as
long as you wish. To exit passive by-pass, press the transmitter or buttons and the system will return to
normal status.
ACTIVE UN-LOCKING – UNLOCK & DISARM:
1. Press the button on the transmitter.
2. The siren or horn will chirp twice and parking lights will flash twice to indicate that the security system is now
disarmed. The vehicle doors will unlock when interfaced with the security system.
IGNITION CONTROL DOOR LOCKS.
If the vehicle’s door locks have been interfaced to the security system, the system will automatically lock the
vehicle's doors when the ignition is turned “ON” and /or unlock the vehicle’s doors when the ignition is turned
“OFF”.
TRUNK RELEASE: Press and hold button on transmitter for three seconds to remote control the trunk
release or other electric devices.
CAR LOCATOR:
Press the button on the transmitter when the vehicle is in the armed / locked mode to active
car locator function. The siren or horn will chirp 6 times. The parking light will flash 12 times, allowing you to
easily locate your car.
VALET MODE: (System is in Disarm Mode)
The valet switch allows you to temporarily bypass all alarm function, eliminating the need to hand your
transmitter to parking attendants or garage mechanics. When the system is in valet mode, all alarm functions
and remote start functions are bypassed, however, the remote panic feature and remote door locks will remain
operational. To use the valet mode, the system must first be disarmed either by using your remote transmitter,
or by operating the Manual Override sequence.
Get into/out valet mode using the ignition key.
Enter Valet Mode:
a). Under disarm mode, turn the ignition to “ON\OFF\ON” position.
b). Press and hold valet switch for 3 seconds until the LED turns ON solid. The LED will remain on as long
as the system is in 'valet mode'.
Exit Valet Mode:
a). Turn ignition 'ON\OFF\ON'.
b). Push and hold valet switch for 3 seconds, The LED will turn off indicate the system are exiting the
valet mode.
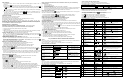
Model SL-IVU-FM915
Lock icon
will be displayed when
the door locked.
Unlock icon
will be displayed
when the door unlock
Valet Mode
Remote start and alarm functions
shall be temporarily on hold.
Hidden Alarm Mode
The security system arm with
hidden alarm function
Hood Trigger
Hood is illegally opened (Zone 1)
Trunk Trigger
Trunk is illegally opened (Zone 2)
Door Open Warning
Doors are illegally opened (Zone 3)
Sensor Trigger
Trigger on Sensor 1 (Zone 4)
Ignition Trigger
Ignition switch is illegally turned on
(Zone 5)
System trigger
Remote Transmission
You are transmitting the signal to
control unit
In
–
Range Indicator
You are within the remote control
range.
Anti C
ar
-
Jack Mode
Activate the anti car-jacking mode
Door Ajar
Engine Cranking
Your vehicle engine Cranking by
remote control
Engine Running
Your vehicle's engine is running
Timer Control Start
Engine start automatically every 2
or 3 hours.
Dail
y Start
Engine start automatically at the
same time next day
PASS 1
Sensor Bypass
Sensor bypass under Arm mode
Turbo Timer
Turbo timer was set up
Manual Gear
Engine Start Memorizing for the
car with manual gear was set up
Activate Channel 3 (Tr
unk
Release).
Activate Channel 3
Activate Channel 4
12:00
Time Monitor
12:00
Alarm Clock
You have set morning call alarm
0:10 P
Parking Meter
Reminder when time is up for
parking
Low Battery
You have to replace the battery of
remote control.
Melody Mode
Remote Control alert user through
melody sound
Vibration Mode
Remote Control vibrates when the
system is triggered
STANDARD LCD ICON CONFIGURATIONS
:
BATTERY REPLACEMENT:
SL
-
RF
9
2
This system needs no specific maintenance beyond remote control battery
replacement. The 2-way remote is powered by a 1.5V AAA battery. The 1-way
remote is powered by a 3V, CR2032 battery
When the power of the battery weakens a icon shall be displayed on the LCD
screen. When the old batteries are replaced, there will be beep sounds indicate the
power is up on the transmitter.
LCD REMOTE CONTROL TRANSMITTER
:
SL
-
RF
9
2 LCD