TRX950;XT90S PROFESSIONAL REMOTE CAR STARTER WITH ALARM SYSTEM & 2-WAY LCD COMMUNICATION OPERATION MANUAL THIS PRODUCT IS DESIGNED FOR PROFESIONAL INSTALLATION ONLY 1
TABLE OF CONTENTS: LCD REMOTE TRANSMITTER: A. REMOTE TRANSMITTER OPERATION…………………………….…4 B. BATTERY REPLACEMENT ………………………………………..….. 5 C. THE REMOTE LCD ICONS WITH FUNCTION ……………..…...…....6 C. PROGRAMMING OF THE LCD REMOTE TRANSMITTER ………...7 1. Screen Lamp ON 2. Power Save Mode 3. Clear The Flash Icon and Melody Sound 4. Stop The Melody Sound. 5. Button Lock 6. Vibration / Melody Mode 7. Enable / Disable Bi Sound While Pressing Button: 8. Low Battery Indication. 9. Set Up Fixed Count Down Timer 10.
Exit Valet Mode L. CAR LOCATOR .……………………………………………………….....16 M. PANIC FUNCTION .…………………….……………..….……….….….16 N. TRIGGER THE SYSTEM ..……..………………..………….….……...17 Clear The Trigger Icons and Melody Sound Stop The Melody Sound Only Noise Abatement Circuit O. ANTI CAR- JACKING .………………………………………….……...18 Active Anti Car Jacking Passive Anti Car Jacking Trigger The Anti Car Jacking Mode Override The System To Turn Off Anti Car Jacking P. SYSTEM’S TRIGGER CHECK …………………….….….…..….…...19 Q.
WARRANTY CARD…………………………………………………………..27 WARNINGS: As with any product that performs automatic functions, there are certain safety precautions that you must practice and be aware of. 1. Keep the transmitter out of children’s reach. 2. Do not leave anyone in the vehicle while running on remote control. 3. Alert servicing personnel that the vehicle can be started automatically. 4. Do not start the vehicle by remote while it’s in an enclosed area or garage. 5.
Note: If the system is interfered by stronger radio frequency around, sources of high voltage electric power or such Obstacles like tall buildings and so on, the transmission range may get shorter as the system uses low out put powered frequency. A. BATTERY REPLACEMENT: This transmitter uses one (1) 3-volt lithium ion battery (#CR2032) that is placed with the (+) side facing upward. To replace the battery, you will need to use a small flat blade screwdriver and a small Philips screwdriver.
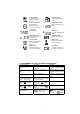
B. THE REMOTE LCD ICONS WITH FUNCTION: Door Lock Door Unlock Your vehicle doors are Your vehicle doors are locked unlocked and the system is Armed Mode Valet Mode Your vehicle is in armed All the function shall be mode temporarily on hold. Remote Transmission In – Range Indicator Your are within the remote control range.
Engine Starting Your vehicle engine starting by remote control Engine Running Timer Control Start Start the Engine Temperature Monitor Indoor temperature of your automatically at the vehicle Your vehicle's engine is running same time next day or every 3-hour.
- (2-second) Enable / Disable Bi Sound (Bi) While Pressing Button 1. Screen Lamp ON: Press and hold the button one second, with one melody sound and the LCD screen lamp will turns on for 5 seconds 2. Power Save Mode: While the power save mode, the LCD remote transmitter uses “0” current to save the battery power. Entry: 1. Press & hold the button for 5 seconds, with one icon on the LCD screen to indicate melody sound and entry the “power save mode”. 2. Under the “Active Arming Mode” and Disarm mode.
transmitter If you want mute the “bi” sound mute always while press button. Press the button first, within 3 seconds press and hold the seconds to disable the “bi” sound. (Bi) button for 2 8. Low Battery Indication: When the power of the battery weakens, it has two short “bi” sound and flash icon while pressing the button of the LCD screen transmitter. 9. Set Up Fixed Count Down Timer: 1.
Press the once button Count down Timer Setting ON / OFF for OFF and for ON Daily Timer Start Timer 4 Press & hold the button for 2 seconds. / Setting Flash icon and “Hours” for adjusting EXIT: Press and hold the the system will exit the programming mode. + for – and for button for 2 seconds or leave it for 10seconds, 1. Clock Setting: Example to AM10:30 button for 3 seconds, with two-melody sound and 1. Press & hold the the “Hours” digit flashes for adjusting. 2.
3. Count Down Timer Setting: Example Set count down timer at 2:30 button for 3 seconds, with two-melody sound 1. Press & hold the and the “Hours” digit flashes for adjusting. 2. Press the button 5 times, the LCD screen will shows and “Hours” digit is flashes for adjusting. 3.Press the until 2:xx 4.Press the adjusting. 5.
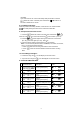
Button Lock Doors & Arm System Panic function Press and Hold for 3 seconds. Car Locator Under armed mode - Arm and Delete The 2 Stage Shock Sensor. Press twice within 3 seconds + Silent Arming / Disarming Ignition in "off" position. + Active Anti Car-Jacking Mode Ignition in "on" position press and hold for 2 seconds Unlock Doors & Disarm System Two Steps Door Unlock & Disarm System Trunk Release (Channel 3) Press twice within 3 seconds. - Passive Arming By-pass While the system Disarmed.
B. BUTTON LOCK: It is useful if you want to disable the transmission function of the remote control temporarily to prevent from any inadvertent pressing of buttons by others. 1. The XT-85s Standard transmitter: button first, within 3 seconds press and hold the ( ) Press the button for 2 seconds to activate or cancel the button lock function. The “Red LED” will pause flash for few seconds to indicate the remote control transmitter is on “Button Lock” mode when pressing the transmitter button. 2.
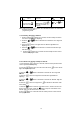
Siren / Horn Parking Light 1. Arming 1 or 3 Chirps 1 Flash 2. Disarming 2 or 3 2 or 4 Chirps Flashes 3. Trigger Alarming Flashes 4. Passive Starter Disable 5. Panic Alarming 6. Car-Jacking Alarming Flashes Flashes 7. Car Locator 6 Chirps 12 Flashes LED Doors Starter Slow Flash Locking Disable Dome Light Turns on for 30 -second Unlocking Slow Flash Disable Fast Flash Disable Disable Flashes Flashes Flashes Locking G. ACTIVE ARMING – LOCK & ARM: 1. Press button on the transmitter.
2. After all entrances are closed, the security system LED will flash fast for 30 seconds. If you reopen any door / hood / trunk, the security system LED will stop flashing. It will begin flashing again once all vehicle entrances are closed. 3. After 30-second timer has elapsed, the security system will automatically “ARM”. The siren will chirp [1] time and the parking lights will flash [1] time.
AUTOMATIC RE-ARM: If this feature is selected, the security system will automatically re-arm itself in 60 seconds after disarming with remote transmitter. Automatic rearm will cancel if any door is opened before the 60 seconds timer has elapsed. J. DISARMING WITHOUT A TRANSMITTER OVERRIDES THE ALARM WITHOUT PASSWORD PIN CODE: (Factory Default Setting) The Override function may be used if the remote transmitter is lost or inoperative. 1. Enter the vehicle and turn the ignition switch to 'ON’ position. 2.
Remote Door Lock Remote Door Unlock Enter Valet Mode: 1. From the disarmed condition, turn the ignition to “ON” position. 2. Push and hold valet switch for 2 seconds until the LED turns on. The LED wills remain on as long as the system is in 'valet mode'. Exit Valet Mode: 1.Return to normal operation, turn ignition 'on'. 2. Push and hold valet switch for 2 seconds, The LED will turn off indicating the system is exiting the valet mode. L.
of an intrusion for 30 seconds. Then it will stop and automatic reset and re-arm. If the one of sensors or detectors still active, the alarm system will sound a maximum of 3 times of 30 seconds cycles.
a. 50 seconds after the system has been triggered. The siren will start chirping for 15 seconds. b. During this 15 seconds period of chirping, you will be alerting to push the valet switch once to turn off the car-jacking feature. c. If not, it will enter second timer car jacking. Second timer: 65 seconds after the system has been triggered. The siren starts alarming and the parking light starts flashing. Third timer: 90 seconds after the system has been triggered a.
If someone tries to page you by tapping the paging (knock) sensor (optional) which is usually mounted on the bottom part of front window, the paging melody sound continues sounding from you Remote LCD Transmitter and “ ” indication flashes on the LCD screen. 1. Press the transmitter button first, within 3 seconds press ( ) button to activate outdoor driver paging function, It responds with chirps of the " indication flashes vehicle, a melody sound and " on the LCD screen to confirm the function is on.
Press the transmitter (4) and (4) button at the same time to active Channel 4 function. Channel 4 is user-programmable timer output. You may program the built-in timer to send a ground signal for any time duration from 1 second to 120 seconds. For instance, this timer output may be used to turn on the headlight, power window or sunroof. (Factory defaults setting at momentary output.) W. CHANNEL 5 TIMER CONTROL OUTPUT Press the transmitter (5) and (5) buttons at the same time to active Channel 5 function.
1. Press first, within 3 seconds press and hold and buttons at the same time for 2 seconds. Two beeping sound ” icon will be displayed on the LCD screen to and the “ indicate the second transceiver pin code is programmed. 2. While the “ ” icon is displayed on the LCD screen, you can remote control and communicate with a second vehicle security system. It has two short “bi” sounds while pressing the button of the LCD screen transceiver. Back to 1st Car Operation: 1.
When you want to start your vehicle, 1. Press button once on the transmitter. 2. The parking light will activate to indicate the remote start received the signal. 3. The engine will start approximately 5 seconds. 4. Once the engine is running, after couple seconds the parking light will turn on again and climate controls will activate and adjust the vehicles interior temperature to your preset setting.
Turbo charge mode keeps the engine running after arriving at your destination for a programmable period of 1, 3 or 5 minutes, This allows the vehicle’s engine time to conveniently cool down the turbo after you have left the vehicle. To activate: 1. While the engine is running, pull up the hand brake and place the transmission gear in the park position. 2. Before turning off the engine, press and release and buttons at the same time.
3-b. Daily Timer Start: Depress the transmitter button first, button for two seconds. The parking light will flash (6) times. The siren chirps (6) times. The vehicle is now programmed to start at the real time of the next day. Your set time for the next day engine start flashes for approx. 3 seconds on the LCD screen. After 3 seconds the icon stays displayed on the LCD screen. within 3 seconds press and hold 4. Press the brake pedal to stop the vehicle running.
This feature allows your system’s remote start unit to be temporarily disabled to prevent the vehicle from being remote started accidentally. This feature is useful if the vehicle is being serviced or stored in an enclosed area. To disable the remote start, move the optional remote start enable toggle switch to the OFF position.
( U.S. ,Continental U.S. and Canada Only) 1. Auto Page, Inc. WARRANTS that this new unit has been thoroughly inspected and tested at the factory prior to delivery.
AUTOPAGE WARRANTY SERVICE CARD Model: _______________ Serial # _______________ DEALER TO COMPLETE CUSTOMER TO COMPLETE Mr./Mrs./Ms.
960 Knox Street Unit B Torrance, California 90502 Main Office: 310-323-1800 Customer Service: 800-262-2527 Ext. 462 www.autopageusa.