
User's Manual Part 1


Chapter 錯誤! 尚未定義樣式。 - 錯誤! 尚未定義樣式。
錯誤! 尚未定義樣式。
2-6
Installation
The unit can be placed on a desktop or a shelf. Alternatively, it may be
wall-mounted. The drilling template included with the unit can be used
to simplify the wall installation process.
For optimal performance, place the Wireless Networking Gateway in the
center of your office (or your home), in a location that is away from any
potential source of interference, such as a metal wall or microwave oven.
This location must be close to a mains outlet and network connections.
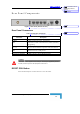
1. Assemble an RJ-45 connector with a protective cover on the indoor
end of the IDU-ODU cable. The length of the IDU-ODU cable should
not exceed 100m. Refer to the relevant System Manual for
instructions on preparing the cable.
2. Connect the IDU-ODU cable to the ODU connector located on the
rear panel.
3. Connect the power cord of the transformer to the unit’s POWER
socket, located on the rear panel. Connect the Mains power cord to
the power transformer and to the AC mains.
NOTE
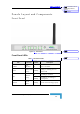
The color codes of the power cable are as follows:
Brown Phase ~
Blue Neutral 0
Yellow/Green Ground
4. Once power is connected, the unit will automatically enter the self-
test phase. When it is in the self-test phase, the STATUS LED will be
lighted ON for about 10 seconds, and then it will blink 3 times,
indicating that the self-test operation has finished. Finally, the
STATUS LED will blink continuously one blink per second,
indicating that the unit is functioning properly.
5. Connect a PC to one of the LAN ports and configure the basic
parameters of the SU-ODU. Align the antenna of the ODU. For more
information refer to the applicable sections of the relevant System
Manual.
6. Use a web browser to configure the parameters of the Wireless
Networking Gateway IDU. For details refer to Chapter 3.
To install the Wireless Networking Gateway IDU:
刪除: 3
刪除: 3
刪除: Operation and
Administration
刪除: Installation