
User manual


Total Access 600 Series T1 ATM IAD UIG/64200681L2-31B
Page 71
© 2002, ADTRAN, Inc. Total Access 600 Series User Manual
Appendix H. Routing in HDIA Mode
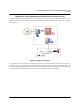
The Total Access 600 allows for complete integration of voice and data delivery from one compact platform. The Cop-
perMountain DSLAM uses Frame Relay instead of ATM as their Layer 2 protocol. Once you have completed the Lay-
er 1 configuration from the previous examples, you must configure the Layer 2 protocol. Refer to Figure 22 on page
72 as you complete the steps below.
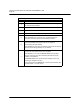
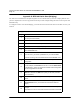
Frame Relay Setup
Step Action
1
From the IAD/W
AN
/F
RAME
R
ELAY
C
ONFIG
menu, select M
AINTENANCE
P
ROTOCOL
.
Set
M
AINTENANCE
P
ROTOCOL
to
S
TATIC
.
2 From the IAD/W
AN
/F
RAME
R
ELAY
C
ONFIG
menu, select DLCI M
APPING
.
3
On the
DLCI M
APPING
menu, DLCI 528 should be selected. Right arrow
to the IP M
AP
menu.
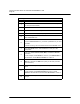
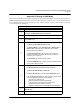
4
On the IP M
AP
menu, set up the following:
Set A
CTIVE
to Y
ES
W
/B
RIDGE
EN
CAPSULATION
.
Set A
DDRESS MODE to either USER SPECIFIED or DHCP CLIENT. If
DHCP C
LIENT
is selected, the link addresses will be learned
through DHCP (skip to Step 5).
Set
F
AR
-
END
IP A
DDRESS
to the next hop router on the ATM
interface connected to the Copper Mountain for this DSL line
(10.100.2.145 in Figure 22).
Set IP N
ETMASK
appropriately for this interface.
Set
L
OCAL
IP A
DDRESS
to the Copper Mountain IP address for this
line (10.100.2.148 in Figure 22).
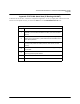
5
On the N
AT
menu, set up the following:
Set N
ETWORK
A
DDRESS
P
ORT
T
RANSLATION
to E
NABLED
.
Set P
UBLIC
IP A
DDRESS
M
ODE
to S
PECIFIED
.
Set P
UBLIC
IP A
DDRESS
the same as L
OCAL
IP A
DDRESS
above.
From the T
RANSLATION
T
ABLE
, set up the following (create entries
so that the appropriate protocols are translated):
Right arrow to create an entry.
Keep the defaults to enable TCP translation.
Press I over the 1 in the first entry to create entry 2.
Change the Protocol to ICMP for this entry.
Continue creating entries as appropriate for each application.
6
Arrow back (left arrow) to the IAD/W
AN
/F
RAME
R
ELAY
C
ONFIG
/DLCI
M
APPING
menu.
7 From the B
RIDGE
M
AP
menu, set A
CTIVE
to N
O
.