
Technical data


7-2 Dial-up Connections 90362-01
Configuring a Dial-up Connection
You can use Worksheet 7, the “Dial-up LAN-to-LAN Interface” worksheet
on page B-10 to record the information necessary to complete the tasks in
this section.
To configure your NetBlazer to use a dial-up LAN-to-LAN connection,
follow these steps:
1. Establish a connection to your NetBlazer as described on page 3-3.
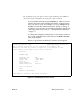
2. On the Main Menu screen, select Dial-up LAN-to-LAN.
The Dial-up LAN-to-LAN screen appears.
Figure 7-2. The Dial-up LAN-to-LAN Screen
In the New connection field, type the hostname of the remote
NetBlazer for which you want to create a new connection.
Note:
The following steps are also used to set up a backup dial-up connection for
a dedicated line, an ISDN connection, or a frame relay connection.
Dial-up LAN-to-LAN NetBlazer Setup Utility V3.0
Set up dial-up LAN-to-LAN connections. Type a new connection name
or use the Arrow keys to move to an existing name and press Enter
to change its settings.
Previous
Help
Return to Main Menu
New connection: <<NAME>>
001 ruby
Press Enter to return to the previous screen
Note:
This field is case sensitive, so be sure to type the remote NetBlazer’s name
correctly. The name of the connection must exactly match the name of the
remote NetBlazer.